
Accounts receivable
[Cash Register > Accounts
receivable]
For many hotels, accounts receivable invoices
make up a large part of their bookkeeping. All invoices, that have been
checked out with a debit payment method or a credit card are directly
transferred into the new accounts receivable module - that is the module
which manages open posts. For all invoices on account, a debtor account
(on invoice) is opened automatically for the invoice recipient. Credit
card receivables are summarized on a collective account for each credit
card.
Scope of functionality
Accounts receivable management enables you
to:
manage accounts
receivable with open amounts
manage collective
accounts for credit card receivable
booking cash receivable
(also for partial payments)
enter commissions
(discounts)
transfer receivables
combine accounts
print bank statements
and list of accounts receivable
payment reminders
Settings (protel Air system data)
[Cash Register > Accounts receivable]
In order to be able to execute the following
settings, the logged-in user will need to access the following program
points: System data > POS > Payment
methods.
 Overview
tab
[Cash Register > Accounts receivable ]
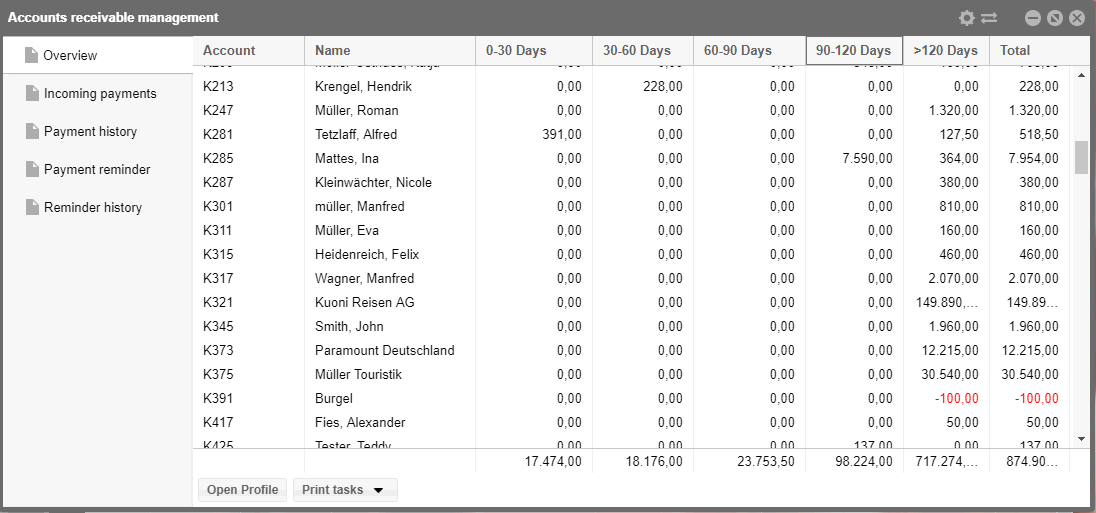
After accessing the accounts receivable management, you will receive
a clear list of all of the accounts receivable that are outstanding. The
open amounts are then scaled based on time period (30/60/90/120 days),
so that one can directly see how "old" the displayed debts are.
In the last column you can see the total debt per debtor.
All of the single and collective accounts are displayed (credit card
accounts).
The displayed columns can also be shown or hidden arbitrarily (learn
more).
Hints about Display
- Collective accounts, or accounts which have already received a
payment or an installment will be marked with the following symbol:

This symbol  in front of an account basically
means that there are additional entries for this account.
With a double
click, you can open all of the collective accounts and view all
of the subordinate entries.
Print Tasks
[Cash Register > Accounts receivable > Overview tab]
By clicking on the [Print Tasks]
button located at the lower half of the window, you can do the following:
Print account analysis
[Cash Register > Accounts receivable > Overview tab> Print
tasks]
At the bottom right, click on [Print
account analysis]. protel Air then creates a PDF-file of the open
debtors, based on the due date, divided into 30 day, 31-60 day, 61-90
day, 91-120 day > 120 day periods
[Cash Register > Accounts receivable > Overview > Print tasks]
In the overview, select an account and click on the Print
tasks > Print AR statement.
protel Air then creates a statement
containing all of the created invoices and outstanding amounts for the
selected account.
 The new text
template for AR statements can be found in the system data (Documents
> Templates > AR Statement (HTML5 only)).
Open profile
[Cash register > Accounts
receivable > Overview]
In the lower left side
of the window, click on [Open profile] to open the guest profile
with the "Receivables" tab opened.
 Incoming
payment tab
[Cash Register > Accounts receivable]
You can balance (or partially balance) one or more open amounts for
a debtor in incoming payments tab.
If you access the incoming payment, the window will initially be empty.
With the aid of the filter, you can set which accounts are to be displayed
in the incoming payment tab.
Hint!
 Double click on an account receivable in the Overview
tab, the payment tab will open automatically for
the chosen account!
[Cash Register > Accounts receivable > Incoming payments]
 |
If
you are searching for a certain account, you can enter the account
number (or part of it) here. Example: Enter "K10", and
all of the accounts which start with this sequence will be displayed. |
 |
If you are searching for an explicit
invoice, enter the invoice number (or part of it) here. The invoice
prefix can be left out when entering the invoice number. Example:
Enter "14. All of
the invoices beginning with or containing this number (e.g., RE_
1453 or RE_2314)
will be displayed.
Hint: You can sort the tables in either ascending or descending
order by clicking the column’s header (Invoice no.) |
 |
Display of the accounts receivable
based on the value date, i.e., based on the value of the asset. |

|
Explicitly search the accounts receivable
management for the Name of the
invoice recipient. |

|
Set a check mark to the filter you
want to use: |

|
Payment
method: Filter the displayed
accounts receivable for a Method of Payment, by selecting a method
of payment in the selection box. Only the debit methods of payment
can be selected (=accounts receivable) |

|
Amount:
Search the accounts receivable management for the Invoice
Amount.
|

|
Status:
By selecting the respective check box, only open
or only booked out accounts
will be displayed. If both of the check boxes have been selected,
all of the accounts will be shown.
Paid off accounts receivable with will be displayed in gray and cursive font. |
Post payment
[Cash Register > Accounts receivable > Incoming payments]
As soon as a payment has been made, select the respective account in
the Incoming payments tab. At
the lower part of the window, you will see the area needed or booking
the payment.

Commission: This section
is for the posting of commissions (see following section: "Credit
card accounts")
Select the payment method for the booking from the Payment
selection box.
The Payment date is
already preset with the protel Air-System date. Change the date, if
payment is to be executed on another day.
The open invoice amount has already been entered as a payment
amount. When dealing with an installment, you can also enter here
the amount of the installment (for more information, go to section
on “Installments”.
In the Payment text
field to the right , you can add additional texts about the payment.
This text will be saved in the “Payment
text” column.
Afterwards, click [Book]
to proceed with the booking.
The assets will be balanced respectively and the debtor will be paid
off - it disappears from the open list (to show paid off accounts receivable,
select the "Booked" checkbox from the status selection list).
Credit card accounts
[Cash Register > Accounts receivable > Incoming payments]
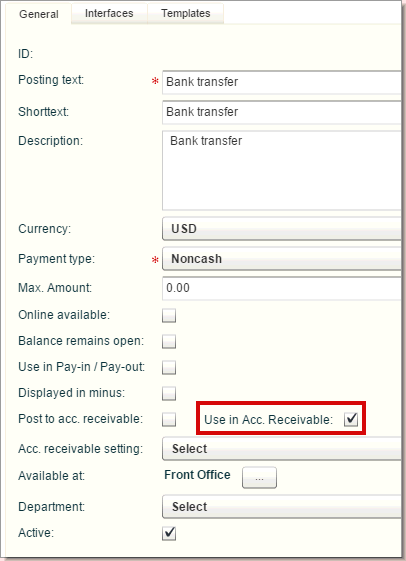
Credit card payments will be automatically put into a credit card collective
account if the credit card payment type has been marked as debtor in the
system data.
For credit card payments, you can also book commissions (service fees
for the credit card provider) and enter them as a percentage or a fixed
value.
When booking commissions, first
select the transaction account (TAA) on which the booking is to take
place:

 The account used here must be stored
in the system data (Options > System data > Articles).
Then, enter the commission as a percentage or as an actual amount.
When using percentages, the amount of commission is automatically
calculated and entered into the amount field.
[Cash Register > Accounts receivable > Incoming payments]
When dealing with installments, simply overwrite the open invoice amount
with the amount of the installment. This amount will then will be booked
as a payment in advance and deducted from the invoice amount. The debtor
account remains open with the balance.
More tasks
If you select an account from the overview, you will have more tasks
available for the account:
By clicking the right mouse button, open "More tasks"...

...or by clicking the
button

Show inovice
Opens the invoice overview for the selected account.
Open profile
Opens the guest profile for the selected account.
Create batch (combine accounts)
[Cash Register > Accounts receivable > Incoming payments >
More tasks]
Should numerous invoices be paid together,
you can select the respective invoices via multiple selection, create
a batch by clicking the [More tasks > Create batch] button, and then
pay them off together. For this batched booking, protel Air automatically
generates a batch which includes all debts and payments.
 Only accounts with the same "Reference" will be batched
(for credit card accounts, e.g., only Amex with Amex, Visa with
Visa, etc.) or debts belonging to a mutual account.
Different account numbers CANNOT be batched.
The Batch type is marked with this symbol:


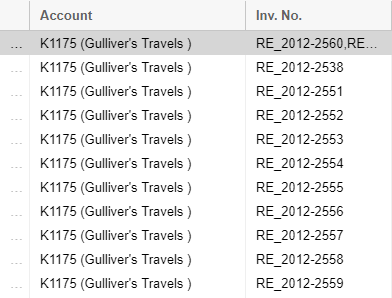
A double-click on a batch
shows all of the accounts receivable and payments contained in the batch.
Transfer item
[Cash Register > Accounts receivable > Incoming payments >
More tasks]
To transfer an open item to another account, select the respective line
and choose “Transfer item” from the [More tasks] list.
The guest search then appears where you can search for the debtor's
profile to which you would like to transfer to.
Dissolve batch
Batched accounts can be separated again by selecting the batch in the
overview and then clicking the [More tasks > Dissolve batch] button.
[Cash Register > Accounts receivable > Incoming payments/Payment
history > Additional tasks]
Should a debtor be booked by mistake, the payment can be voided:
Display all of the “booked
out” accounts: Activate the Status
filter...

and select the "Booked out" checkbox:

Click on the magnifying glass  to
update the list.
Search the list for the respective account.
Double click on the
symbol  in front of the account in order to
list the booked payments.

Select the booking you would like to delete (booked payments
will be shown in red font).
At the bottom of the window, click the [More tasks] > Void
payment.
Afterwards, a cross-entry via the payment methods with which
the debtor was paid off, will be created. At the same time, the debtor
will be opened again so that the correct booking can follow.
[Cash Register > Accounts receivable > Incoming payments >
More tasks]
Has a payment reminder fee been sent to an open debtor, look further
below: "Payment reminder" the reminder
fee can be placed separately into the invoice.
In the Accounts receivable management,
look for the debtor in the incoming payments
tab for which you would like to post a payment reminder.
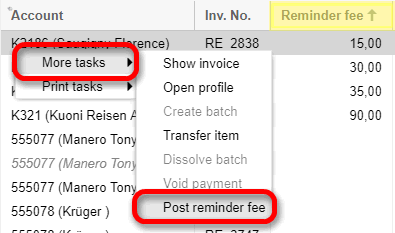
Click on Post reminder fee.
protel Air will then create a passerby invoice in which the invoice recipient
is already included.
The passerby invoice opens with the entry
€ 0.00, where an item which had
been previously created item (e.g., payment reminders) with the due amount,
will need to be posted - see next illustration.
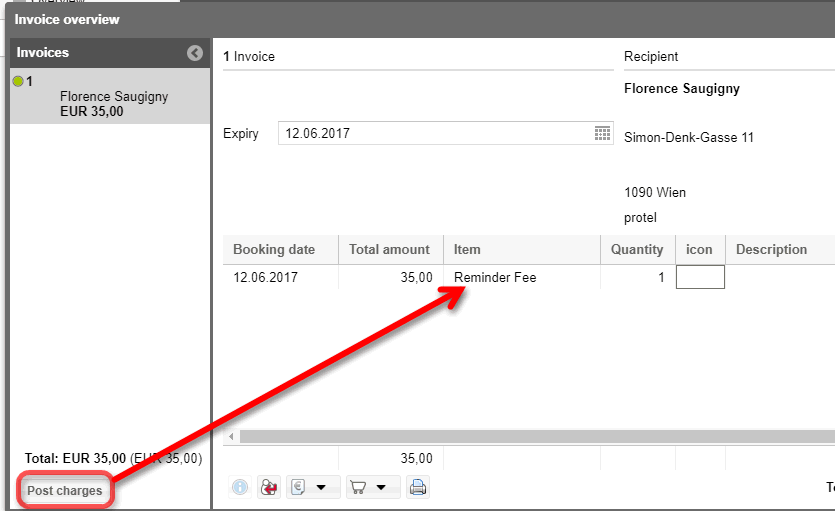
Has the payment reminder been paid, the passerby invoice will be checked
out (to do so, click on the  > Check
out located in the passerby invoice).
Attention!
 When
checking out the invoice for the payment reminder fee, make sure
that you do not select a debit method of payment (e.g., bank transfer)!
This avoids any further open debtors from occurring.
Print Tasks
Print account summary
[Cash Register > Accounts receivable > Incoming payments >
Print tasks]
Select an account from the overview in order print an account statement
of all receivables. Click on Print tasks
> Print account summary.
 When working with credit card batched
accounts, all of the receivables from the respective reservations will
be shown here together.
Print accounts receivable report:
[Cash Register > Accounts receivable > Incoming payments >
Print tasks]
Print a complete list of the accounts receivable visible in the window.
Click on Print tasks > Print Accounts receivable report.
protel Air prints the list exactly the way you see it on your monitor
(WYSIWYG), considering all of the set filters and display options. You
can show or hide certain columns or change the order and this will be
taken into account when printing the document.
 Payment
history tab
[Cash Register
> Accounts Receivable]
All of the booked out debtors are displayed by default in the payment
history.
Incoming payments can also be deleted here
(see above, section: Void payment).
[Cash Register > Accounts Receivable >
Payment reminder tab]
In the payment reminder, all of the debts appear
which, based on the definition of the reminder code, are due, i.e., after
the due date is reached the respective payment reminder must be initiated.
By means of the [Payment reminder] button, all of the payment reminders
and for a selected debtor can be generated and sent. Debts for which payment
reminders cannot be generated (cannot be dunned) will be displayed in
red font. This occurs when the respective
payment reminder code is allotted in the guest profile, or by setting
the respective check mark in the respective payment reminder check box
(see below).
Settings (Payment reminders)
[Cash Register > Accounts receivable]
To actively use the payment reminders, there
are a few pre-settings which will need to be done in the system
data.
 Payment
reminder tab
[Cash Register > Accounts Receivable > Payment reminder]
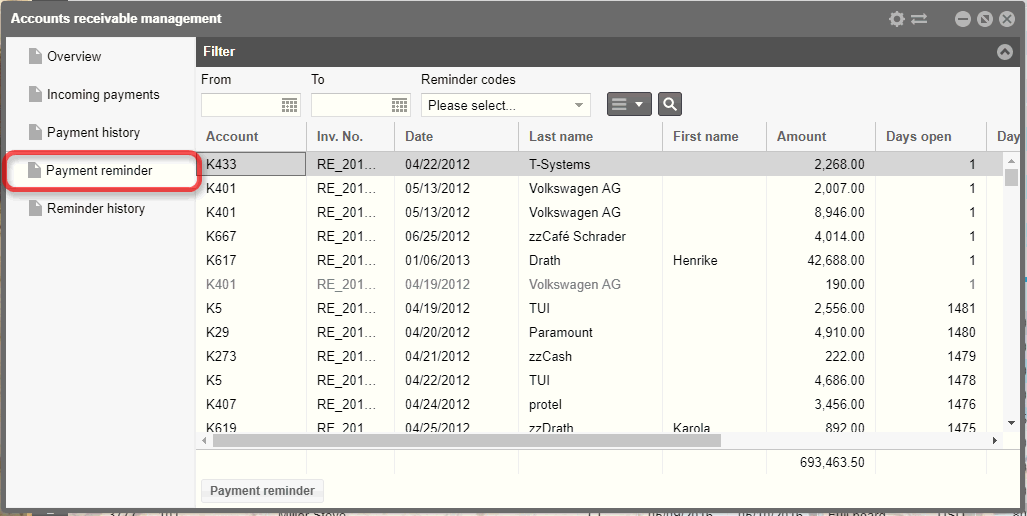
The following information will be displayed
for each accounts receivable:
Account, Invoice
number, and Invoice date
Name of debtor
Open balance
Days open: Number of
days the balance is open
Days left: Number of
days until the next reminder
Reminder levels: Payment
reminder level reached. Has a debtor not yet been reminded, then the
payment reminder level is 0.
Reminder date: This
is the deadline when the payment reminder is due, i.e., a payment
reminder can be created as of this date. The reminder date is automatically
calculated based o the invoice date and the payment reminder code.
(provided that the invoice date has not been manually overwritten).
Example:
Invoice date: 1.1.2016
Reminder levels 1 starting at 14 days
Reminder date: 15 January 2016
Filter
By means of the filter you can search the accounts receivable for special
features.
In addition to the default filters (From/to,
Reminder codes), there are several filters you can show via clicking
the More-Menu  .
.
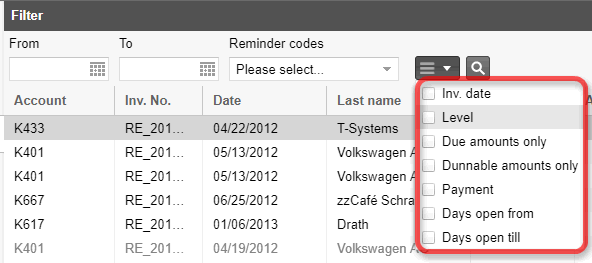
Set the checkmark to show the respective filter.
In the following example the filter "Level"
has been set:

Fig.: Show only accounts receivable
with level 2.
[Cash Register > Accounts Receivable > Payment reminder]
Select an accounts receivable and click on the [Payment
reminder] button.
These possibilities are available in the dialog box:

Payment
reminder dialog box |
Set
reminder level to... |
When opening the dialog box, the
current reminder code level for the accounts receivable will be
displayed here. Has a debtor not yet been reminded, then the payment
reminder level is 0. You can also manually increase the reminder
code. |
Last
reminder date |
This is where the most recently calculated
reminder date is displayed |
New
reminder date |
The new reminder date is automatically
calculated. It can be adjusted manually. |
Payment
reminder not necessary |
By selecting this check box, the
selected debtor will not receive a payment reminder (appears in
the list in red) |
Print |
Select a template
and language.
Print distribution
PDF: A PDF is generated
and can then be downloaded.
E-mail: Sends an Email
with the payment reminder (PDF) in the attachment to the
recipient's email address. The email address is taken from the
contact data saved in the guest profile!
The default email has the following wording:
(click here)
ODT: Generates a file
in .odt format. The file can then be saved and edited using Open
Office.
Increase reminder level after
print: By selecting this check box, the payment reminder
level will be automatically increased one level and the reminder
date will be adjusted respectively. This checkbox should normally
be activated. |
Sending several payment reminders
Use one easy step to send several payment reminders. To do so, select
the accounts that are to receive a payment reminder by holding down the
<Ctrl> button and select the individual accounts by clicking on
them. Afterwards, click the [Payment
reminder] button.
The Payment reminder dialog
complies with the above mentioned dialog box, only the Set
reminder level to and Last reminder
date entry fields are missing. Because the debtors can have varying
reminder levels, the reminder level will be increased by one level up
if the Increase reminder level after
print checkbox has been selected.
Notes about payment reminder fees
The payment reminder fee will not be posted separately, but rather displayed
in the payment reminder only for "informative" purposes. You
can, however, post the payment reminder fee separately, by creating
a passerby invoice (see above: "Passerby
invoice" tab > More tasks > Post payment reminder fee).
Payment reminder text templates
Standard text templates for payment reminders can be found in the protel
Air System data (Flash) under Options
> System
data > Text templates
> Payment reminders.
 Reminder
history:
In the reminder history, already created (sent) payment reminders can
be reviewed. This will help you see when you sent a payment reminder to
the invoice recipient.
 The protel Air
upgrade in Summer 2020 brought about changes to the
user interface and also to many functions.




 The new text
template for AR statements can be found in the system data (Documents
> Templates > AR Statement (HTML5 only)).
 located at the
upper right corner of the window. If a filter criterion has not
been set, all of the open accounts receivable will be displayed.


 >
> 
 .
.


