Active lists
At the reception, it is important to have
quick access to information. The active lists in protel Air are an essential
resource for your daily work at the front desk. In combination with the
Context menu, all of the information and functions are immediately available
when you need them.
Sort by name, show or hide certain columns or use filters to define
which information should be displayed. By means of the context menu (right
click on a list entry), you have access to the most important functions
in every list: Open a reservation or a guest profile, send out reservation
confirmations, or create an invoice.
To view the list, just click on “Lists”
in the protel Air menu
bar at the top of the window.

Each list provides a clearly structured table of the required information
and can be sorted and displayed according to your needs.
Video Tutorial
All active lists in protel Air
are structured in the same way. The result table is in the center of the
window. Contents and appearance can be customized by means of the filter
functions and column settings.
In the left part of the window you
can see all of the available lists [1]. Via
the title bar, you can access a list and switch between the lists.
Contents
and appearance can be customized by means of the filter functions and
column settings [2].
The
result table is located at the center of the window [3].
The quick access function enables
you to directly access a certain list. Just enter the name of the list
into the "Search tree view" field and that's it:

Update display
 As soon as you change filter criteria
in a list, you will have to refresh the display. As soon as you change filter criteria
in a list, you will have to refresh the display.
|
[Active lists > Structure > Filter functions located in the upper
part of the window]
On the left-hand side you will find filters that you can use to limit
the hitlist to specific criteria. Depending on the list you are using,
the filter functions my vary.

Figure: Available filters
in the reservation list |
Reminder: When setting a filter, hit
the <Enter> key afterwards or click on the magnifying glass
 located to the top right of the window to refresh
the display.
located to the top right of the window to refresh
the display. |
Here you will find a model description of the filter functions in the
reservation list:
Search

|
When opening the lists, they are
set to the current date by default. Of course, you can also change
the date or duration of stay by simply overwriting the
date in the entry field (From:/To:) or by selecting a different
date using the calendar function.
Period:
Looks for reservations within the provided searches for reservations
made within the given duration.
Option
until: Searches for optional reservations whose option
limit expires on the entered date. Enter the option until and
select the “Optional” status located in the lower left part of
the window. Remove the check from all of the other status filters.
Created: Displays reservations
which have been created within the selected time-period. This
can especially be handy when wanting to view all of the reservations
which you have created on a specific day! |
Type
|
Rooms:
Display at room level. Rooms are displayed only once, even
if the room is booked for one or more guests. This is useful if
you would like to check in all guests for a particular room at
the same time.
Guests:
Display at guest level. Every guest is listed separately. A room,
reserved for several guests, will be displayed more than once
(once per guest). Select this option if you would like to check
in one guest of a room booked for several guests. |
Name,
Res./CRS |
In most
active lists you can search for the guest’s last name.
In the reservation list you can even search for the reservation
number . You do not necessarily have to enter the entire
name. It is enough to enter the first (couple of) letter(s)
for instance. protel Air
then shows you all the guests whose surname or company name begins
with this letter. |
Rate code |
You can
limit the list by only displaying hits with a certain rate code.
Simply enter the name of the rate code (or a part of it) and the
desired list is done. |
Room / Room type |
Would you
like to see the arrival and departure dates? Or would you like
to see information about a room's turnover? This filter will help
you. Simply enter the name of the room or room type and the desired
list is done. |
Allotment |
You can
limit the list by only displaying hits with a certain allotment
(quota). Simply enter the name of the allotment (or a part of
it) and the desired list is done. |
Status |
You can
further limit the hit list by only displaying hits with a certain
Status, e.g., when only wanting to view definite
reservations.
Simply select a check box to filter
the results list using one or more statuses.
|
Show additional filter
You will find the following button in most of the active lists:

Click this button to show additional filter.
Mark the checkbox of the desired filter to activate it:
The selected filter will be shown in the active list.
Underlined columns | List elements can be edited "inline"
The contents of columns with underlined column titles can be edited
inline.
Learn more about inline editing:
Click two
times into the underlined field for the column you would like
to edit.
Change the contents of the field
which you have clicked on.
Click [Enter] to adopt the changes.
Example:

Figure: Change room
number inline |
Open a list-element
Double-click the list-element to open it. While doing so, make sure
that you are clicking into a column which is NOT
underlined.
Standard buttons
There are several buttons in the lower part of the dialog allowing you
to work with the list. Here you will be able to see what the editing possibilities
are for the respective list. Depending on the list you are using, the
buttons displayed may vary.

Figure: Buttons in the
arrival list |
Every action activated by the respective button is only valid for the
entry which you had previously marked in the active list.
As each user has individual preferences for what is to be displayed
on the screen, protel Air
offers you many possibilities for flexibly customizing the structure of
your active lists. For example, you can show or hide any of the columns.
Without having to continually reset your questions, simply save each
active list with all of the settings.
Just access the desired list and make all of the necessary changes
you require.
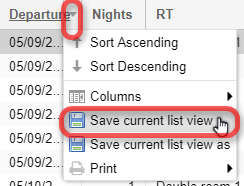
Move the mouse pointer over an arbitrary column's header in
the list and then click on the little arrow. Select the "Save
current list view" entry from the drop-down list.
Select whether the settings are to be saved only
for you or for all of the users.
- The list view will now be saved, i.e.,
when opening it next time, the list appears with the column settings
which have been last saved.
 Related topic: Lists > User defined lists
When
using the "Save current list view as", a new list with another
name will be saved. You can make unlimited settings and then save the
list as a user defined list or for all the users at the hotel. The following
properties can be configured and saved: The column sequence, column width,
column sorting, show/hide columns, and filter settings.
How to proceed:
-
- Access the desired list and make all of
the necessary changes you require.
Move the mouse pointer over an arbitrary column's header
in the list and then click on the little arrow. Select the "Save
current list view as" entry from the drop-down list".

A new window then opens:
Enter a meaningful name for the list.
- As need arises, select a new value for
the sorting. For example, if the list is to appear in first position
under "User defined lists", you will have to use
1.
If you want to sort the list in alphabetical order, leave the sorting
value empty.
- Select whether the new list is going to
be saved only for you or for all other users. "Only or me"
means that only you are able to access the list. "For all
users" means that the list is also available for other protel
Air users.
- The list view will now be saved, i.e.,
when opening it next time, the list appears with the column settings
which have been last saved.
- Then, click [OK].
- To access the saved list, click on the
Lists button in the menu bar, and then select
User defined lists . There you will find the lists
divided into areas of application.
Example:
Compile a list displaying all of the reservations with the status “non-binding
offer” and create a list for the available offers based on this list.
Access saved lists (user defined lists)
In
the Lists menu, click on User defined
lists.

You then proceed to an overview which
displays all of the saved lists in your system. This includes lists which
have either been created by you or another user.
Context menu
For every entry displayed in the active list you can call up the context
menu. The context menu provides you with many options for the selected
entry.
Learn more in the next chapter: “Elements
& Functions | Context menu.

 located
at the upper right hand corner of the window.
located
at the upper right hand corner of the window.