Create and edit user roles
[Stack-Menu  > System
> User administration > User roles]
> System
> User administration > User roles]
A user role consists of several privileges which are typically issued
together. A user can have several user roles and have several roles in
various hotels.
Privileges are individual rights used for reading, altering and deleting
data.
Let's get started!
Log into your protel Air hotel software and select the suitable hotel
(if there is more than one).
Open the stack menu and click on System
> User administration >
User roles.
You can either use the predefined protel rolls or use a hotel-specific
role. The following roles are
relevant for protel Air:
pAir Kundenrolle (pAir Customer
role): Releases the protel Air menu bar.
pAir Kundenadminrolle (pAir
Customer admin role): Releases the protel Air menu bar and
allows the employee to create new users. This role is meant to be
used by the hotelier or the hotel manager. It allows you to assign
the "CustomerAdminRole" to additional employees.
pAir Front Office: Access
to all the Front Office functions (even new ones). By default, this
role encompasses all rights and CANNOT be edited or changed. Users
with this role automatically have access to newly developed functions!
Dublettenkontrolle (Match &
Merge): Manages access to the guest profile menu point Match
& Merge (merge two identical guest profiles).
PciTokenize : Is required
to encrypt credit card information (only for select users!)
PciDetokenize: Is required
to encrypt credit card information in the so-called detokenizer (only
for select users!)
pAir MICE Menu Roles:
Manages access to MICE (only when using protel Air MICE as an add-on
subject to charge).
Cloud CRS: Manages access
to the "Central Reservation System“ dialog box.
KundenRolle (CustomerRole):
Optional. Only required in combination with the Cloud CRS role and/or
the WBE5 add-on. Manages access to the configuration dialog boxes
for the "Central Reservation System" and the configuration
dialogs for the WBE5. This role should only be given to users who
have the pAir client admin role.
Messenger-Role: Only
required in combination with the WBE5 add-on. Manages the access to
the configuration dialogs for protel Messenger (add-on for automatic
message delivery, is only used in combination with the WBE5 add-on).
These roles are default roles which cannot be changed! Clicking on the
Info icon enables you to see which privileges are connected to the individual
roles.
Example:
Figure: Display of privileges
linked to a role. |
Adding hotel-specific user roles
If you would like to set up a user role for your hotel or your hotel
group, click on [Add] located in: (stack menu
> System > User administration > User roles).
In the General
tab, enter the name and a short description for the new user role.
Figure: Stack menu > System > User administration > User roles
> [Add] |
Then, switch to the Rights tab. Please select the Customer level (being a protel Air
user, this is the only level available to you. There are other levels
with additional permissions to which only protel support and protel business
partners have access.
Figure: Stack menu > System > User administration > User roles
> [Add]
Rights: Customer
level |
Figure: Stack menu > System > User administration > User roles
> [Add]
Rights: Customer level
- Available rights |
Click on the  symbol located to the left
next to the description of the rights to open the individual privileges.
symbol located to the left
next to the description of the rights to open the individual privileges.
When you select a privilege,
you will see a description of the privilege to the right of the window
- see next figure.
Figure: View privilege
description |
You can either assign entire files  containing all of the privileges,
or select them individually
containing all of the privileges,
or select them individually :
:
To do so, select a file  or a subordinate privilege
  and click on the green plus
sign
and click on the green plus
sign  .
.
Assigning is made even easier with the Drag
& Drop function:
Select a file or privilege and drag it to
the middle column by keeping your mouse key depressed.
Suggested procedure:
To keep things easy, assign an entire file and remove the individual
privileges by clicking on the red minus sign  or use
the mouse to drag the privilege to the left.
or use
the mouse to drag the privilege to the left.
Once you have assigned all of the desired rights, click on the [Save] button in the lower right
section of the dialog box.
The new user role is always assigned to the hotel or the hotel group
you selected in the HTML5 client (see the section above about Selecting
hotel). Therefore it is recommended that you pay attention to which hotel
is selected in the upper right corner of the browser when applying new
roles.
HINT:
The search function!
 You can explicitly search for certain privileges.
Enter a word into the search field, such as "Cancel".
You will then be shown all of the files which contain the privilege
that matches the search word you entered.
Open the file by clicking on the plus sign  and you will be shown the privileges (for the available and assigned
rights).
and you will be shown the privileges (for the available and assigned
rights).
Editing hotel-specific user roles
Hotel specific user roles (i.e., internally generated) can be subsequently
edited.
Select the role in the Manage user
roles (Stack-Menü > System > User
administration > User roles) and click on [Edit].
To assign a new right, open the relevant role, select the right in the
Available Rights column on the
left, and Drag & Drag & Drop it to the Assigned
rights column in the middle.
Step-by-Step
Select the role in the Manage user roles (Stack-Menu >
System > User administration > User roles) and click on [Edit].
The Edit user role window opens.
Once you are in the role, click on the Rights
tab.
In the left part of the window you will see
all of the available rights and in the middle of the window all of the
assigned rights.
Enter the name of the right that you would like to assign into
the search field - the example in the following figure shows the search
for the "ConfidentialRate" right.
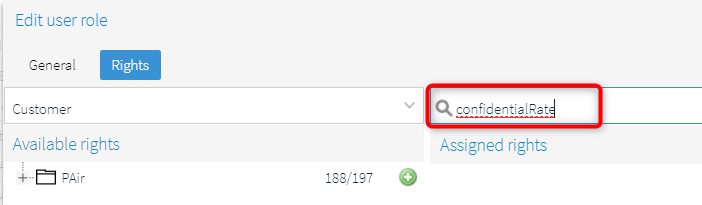
It is also possible to enter parts of the
name.
Then, on the left side of the window, all groups that contain
a right that corresponds to the entered search term appear.
Open
the respective group by clicking on the little gray [+] symbol located
in front of each group.
Select the right and click on the green plus sign  to add the role.
Or Drag & Drop the right from the Available rights (left) column
into the Assigned rights column (right).
Clear the search field to see all of the rights which have been
assigned to the user role.
Assign rights
To assign a right, select it in the Available
rights column and Drag & Drop it into the Assigned
rights column in the middle.
Remove assigned rights
To remove a right, you will need to select it in the Assigned
rights column and use Drag & Drop to pull it to the Available
rights column to the left.