Reporting
In addition to the active lists, protel Air offers a wide range
of reports which provide you with information which you need to be able
to make well-founded decisions for your business.
Introduction
Access
Click on Reporting located in
the "Office" menu in
order to receive an overview of all of the available reports. In the tree-view
to the left, there are various topical files which enable the reports
to be sorted based on their contents.
To see the reports contained in a folder,
simply click on the symbol in front of the respective folder.
 |
Closed folder: Open
folder by clicking on  |
 |
Open
folder: Close folder by clicking on  |
In order to provide a description for a report
as well as setting various entry fields to help you with evaluation times
or assist you with evaluating important parameters, click on a report
using the left mouse button. In the "invoice summary" report,
you can decide whether to list open as well as closed invoices.
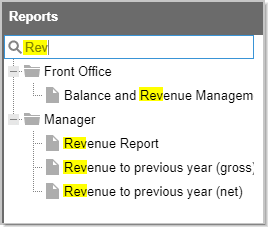
By means of the quick access bar, you can
search for an explicit report. Simply enter the name of the report in
the upper left part of the window and protel Air will provide you with
the respetive results:

Format
In the lower left part of the window, you can select the output format:

PDF |
Creates a document in
Adobe PDF document |
XLSX |
Creates
a Microsoft Office Excel Workbook in Excel
2007-2010 Format (xlsx) |
If you would like to send a report via email, simply select the “Send
by mail” check box below.

Has a registered user’s email address been saved in the system data,
protel Air automatically enters the user’s email address. You can also
manually enter one or more email addresses. Numerous email addresses must
be separated by a comma.
After clicking on [Print], the report will be sent in the selected format
to the address provided.
Many reports contain drop-down lists within which you can make a certain
selection.
Example:

If only some of the elements are to be considered, unselect the "All"
checkbox and choose the desired element from the dropdown list.
Print
Select the desired report as explained above, select
the evaluation time, and additional report specific criteria, if need
be.
Then, click on [Print]
located in the lower right part of the window.
The report is generated using the selected format.
Creating a report in Excel format
When wanting to internally process the numbers, you can also generate
the report in Excel format (XLSX). Contact the XLSX
export format located in the lower left part of the window.
If you do not
want to wait until the report has been generated, you can move this procedure
into the background.
As described
above, generate the report by means of the [Print] button.
The following
message window appears:

Select the
[execute in background] in the lower right corner of the window. The
task will then be moved to the background.
As soon
as the report has been generated, a note will appear:

In addition,
a figure appears in the upper right of the title bar:

The figure
indicates how many generated reports are available for viewing or
saving. Click on the figure to download the reports. To download a
report, click on the download symbol located next to the report.

After having
downloaded the reports, they can be deleted from the list by means
of [X].
The appearance and saving of the reports will then proceed as usual.
Report groups
Each report is assigned to a specific report group. The groups are displayed
in alphabetical order - see the following figure:

 The protel Air
upgrade in Summer 2020 brought about changes to the
user interface and also to many functions.


