Room assignment
Room assigment enables you to allocate individual
room type reservations for specific rooms.
Access room assignment
You can access the room assigment via the "Reservation
> Room distribution” menu.
Conveniently, the room assigment always opens with rooms which have
not yet been assigned.
Date selection (arrival date)
Filter the reservations via the date field for which you would like
to carry out a room assignment after the arrival date. Enter it directly
and select it via the calendar.
What does the dialog box show you
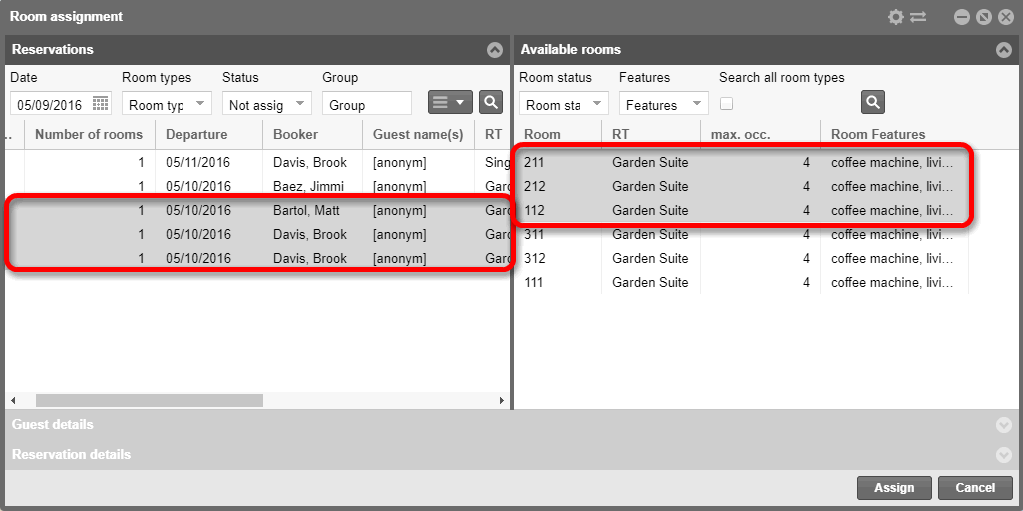
The left part of the dialog box shows you all of the reserved rooms
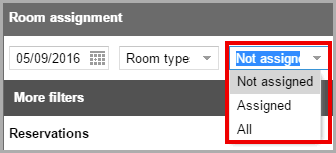
with the arrival date selected above. By default, only the rooms appear
which have not been assigned. The selection box at the upper left can
alternatively be used to display already allocated rooms:


With one click to the reservations, protel Air starts searching for
the available rooms. The result is shown in the table to the right.
Room
column in left part of window
What
appears here?
- a question mark (?) if no rooms have been
allotted yet
- the room number if the room has been allotted
Meaning
of the columns "<"and">" in the right part of
the window
In
the right part of the window (available rooms), the "<" and
">" columns provide information about the number of days
before or after the previous or next reservation.
< |
Last occupancy x days
ago
A
"0" in the "<" column means a direct subsequent
booking which is preferred out of a used capacity point-of-view.
|
> |
Next occupancy in x
days: the number indicates in how many days the room is going
to be reserved. The column remains empty if there aren't any future
reservations for the room. |
Assign Rooms
a) Automatic room assignment
Select a reservation in the left part of the window.
In the right part of the window, all of the available rooms for the
reservation time period will appear.
One or more available rooms have been preselected as a proposal, corresponding
to the number of reserved room.
If you are satisfied with the selection, click the [Assign]
button. The rooms will then be allocated accordingly in the selection
b) Assigning rooms manually
Instead of using the automatic room assignment, you can also manually
assign a desired room by clicking on the right part of the window and
selecting another available room.
By using the multiple selection, you can select more than one room simultaneously
(e.g., if a reservation has more than one non-assigned room).
Should a reservation contain more than one room, and you only assign
one room, the remaining rooms will be automatically split from the
reservation.
Search
in all room types
[Reservation
> Room assignment > right part of window "Available rooms"]

If
you activate the Search in all room types in the
right part of the room allotment window, and then click on the little
magnifying glass, all room types will be considered when searching for
available rooms (i.e., rooms from other room types can be allotted).
If
you select a room from another room type and click on [Distribute],
you will be asked if the rate is to be recalculated. The way you answer
the question depends on whether you are working with a free update
or an Upsell .

Answer with [Yes]
if you are dealing with an Upsell . In this case,
the rate column is adjusted in the table.
Answer the
question with [No], if we are dealing with a free Upgrade.
Nothing will
happen if you click on [Cancel]. You simply return to the room allotment
dialog box.
Group search

If you only want to assign rooms for a certain group, you can enter
the name of the group here. After clicking on the magnifying glass icon,
only reservations for the group in question will be displayed.
Additional filters
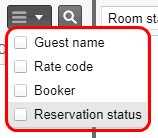
Click the More filter  icon, to open additional
fields to search reservations with specific features.

Guest details

In the left part of the window, select a reservation and in the Guest details menu ribbon, click
on the arrow pointing down  . Access more useful information,
such as whether the guest has an exclusively selected room, what features
should the room have, which room did the guest reside in during his last
visit, etc.
Reservation details

In the left part of the window, select a reservation and in the Reservation details menu ribbon,
click on the arrow pointing down . Access more useful
information, such as notes on the room or the reservation.
Show available rooms with certain features
In order to be able to offer a guest a room "tailored to meet their
needs", you can limit your rooms in the right part of the window
to the desired Features - see
following illustration:

The desired rooms and preferred room features can be found in the guest
information (see above).
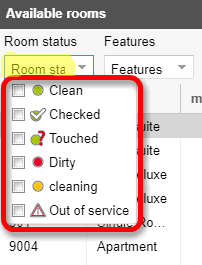
Display rooms with a certain status
For example, if only available or checked rooms are to be displayed
for allotment, you can filter the available room's status in the right
part of the window - see illustration:

Open reservation
A selected reservation can be opened directly in the room assignment
dialog - either by double clicking, or via the context menu.
 The protel Air
upgrade in Summer 2020 brought about changes to the
user interface and also to many functions.


 icon, to open additional
fields to search reservations with specific features.

 . Access more useful information,
such as whether the guest has an exclusively selected room, what features
should the room have, which room did the guest reside in during his last
visit, etc.


