Items
[System data  POS
POS  Items]
The “items” tab allows you to configure all
services that you want to offer your guests in addition to accommodation.
This can include drinks, telephone charges, ironing service, postcards
etc. For your convenience, the system comes with a couple of predefined
items. You can select items that you do not need for your purposes and
click the “Remove” button to delete them. Please
note that items marked with an asterisk (*) are required by the system
and can therefore not be deleted or fully edited. Also, you must specify
a tax rate for all items with the exception of external tax.
Product groups
[System data  POS
POS  Items
Items  Product groups tab]
protel Air provides
the following default product groups.
Accommodation
Extras
Beverages
Food
You can feel free to add new groups as needed.
[System data  POS
POS  Items
Items  Items tab]
Revenues in protel Air are entered both on a product group level and
an item level. items are assigned to specific product groups. For example,
the item referred to as “Breakfast” belongs to the “Food” product group.
- To create a new item, select the relevant product group in the
tree view on the left.
Click the “Add” button and then enter the required data for
the item in the dialog box that appears. Fields that are marked with
an asterisk (*) are mandatory. The following properties can be defined
for an item:
Item number (TAA):
Enter the item number or the PLU code (mandatory). If you do not
assign your own Item numbers, the internal system ID will be used
as the Item number instead.
Posting text: Enter
a text that will appear on the guest's invoice.
Description: The
text entered here will appear for online bookings.
Product group: This
is preselected but can be changed if required.
Price: Entering
a per unit price for the item is recommended but not required.
Alternatively, you can enter the price later when posting the
item or override the system data default if required.
Currency: a
currency can be selected or each item. When offering an item in
a foreign currency, create this item in the respective currency.
Tax
rate: Select the tax rate that applies to the service.
Statistics
group: The “Statistics group” tag defines which revenue
group a sold item is assigned to. For example, if you want the
item to be listed under “F&B” (food & beverage) in the
hotel status report, select the “F&B” tag from the pull-down
menu.
Unassigned items will be listed as “Extras.”
Using the “Statistics group” tag consistently will help you understand
exactly which items are behind the revenue figures for accommodation,
F&B and extras in the hotel status report.
Meal plan code:
If you want the item to appear on the meal plan, assign the relevant
meal plan code here. If
a meal plan code is selected, you must also specify when the meal
will be served relative to when the item is posted in the system:
On
posting date: The meal type will be added to the
meal plan on the day it is posted, e.g. dinner as part of
a half board package. The guests arrive and have dinner on
the day of their arrival.
On following day: This
applies to all meals that are relevant for the day after the
accommodation, for instance breakfast. The accommodation is
posted as part of the end-of-day routine. Breakfast, however,
is included in the posted rate code but not served until the
day after it is posted.
Day
before posting: This refers to all services that
need to be posted before the day the accommodation is posted,
e.g. preparations as part of a flat rate or meal.
Bookable online:
Select this check box for items or additional services that you
want to make available for online booking. This can be useful
for things such as bicycle rental, breakfast, dinner etc. Your
guests will then be able to book these items in addition to the
accommodation on your website. Additional items booked online
will automatically appear on the guest invoice that protel Air
issues.
NOTE:
In order to allow services to be selectable for online booking,
you first need to make the following system data settings:
a) Open the System data and then click the “Online booking” icon.
b) Select the “Choice” tab and then click the “Show additional
items with online booking” radio button.

Only by rate code / calculation:
If you want an item to be available only for a particularrate
code, check this box.
Here's how it works: Enter an item calculation for the relevant
price type in the advanced pricing.
In the item calculation, click on [Add] to determine which item
should be offered as additional option for this price type.
For each item, check the Bookable
to rate code check box.
Do
not list in reports: If you do not want an item to
appear in a report, check this box. Example: Only show revenue-relevant
items when generating the revenue report. The report will omit
all marked items.
Available at: By
selecting “Available at”, you can determine in which area an item
is to be available:
Front
Office: The items can only be booked via protel Air’s
Front Office (Standard)
Minibar
(only when using the protel Air Housekeeping App): The item
is solely available for the protel Air Housekeeping-App. For
the Housekeeping App, we recommend creating separate items
and allocating them with the “Minibar” property.
MICE
(only when using the protel Air MICE event management module):
The item is only available for the protel Air MICE event management
tool.
If an item is to be bookable anywhere, it will be allocated
to all 3 areas.
Department
(only when using the protel Air MICE event management module):
Link an item to a specific department (e.g., Banquet, Restaurant,
Maintenance, etc...). Should the item be booked for an event,
the allotted department will automatically appear in the respective
event dialog box (Sales charges). In this manner, all of the various
areas of responsibility will automatically become visible.
- Click “OK” to confirm and save the item or click the Next item
icon to create another new item.
Interfaces tab
[System data  POS
POS  Items
Items  Items tab
  Add/Edit item]

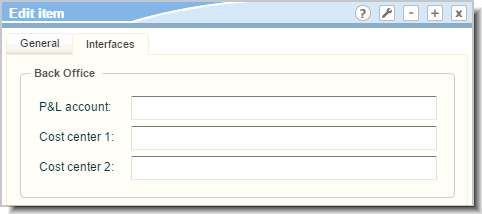
You can define a back office account for each article and two cost centers.
The data entered here are necessary for the export to the accounting software.
If required, enter the item's profit and loss (P&L) account and
the name or number of the item's cost center(s).
[System data  POS
POS  Items
Items  Packages tab]
You can create any number of packages in various combinations. A package
is made up of several items.
Adding packages
In the items system data, select the “Packages” tab and then click [Add].
item number (PLU): You can assign
the package a separate item number / PLU code.
Posting text / Description:
Use this field to enter a posting name, which will appear in the items
overview and for online booking. If required, you can click the globe
icon to enter a translation.
Product group: Select a product
group for your package.
Bookable online: If you select
this check box, the package will be available as an additional item in
the optional online booking engine. This can be useful for half or full
board, special offers (e.g. room with champagne and strawberries), wellness
packages etc.
Included items: Click the [Edit] button to add individual items
to the package:
Select the relevant items from the grid on the left and click
the arrow icon to add the items to the “Content of package” grid on
the right. You can then change the quantity of the individual items
or adjust the price per unit.
Click “Apply” and “OK” to confirm the changes.
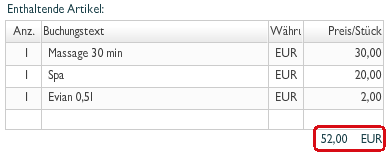
The total price for the package as calculated from the individual items
appears in the “Included items” section of the New package window:

[System data  POS
POS  Items
Items  Meal plan code tab]

For meals to be correctly added to the meal plan, you should link the
corresponding item to a meal plan code.
1. Configure a meal plan code
Open “POS > items” in the system data. Select the “Meal plan codes”
tab and enter the individual meal types such as breakfast, lunch, dinner,
5-course dinner, champagne welcome etc.
2. Link item to meal plan code
Once
the meal plan codes have been created, you need to assign them to the
relevant items. If a meal plan code is selected, you also need to specify
when the meal will be served relative to when the item is posted in the
system. (For more information, please refer to Meal
plan code in the “Add / edit items”
section.)
 The protel Air
upgrade in Summer 2020 brought about changes to the
user interface and also to many functions.
 POS
POS 


