Arrivals
The Arrivals list displays all guests arriving
on a certain day or within a certain set time period. By means of the
Context Menu, you can check in
a guest or Cancel an arrival.
And it is just as easy to find additional information about the guest
or reservation.
 The
departure list is automatically accessed for today's date.
The
departure list is automatically accessed for today's date.
Displaying the primary guest's
language
The language
column issues the primary guest's language from the profile:
Example

HINT:
The Language column always shows
the primary guest's language and not the language of guests who are not
the primary guest!
You can display the language column by using the
Show or hide columns function.
Open the Arrivals list
Open the Arrivals list by means of the "Lists > Arrivals"
menu points.
The arrivals list displays all of the expected arrivals occurring on
a certain date. The protel Air
date (today's date) and the expected arrivals are specified. You can change
the display by selecting another date. Tomorrow's departures can be seen
today.
Filter functions in the arrivals list

With the aid of the filter functions, you
can limit the displayed departures based on certain criteria. For example:
|
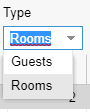
Room: Display at room level.
Rooms are displayed only once, even if the room is booked
for one or more guests. This is useful if you would like to check
in all guests for a particular room at the same time.
Guests: Display at guest
level. Every guests is listed separately. A room, reserved for
several guests, will be displayed more than once (once per guest).
Select this option if you would like to check in one guest of
a room booked for several guests. |

|
You can search for the name of a
guest profile. You don't have to enter the entire name.
While entering the first few letters of the name, protel Air shows you the reservations
whose guest or booker begin with the letters you have typed in. |

|
Search
for either the reservation number or the group number. |

|
This is where you enter a room description
when you are explicitly looking for a certain room.
When entering the name of the room type, only the reservations
for this room type will be displayed. |

|
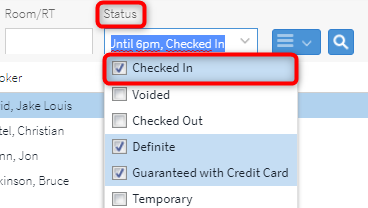
Filter
for the status of a reservation, e.g.:
Arrivals, which have been checked in
today: Select the "Checked in" check box, for
the Status and uncheck
all the other check boxes. |
Arrivals
which were planned for today and cancelled: Select
the "Checked in" check box, for the Status and uncheck
all the other check boxes. |
|
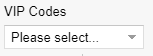
Upon
request, you can display only arrivals in the arrivals list which
have a certain VIP code. Activate the VIP
codes check box located in the list of additional filters
 .
You can then select the code in the VIP code filter. After clicking
on search .
You can then select the code in the VIP code filter. After clicking
on search  , only arrivals which have this code
will be displayed. , only arrivals which have this code
will be displayed. |
As you can see, there are quite a number of
possibilities. Additional information about the filtering possibilities
in the active list can be found here.
Refresh display
 As soon as you change filter criteria
in a list, you will have to refresh the display. As soon as you change filter criteria
in a list, you will have to refresh the display.
|
Displaying room status
[Lists > Arrivals list]
The room status is displayed in the Room status column so that you know
whether or not a room is ready for check-in.
Icon |
Meaning |

|
Clean |

|
Checked |

|
Touched |

|
Dirty |

|
Being cleaned |

|
Out of service |
Open the reservation dialog box for
the respective arrival by double-clicking in a field whose column has
NOT been underlined.
A simple click of the mouse in the field
with the underline column, enables you to change the contents of the field
(see below: Edit displayed contents).
By means allotted buttons
in the window below, you can execute the following actions for one or
more of the marked reservations - the same actions can also accessed via
the context menu (right mouse click).

|
Opens the guest profile
for an allotted guest.
The button is only active when a guest has been saved for the
reserved room. Clicking the button opens the respective guest's
profile (not that of the booker!). In the arrivals list, the allotted
guest will appear in the "Last name" i.e., "Guest
name(s)" column. "Gastname(n)" displayed. |
|
Select an arrival
and open the respective reservation. This will take you to the
reservation summary where you have access to all of the other
details of the reservation. |

|
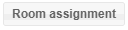
Checks in a
selected arrival. With the aid of multiple
selection , you can easily and conveniently execute a
group check-in.
If
a room is blocked for the guest and it is dirty, the message "Room
is not clean, do you really like to continue?" is displayed.
If
no room is blocked for the guest the Room assignment screen appears
where you can assign a room. |

|
The check-in
for a previously checked in arrival will be reversed. You can
only cancel a checked-in reservation if the guest has checked
in today and does not have a balance.
To
be able to use the function, the arrivals list needs to display
checked in reservations (select the "checked in" box
in the status dropdown list).
|

|
Cancel one or
more reservations by clicking this button. |
|
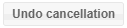
Only works for
arrivals which have been cancelled today or in the future. [Reset]
undos the cancellation.
To
undo a cancelled room, you will need to make the room visible
in the reservation list: To do so, select the cancelled
check box located in the status selection list located to the
top right of the window. |
|
For
room type reservations without allotted rooms, access room allotment
to allot a room for the arrival.
Room type reservations without allotted rooms are marked by a question
mark in the arrivals:
|
|
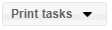
To
print the arrivals list, click on the sub-task entitled "Print".
The list will be printed exactly in the same way as it appears.
Click
on the "Registration form"
sub-task to print a registration form for the selected guest.
Print
as Excel list: Exports the Arrivals list in Excel format. |
As you can see: the possibilities are endless. Further information on
filters in active lists can be found here.
The contents of columns with underlined
column headers can be edited inline.
Learn more about inline editing:
Click into the underlined field
for the column you would like to edit.
Change the contents of the field
which you have clicked on.
Click <Enter> to adopt the
changes.
This enables you to change:
Requirements: To view the respective column, it must have been selected
in the Column settings.
Example: Change the room
in the arrivals list
Open the arrivals list and click on the column of the reservation for
which you would like to change the room.
A list then opens. The list shows all of the available rooms for the
reserved room type.
Helpful: The room status will also be displayed.

 Further information about filters and display options for the active lists
can be found here:
Elements & functions > Active Lists > The
structure of active lists
Further information about filters and display options for the active lists
can be found here:
Elements & functions > Active Lists > The
structure of active lists
 at the top right.