Allotments: Rooming list | Enter manually
[Reservation > Allotments > Allotment
dialog box > Rooming list | Enter manually]
With the
rooming list feature, you can name all guests and reservations
for an allotment manually (this help section) or import them from
an Excel spreadsheet (see Import
file section) in just a few steps.
The 'Rooming
list | Enter manually' feature enables you to manually enter all
guests and reservations for an allotment into a central dialog box. This
provides you with an efficient tool for selecting several reservations
for an allotment in a single step. This feature will especially benefit
you when dealing with larger allotments.
Example
The booker of an allotment was sent the allotment contract for signature.
A few days later, they return the signed contract, including recognition
of the terms and conditions. The allotment has already been set to blocking.
Now, only the reservations for the allotment have to be named.
A few days later, the booker sends you a list containing the names of
the guests. At this point at the latest, the allotment can finally be
set to ''Open for pickup'' and all of the guests can be named for the
allotment. The input of the guests can take place directly in the rooming
list: Here you can enter all of the guests one after the other. After
that, all of the guests have been named and all of the reservations are
in the system.
Accessing the function
[Reservation > Allotments > Allotment
dialog box > Rooming list | Enter manually]
The rooming list is individually entered for each allotment.
Open the relevant allotment (Reservation > Allotments > Edit allotment)
and click on the Rooming list > Enter
manually button located in the lower left of the window.
 Please keep in mind!
The
Rooming list button
is only active if a certain number of rooms has been created
for the allotment (go to ''Allotment'' section). and the Open for pickupstatus has
been activated!
In
order to use the rooming list, the user must be assigned a
corresponding user right: PAirAllotmentImportRoomingList
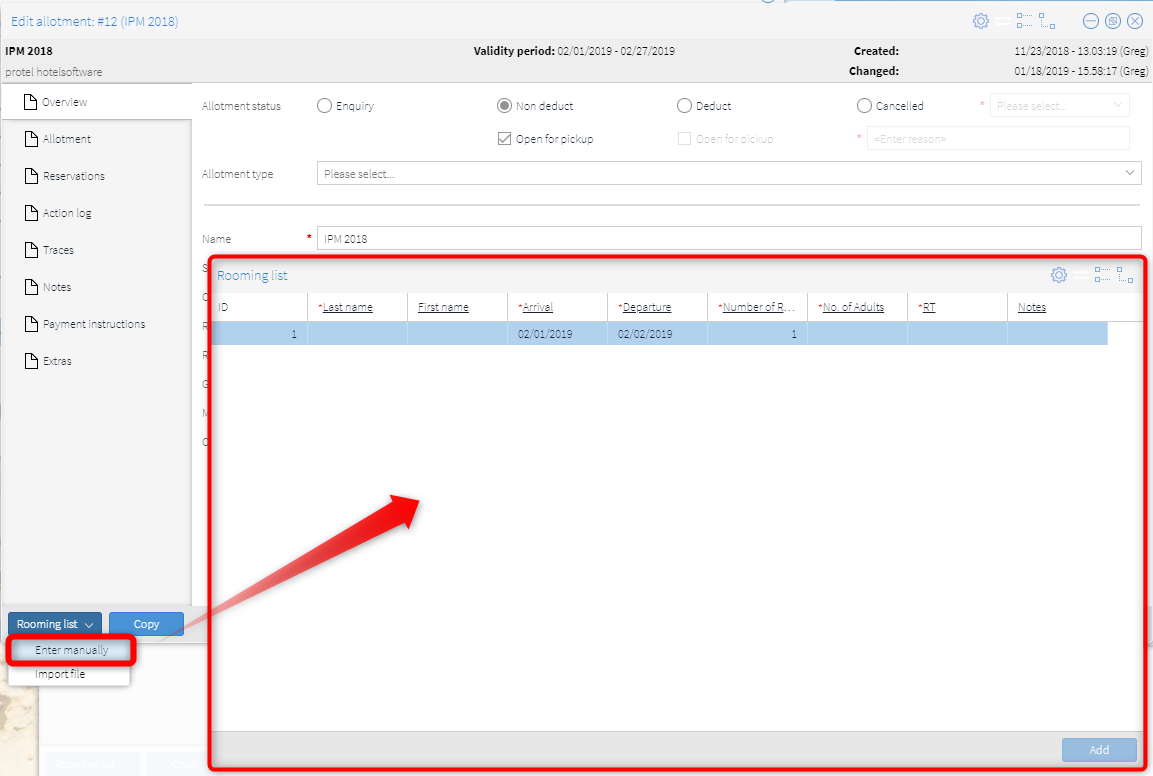
The Rooming
list window then opens.
Entering several guests successively
[Reservation > Allotments > Allotment
dialog box > Rooming list | Enter manually]
Open the relevant allotment (Reservation > Allotments >
Edit allotment) and click on the Rooming
list > Enter manually button located in the lower left of
the window.
In the Rooming list
dialog box, you can successively enter the guest data in each line:
Each row corresponds to a specific reservation data record that will
be created for the allotment: One guest profile and one reservation
are created per line (several if the number of rooms is the same).
Start with the first guest in the first line.
Fill in at least the mandatory fields such as last name, arrival,
departure, number of rooms, number of adults, and room type (RT).
Hint:
Press the tab key to move to the next field.
As soon as all of the mandatory fields have been filled in,
the cursor automatically jumps to the next line where you can enter
the next guest.
After all of the guests have been entered into the list, click
the Add button.
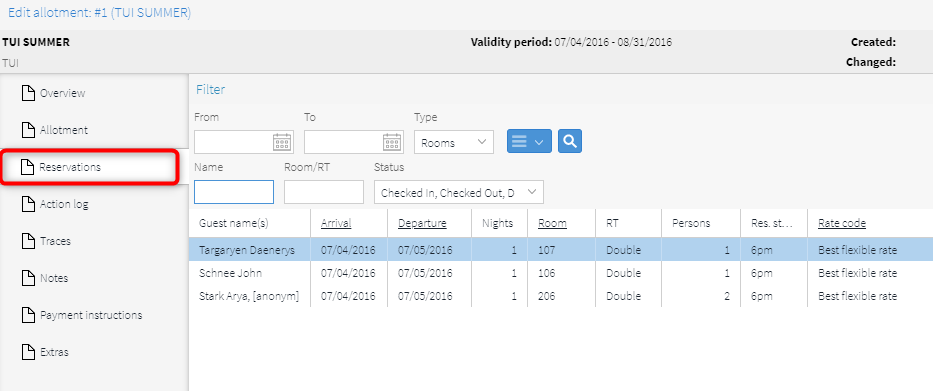
protel Air now creates the respective reservations.
In the Reservation tab
of the Allotment you can finally
view the reservations you have created - see next figure:
Hint:
If the reservations do not appear immediately in the Overview tab, close
the allotment and then reopen it!
NOTE:
With each manual entry, the data (guests and reservations) are
newly created! Repeat entry of the same list would result in duplicate
data.
The guest profiles are created with the ''Mark as deleted''
status. This prevents excessive duplicates from occurring in protel
Air (more information can be found in the FAQ). |
Columns and their meanings
[Reservation > Allotments > Allotment
dialog box > Rooming list | Enter manually]
The following list contains all of the fields that protel Air provides
for importing purposes. by showing and hiding columns, you can decide
which fields are to appear in the Excel file (see section on ''Showing
and Hiding Columns'').
Mandatory fields: Columns marked
as mandatory fields must be filled in. The reservation data cannot be
created without making an entry into the mandatory field .
Dropdown
list: If certain elements are made available in a cell via a dropdown
list, only the elements appearing in that list may be selected!
Column |
Mandatory field |
Format/selection |
Explanation |
ID |

|
Figure |
Sequence
number beginning with 1 This number is automatically created by
the system and cannot be changed! |
Last
name |
|
Free text |
Last
name of guest. The entry of the last name is mandatory. |
First
name |

|
Free text |
First
name of guest. |
Middle
name |
|
Free text |
Middle
name |
Second
last name |
|
Free text |
Second
last name |
Salut. |
|
Drop-down list |
Guest's
personal salutation Select an element from the list. |
Gender |
|
Drop-down list |
Guest's
gender. Select an element from the list. |
Birthday |
|
Date |
Guest's
birthday. The guest's date of birth must be entered in a valid
date format. |
Language |
|
Drop-down list |
Language
spoken by the guest. Select an element from the list. |
Nationality |
|
Drop-down list |
Guest's
nationality. Select an element from the list. |
Passport |
|
Free text |
The
guest's identification number, passport number, etc. |
Arrival |
|
Date |
Date
the guest arrives. The entry of the arrival date is mandatory.
|
Departure |
|
Date |
Date
when the guest departs. The entry of the departure date is mandatory. |
Number
of Rooms |
|
Figure |
The
number of rooms for this guest. This information is mandatory.
|
Number
of Adults |
|
Figure |
The
number of adults for this guest. This information is mandatory.
|
Number
of Children |
|
Figure |
Number
of children for this guest. |
RT |
|
Drop-down list |
The
room type being booked. Select an element from the list.
Only room types that
have been configured in the allotment are offered for selection
here! |
Arrival
time |
|
Time |
Planned
time of arrival. |
Departure
time |
|
Time |
Planned
time of departure. |
Notes |
|
Free
text |
Additional
comments regarding the reservation. |
VIP
codes |
|
Drop-down
list |
Guest's
VIP code. Select an element from the list. |
Show/hide columns
You can easily hide columns which you do not require for the manual
entry. It is important that you do not hide any mandatory fields, as these
are required for error-free input.
This is how it works
Call up the allotment (Reservation > Allotments > Edit
allotment) and click on the Rooming
list > Enter manually button located in the lower left of
the window.
Move the mouse over the column header of any column and then
click on the small arrow - see illustration:
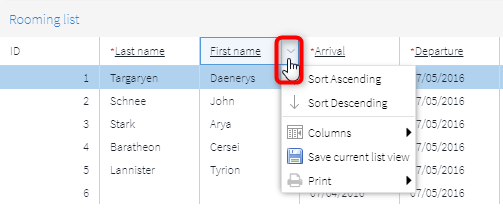
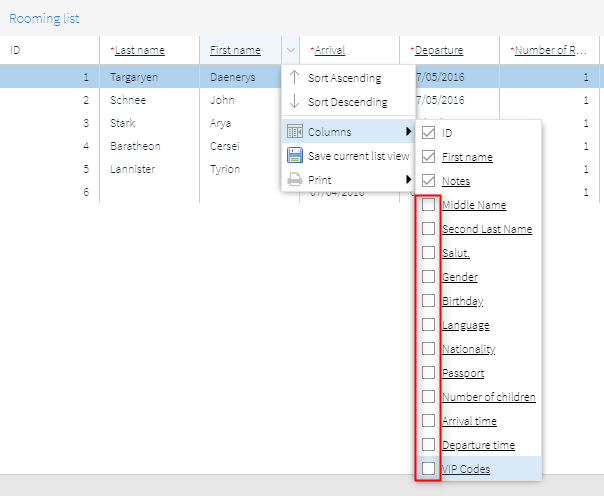
Select the Columns entry in drop-down list.

Columns that are already active in the template have a checkmark
in the respective box.
To hide a column, you simply have to uncheck the checkbox.
In our example, several columns are hidden at once - see the
figure below:
Attention!
Never
hide columns that are mandatory fields because they are required
for error-free import! These fields are mandatory:
ID
Last name
Arrival date
Departure date
Number of rooms
Number of adults
Room type
 The columns displayed
in the window update according to the selection made.
The columns displayed
in the window update according to the selection made.
Now, click on Save current list view.

Close the window by clicking on Close.
Note!
The column settings are used for
all allotments!
