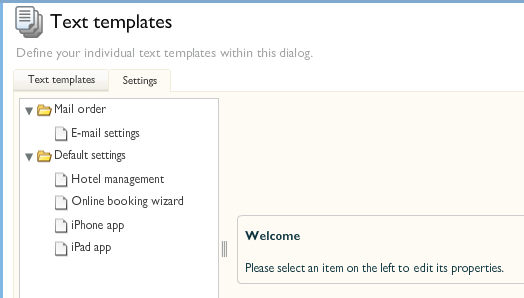
Text templates
[System data > Documents > Templates]
protel Air
allows you to design your own text templates for invoices, reservation
confirmations and registration forms. You can create these templates in
OpenOffice and save them in odt format. OpenOffice
is a free office software package that you can download from the Internet.
You can download the latest version of OpenOffice from here: http://de.openoffice.org.
Launching
Open the System data menu in
protel Air, and then
click Documents > Templates.
protel Air distinguishes
between two types of text templates that reside in different folders:
Default templates
[System data > documents > Templates > Default templates]
This folder contains the system provided templates that you can use
as required for your own designs.
Reservation |
These are the default templates
for reservation confirmations. The system provides two different
types of confirmation templates: A standard reservation confirmation
(“Reservation”) and a confirmation for bookings with additional
items (“Extended reservation”). |
Invoice |
These are
the default templates for invoices. |
Guest
letters |
This is
where you will find templates for your guest letters, such as
invitations to events, brochures, etc. Contrary to reservation
texts, invoices, and registration forms, guest letters do not
have direct reference to a reservation.
Guest letters are created in the guest
profile (“Text history” tab > [New document] button).
The templates for the guest letters
support the standard replacement codes for reservation texts and
emails. |
Registration
form |
These are
the default templates for registration forms. |
In addition, you can
find further templates for protel Air HTML5 and protel Air MICE.
 IMPORTANT IMPORTANT
Standard
templates can neither be edited nor removed! Individual
templates with your own texts can be created under Text
templates > My
templates. The standard templates serve as a kind of
stencil which can be arbitrarily adjusted to suit your needs. |
[System data > documents
> Templates > My templates]
Use this panel to manage your own customized templates for reservations,
invoices and registration forms. The corresponding folder is initially
empty when you acquire the system.
Creating your
own templates
The easiest way to create a new text template is by editing an existing
default template. For instructions on how to do this, please refer to
the following sections.
Download and edit
a template
First of all, think about the type of template you want to create. If
you want to create your own reservation template, for example, you should
download a “Reservation” type default template to work from.
To download, left-click the file name
of the template file in the table and save the template to a folder
of your choice (e.g. to the language subfolder in the template type
folder you created previously).
Open the downloaded file (file name is “default.odt”) in Open
Office and change the text, the text replacement keys or the layout
according to your requirements or preferences.
Include a custom logo.
The default templates contain a small protel logo in the upper right
corner. You can, of course, replace this logo with your own logo.
Highlight the protel logo and replace it by uploading or pasting your
own log to that position.
Add your customized
templates
Once you are happy with your changes, save the new text template under
a new name on your hard drive. Please note that the file name should not
contain blanks or other extended characters (e.g. write “Bestaetigung”
instead of “Bestätigung” [German for confirmation]).
You now need to upload the customized template to the system:
In the tree view on the left, select
the “Text templates” tab and click “My templates.”
Click the “Add” button. This opens
the “Edit templates” window.
Enter a name for the template, and
select the type and the language of the template.
Click the browse button [...].
Navigate to the folder where the
template is stored and click the “Save” button to upload the file.
Finally, click “OK” to add the new
text template to the table.
Hiding
templates that are not currently required
When printing reservation confirmations, invoices or registration forms
you can choose from a variety of text templates. In order to have only
relevant templates displayed for selection, you can disable the ones that
are not currently required in the system data:
Open the system data dialog box for text templates configuration.
Double-click the template that you want to disable.
Clear the “Active” check
box in the dialog box that appears:
Click [OK] to confirm.
The disabled template will no longer be offered for selection when printing.
PLEASE NOTE: A template type
can be completely hidden by disabling all text templates of the template
type.
[System data > Text templates > My templates]
Integrate your text templates or QR codes! QR codes are two-dimensional
barcodes which can be scanned and read by smartphones and tablets. Information
about internet addresses, directions about how to get somewhere, or reservation
information can all be included in the QR codes. Practical: When utilizing
the Ariane Self-Check-in kiosks, the QR code can be used for checking
in.
How to proceed:
Open the template in Open Office, and insert an arbitrary picture
to the spot where the QR code is to appear (Menu “Insert > Picture
> From file...”)
If necessary, adjust the image size. When the template has been
created, the picture will then be replaced by the QR code.
Right-click on the image and select the Picture
command from the context menu.
Open the Options located
in the “Picture” window.
In the Name entry field,
please enter: qrcode
In the Alternative (Text only)
entry field, enter either a replacement code which portrays the information
about the reservation (e.g. reservation number) or enter the internet
address (directions for getting somewhere, etc.) which are to be then
linked to the QR code.
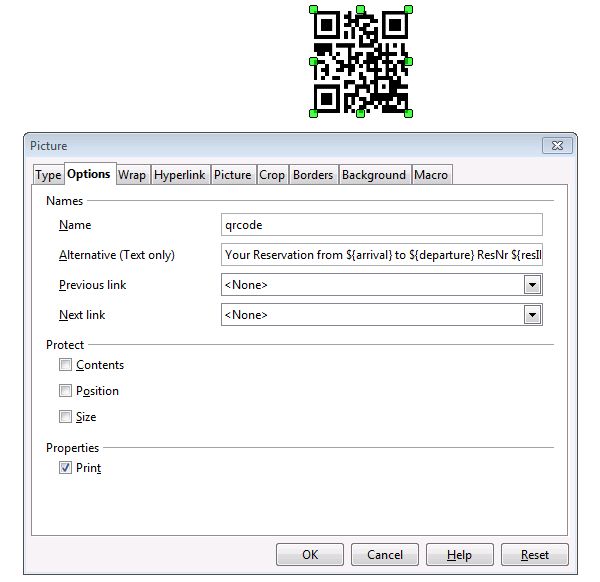
Fig.: The following has been entered into
the Alternative
(Text only) field:
Your Reservation
from ${arrival} to ${departure} ResNr ${resID}
Save the template.
Open Office now creates a QR code with the desired information
Scanning QR-Codes
The guest can now comfortably scan the QR code with his portable terminal
(e.g., smartphone). Otherwise, only the information on the booking confirmation
or the invoice are then also digitally available in the smartphone.
The QR code which has been scanned by the smartphone can look something
like this:

Fig.: Scanned QR-Code
Tip: Scanning the QR code
via the iPad app
If you enter the replacement code ${qrcodeinfo}
in the alternative text field when creating the QR code (see 'Integrating
QR Codes, step 6), the QR code can be scanned in via the iPad app.
Scanning the QR code automatically opens the
corresponding reservation in the iPad app.
Settings
[System data > Documents > Templates > Settings tab]
Use the “Settings” tab to assign default text templates for invoices,
reservation confirmations and registration forms and configure how your
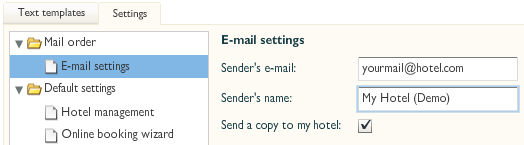
reservation confirmations are sent electronically.
Enter the e-mail address and the name of your hotel to use in your outgoing
e-mail communication. You can also define whether or not you want to be
copied on e-mail reservation confirmations that are sent by the system.
[System data > Text templates >
Settings > Default settings]
Determine which of your templates are to be used for the Reservation
confirmation and the Registration
form by default.
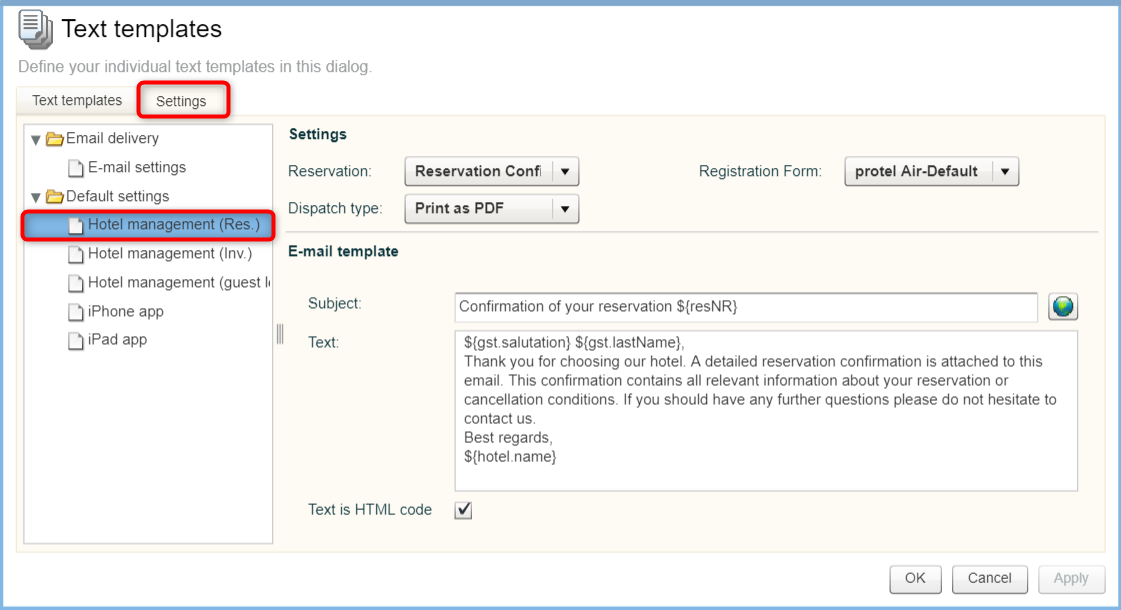
Settings
In the Confirmation type field,
you can select a default confirmation type to be used for your reservation
confirmations. When creating the reservation confirmation, the preset
confirmation type will be selected as the standard value. Example: The
majority of your confirmations are sent via email. When creating the reservation
confirmation, the “Send an email” option should therefore always be preselected.
E-mail
template
The E-mail template section allows you to enter the subject and the
body text of the e-mail message.
The following replacement codes can be used in your e-mail text:
${curUser}, ${hotel.user} Current /
executing user
${hotel.contactFN} First name of point
of contact in the hotel
${hotel.contactLN} Last name of point
of contact in the hotel
${resNR} Reservation number of the
reservation (works in the text body as well as in the subject line)
${hotel.name} Name of the hotel
${gst.salutation} ${gst.lastName} Salutation
and last name of the guest
${arrival} Arrival date
${departure} Departure date
${gst.shortSalutation} Short salutation
(Mr.)
${gst.department} Department
${gst.firstName} First name of the
guest
${inv.fiscalCode} Fiscal code from
the invoice
${res.udf.", "} Replaces
the content of a user defined field of a reservation. Please insert the
name of the relevant identifier
Subject line
Tip:
Enter the reservation
number in the e-mail subject line:
The system provides a text replacement key that allows you to output the
correct reservation number to the subject line of your confirmation e-mail.
As all reservation numbers are unique, booking confirmations sent by e-mail
can be clearly identified and easily associated with a guest.
Add the ${resNR} text replacement key to the
subject line of your e-mail template. This
key will then be replaced at runtime by the respective reservation number
from the system.
Please
note that the string inside the curly brackets is case sensitive.
Repeat the above steps for the online booking
wizard and the iPad app if required.
A copy of the confirmation e-mail sent by
protel Air to the configured e-mail address would look similar to this
in your inbox:

Apart
from the reservation number, you can insert any of the above mentioned
codes into the email's subject
line.
[System data > Text templates >
Settings > Default settings]
Here you can determine which of your templates are to be used for your
invoices by default.
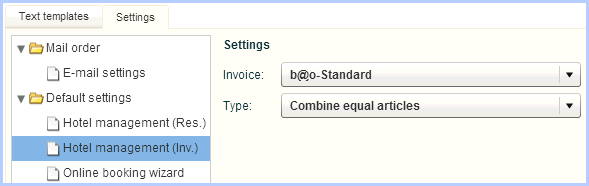
The Type field enables you to
determine how the booked articles are to appear in the invoice. Example:
When drawing up the invoice, the standard invoice should always be accessed
with the “Combine equal articles” option.
In addition to the above mentioned replacement codes for email templates,
you can use the following codes specifically for invoice E-mails:
${inv.fiscalCode}
${inv.invoiceDate}
${inv.invoiceCode}
${inv.invoiceName}
${inv.totalAmount}
${inv.totalChargedAmount}
E-mail
template: The E-mail template section allows you to enter the
subject and the body text of the e-mail message.
 HTML source code:
Should you select the “HTML source code” check box, you can use the HTML
tags in order to format the letter to your liking. Please note that you
will need to have a good working knowledge of HTML to do this!
HTML source code:
Should you select the “HTML source code” check box, you can use the HTML
tags in order to format the letter to your liking. Please note that you
will need to have a good working knowledge of HTML to do this!
Settings: Here you can determine
which of your templates are to be used for your guest letters
Email template: In the email
template area, you can enter the subject
as well as the standard email text
for your guest letters. Please note that the email will be transmitted
in an unformatted form (e.g., without special font types, images, or the
like).
HTML source code:
Should you select the “HTML source code” check box, you can use the HTML
tags in order to format the letter to your liking. Please note that you
will need to have a good working knowledge of HTML to do this!
Online
booking wizard
This panel allows you to select a template to be used for online bookings.
Enter a subject and the corresponding body text and select a template
for each reservation type:
Select a reservation type (with or without credit card) from
the top pull-down list.
Enter a subject and body text.
Select a template from the “Reservation” pull-down list. This
template is used to create a PDF attachment for the confirmation e-mail.
Click [Apply].
Provide your private guests and companies with a personal WBE access
together with their own login data needed for making online bookings from
your website (WBE). If you allow guests visiting your online booking engine
to register and create a WBE login themselves, they will receive an email
informing them about the successful registration.
The subject and text for this email can be adjusted and edited any way
you like.
WBE login (reset)
If a guest who is logging in with his personal WBE login requests a
new password, he will receive an email with a link by which a new password
can be created.
The subject and text for this email can be adjusted and edited any way
you like.
PMS-WBE login
When creating a new WBE login by means of the [Create
WBE login] button located in the guest profile tab, the respective
guest will receive an email with all of the necessary information regarding
his new WBE login. The subject and text for this email can be adjusted
and edited any way you like.
PMS-WBE login (reset)
When resetting the WBE login by means of the [Reset
WBE login] button located in the guest profile tab, the respective
guest will receive an email containing a link allowing him to create a
new password. The subject and text for this email can be adjusted and
edited any way you like.
iPhone App /
iPad App
If you use our iPhone or iPad app to enter reservations directly on
your iPhone / iPad, this panel allows you to select which reservation
template you want to use for this purpose. You can also enter the subject
and corresponding body text for the e-mail.
The protel default text templates contain a number of text replacement
codes which are indicated in the text by a preceding $ sign. These codes
are essentially placeholders for the actual information that is stored
in the system and replaces the text replacement code in the output (e.g.
your hotel name, a guest's name, or arrival and departure dates).
Download a list of all the text replacement
codes as PDF file:

Please pay particular attention to correct spelling and note that the
text replacement codes are case sensitive. We recommend copying and pasting
the key straight from the document to your text template.
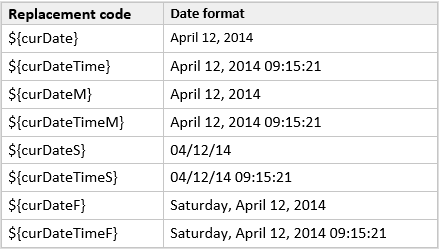
Printing the date
When exporting the date, the question of which date format is to be
used for the respective document often arises. Therefore, protel Air offers
you a large selection of replacement codes with which you can export the
date in long form, short form, with or without the time, etc.