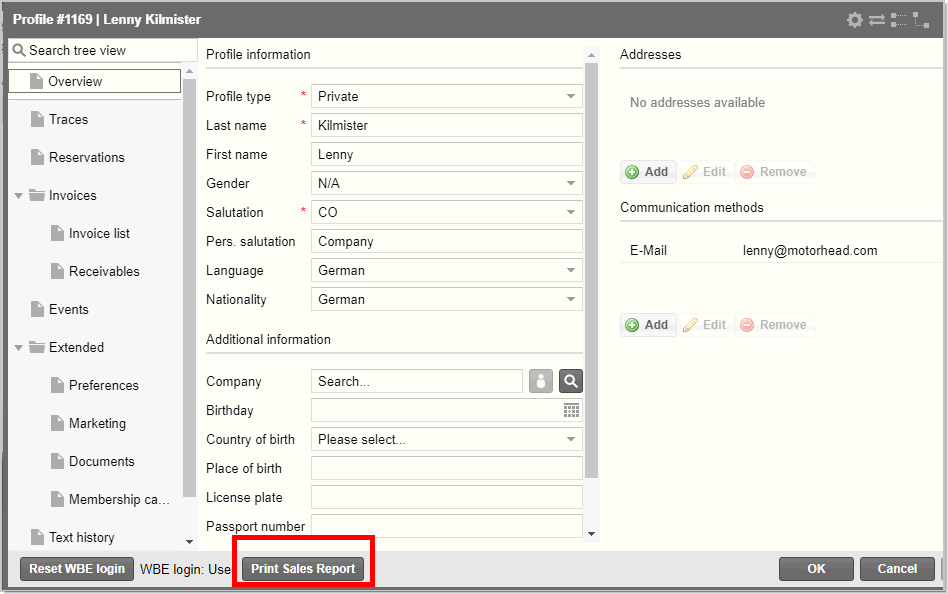
protel Air
profiles: The clearly structured tabs allow easy and fast access to address
and contact data and provide the reservation and invoice history of each
guest. Also included is the display of all generated revenues up to date
(Sales Report). Individual notes and keywords (e.g., VIP codes) facilitate
personal and individual guest service.
In order to be able to better categorize your
various contacts, protel Air
divides all of your profiles into certain groups, each displays a certain
"contact type".
Icon |
Description |
 Private Private
|
Individual
guests / private individuals, who book rooms - for the most part
to their own private accounts. |
 Company Company
|
Companies
/ entrepreneurs who book rooms for their employees. |
 Travel agency Travel agency
|
Travel
businesses and travel agencies by which the room is booked. |
 Group Group
|
Private
travel groups or groups of employees, i.e., groups which most
often have shared arrival and departure dates and similar booking
details. |
 Source Source
|
Reservation
offices, which are neither companies nor travel agencies, e.g.,
central reservation systems. |
The guest search is the first step for every
action. It helps you to find already existing guests and also helps you
to create new guest profiles.
 go
to Guest search
go
to Guest search
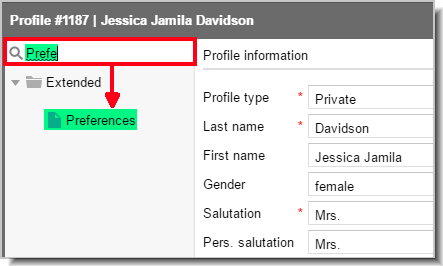
By means of the quick access bar in the
upper left, you can search for an explicit guest profile tab. Just enter
the name of the tab and protel will display appropriate results:
Overview tab
[Guest profile > Overview]
The overview tab shows all of the general guest information such as
salutation, address, nationality, etc.
The guest's first and last names will be entered.
The entries on the profiles for companies, travel agencies, and sources
are a bit differently structured. This is where additional information
such as company name, company owner, or the name of an employee from a
certain department can be saved as the contact person. Such contact persons
can be employees from reception or bookkeeping who make reservations for
the company. They also receive invoices which are then paid for via bank
transfers.
Entry fields marked with * are mandatory
fields.
Profile
information |
Profile type* |
Set a check mark in order to edit
the profile type which had been selected when creating the guest
profile. |
Name* |
Only for company, travel agency,
source, and group profiles. Name of the travel agency's company/group/source. |
Department |
Only for company, travel agency,
source, and group profiles. Providing the contact person's department. |
Last
name* / First name / Middle name |
The guest's last and first names
(and middle name) or when dealing with companies, the name of
the owner or contact person. |
Gender |
By default, this field is preset
with "n/a" for the guest's gender and can be set for
each guest individually. Providing information about gender will
be especially required for interfaces such as Customer Alliance
or municipal registration interfaces. |
Salutation* |
This is where you select the salutation
which has been saved to the system data. If another language,
such as German, is selected in the drop-down list below, the German
salutation Herr or Frau appears.
 NOTE: You can also use
academic titles for the salutation (e.g., "Dear Dr...").
NOTE: You can also use
academic titles for the salutation (e.g., "Dear Dr...").
|
Pers.
Salutation |
The personal salutation is automatically
filled in when you have made a selection in the "Salutation"
field. It comes into use when printing correspondence and can
be overwritten, if desired. This information is also helpful when
greeting a person on the telephone. |
Language |
Guest's language: important for
the language used in invoices and documents.
NOTE: When the respective
template has been saved in the respective language, the booking
confirmation will automatically be printed in the guest's language.
Create a text template in every language used and save it in the
system data under "text templates". |
Nationality: |
Citizenship The nationality can
differ from the place of residence (country). |
Additional
information |
Company |
You can link private guest profiles
with a company. The company name entered is only for informational
purposes and is not a company reservation. With
just a simple click of the mouse on a company, you can directly
access the linked company profile! |
Occupation |
Governments in some countries require
the recording of the guest's occupation. |
Birthday |
Enter the guest's birthday here.
The date entered will be double-checked to avoid mistakes. |
Country
of birth |
If necessary, this is where you
keep the guest’s country of birth. To make the search easier,
you can also resort to using country favorites. To add countries
to the “Favorites” list, select the respective ones in the system
data under “Guest profile > Countries.”
Enter the first letters of a country
into the list and protel Air will skip to the respective country.
In order to be able to access countries which are used less in
the country selection, click on the “All” option in the dialog
box. |
Place
of birth |
If necessary, this is where you
keep the guest’s country and city of birth. |
License
plate |
When the guest arrives with their
own vehicle, you can save their license plate number, if you want
to. |
Passport
number |
This is where you save the personal
ID/passport number. |
Special rates |
If
you want a certain rate code to be pre-selected for a guest when
creating a new reservation, you can set the desired rate code
here.
If this rate code has expired or does not have a valid calculation,
the selection will be respectively marked as expired. |
Mark
as deleted |
Used to delete profiles which then
are hidden from the profile search by default. They are only displayed
if profiles which have been "Mark as deleted" are explicitly
shown. |
Addresses |
Click
the [Add] button to save
a new address or to add new ones. |
Type |
Display the address type in the
selection field (private or business address, post office box). |
Addr.
add-on |
Here you can further specify the
addressee. Two common address add-ons are, for example,
"c/o" (care of) followed
by recipient's name or "to the attention of" followed
by recipient's name which ensure that your mail gets to the hands
of the right person, people, or team. |
Street,
No. |
Enter the house number and street
name here. Only enter the number of the post office box. |
Free-text
fields |
The free-text fields enable you
to enter additional address information such as Apartment, suite,
unit, building, floor, etc. |
Country |
Select your guest's country of residence.
The country entered here will be used for compiling monthly nationality
report.
|
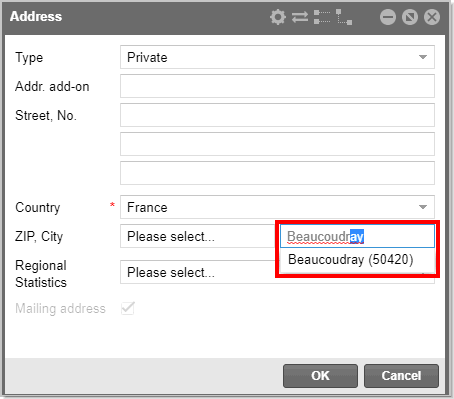
ZIP |
Postal code / Zip code entry without
providing the country code.
When you record a postal code, protel
Air will automatically complete the fill-in by providing you with
a city after you have finished entering the postal code. NOTE: The
country will need to be selected.
When the first few digits of the postal
code have been entered, a list will appear with the respective
cities.
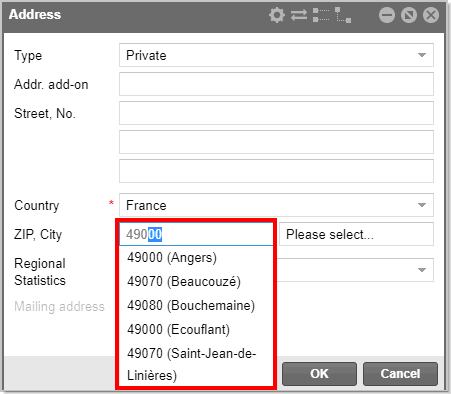
After you have selected the city,
you can edit the information, for example, by adding additional
city districts. |
City |
City used in the address
When entering a city, protel Air tries
to automatically fill in the postal code.
protel Air has access to an online
postal code directory which has comprehensive data for the
following countries:
Austria France Germany Great
Britain Italy Netherlands Spain Switzerland USA Canada
The relevant postal code directory
is active as soon as the respective country has been selected.
After having entered only the first
few letters of a city, the list will show you a respective string
of characters. Select the appropriate city from the selection
list.
|
Regional Statistics |
providing the regional statistics
is only required if, for example, you are required to mark your
guests with special country codes. The
selectable country codes are saved to the system data under
"Guest profile > Countries".
|
Mailing address |
The mailing address is used for
general correspondence. All additional address are saved for informational
purposes.
|
Communication methods |
By
clicking on the [Add]
button, you can enter as much contact information as you like.
Email address,
phone no., etc.
Should you want to send your booking
confirmations in the form of an email,
it is important to save the guest's/booker's email address here.
Select a type and then enter the appropriate
data (e.g., email address).
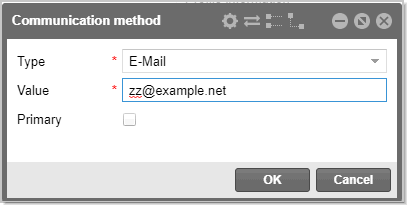
Mark the preferred contact data as
"primary" (for
example primary telephone contact, primary email address, etc.) |
[Guest profile > Traces]
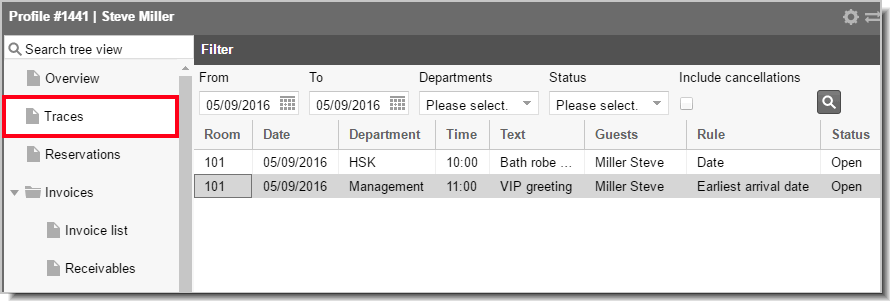
This is where all of the trace entries made for a guest will be displayed
for information purposes. If the  Auto
Trace check box has ben activated while creating the trace, the
trace will be automatically set for the guest’s next reservation. This
will be displayed as an “X” in the “Auto Trace” column.
Auto
Trace check box has ben activated while creating the trace, the
trace will be automatically set for the guest’s next reservation. This
will be displayed as an “X” in the “Auto Trace” column.
The status of a trace can be directly seen in the Status
column.
By double clicking a trace entry, you will be forwarded to the traces
window.
Change status
By clicking the [Change Status],
you can change the status from open
traces to finished and vice-versa.
Related Topics:
Reservation dialog box: Create and edit traces
Lists
> Traces: List for displaying and managing traces
Reservations tab
[Guest profile > Reservations]
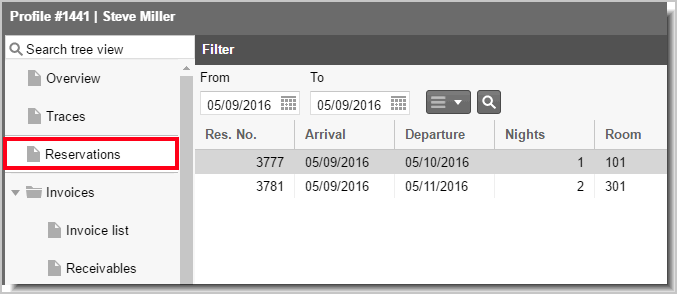
This is where all of the reservations which the guest has made so far
are listed; future reservations will also be added to this list (reservation
history). The list contains all of the reservations which have been created
or linked to the profile (see here: Reservation summary > linked
profiles). Use the context menu or a double-click to open a reservation.
Filter
From / To
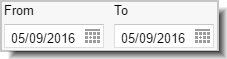
[Guest profile > Reservations > From / To]
Field |
Description |
From / To |
Filter
the display by entering a time-period. The system shows all of
the reservations made within the given time period. |
[Guest profile > Reservations > Status]
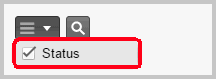
You can choose between the following status options:
Field |
Description |
Include cancellations |
Even cancelled
reservations are displayed. |
Guest |
The accessed
guest profile is a guest (bookers can also be other individuals
or companies). |
Booker |
The accessed
guest profile is a booker. |
Linked Profile |
Displays
reservations, where the guest profile had been linked as an additional
profile (more information can be found here).
Reservations linked to profiles will
be displayed in a separate column (‘Linked profile 1-5’) and can
be arbitrarily shown or hidden (see following section on: "Hide
and display columns"). |
Display or hide columns
[Guest profile > Reservations]
Display additional information such as targeted revenues in a separate
display. To do this, show the desired revenues column (food/minibar/drinks/extras...)
and the respective amount will be displayed in the table.
Find out more about how to display and hide columns here.
Number of nights
[Guest profile > Reservations]
The number of nights for the time selected in the "From / To"
filter is displayed in the dialog below.
Example:
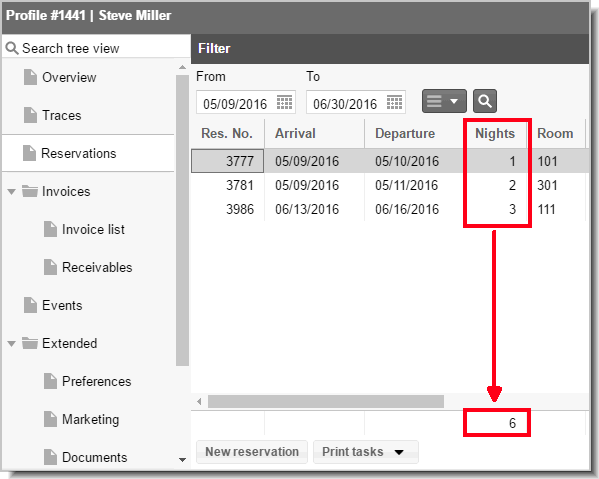
[Guest profile
> "Reservations" tab]
In the guest profile's reservation tab, reservations can be created
for the guest profile with a simple click of the mouse.
Access the guest profile and click on reservations
located to the left.
Click on [New
Reservation] to create a new reservation for the accessed guest
profile.
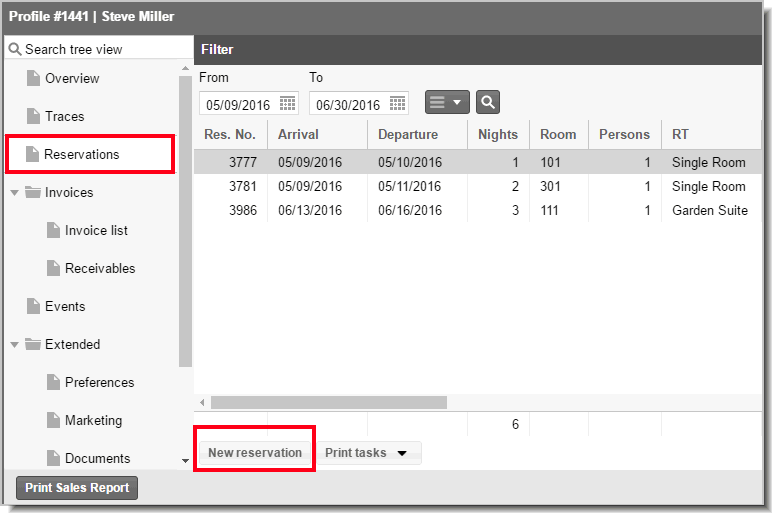
The new reservation is generated for a night's stay for the current
date by default.
Room type, rooms, as well as arrival and departure date can be adjusted
in the reservation dialog box's room tab.
Create WBE login / Reset WBE login
Provide your private guests and companies
with a personal WBE code together with their own login data for making
online bookings by means of your website (WBE). Having their own access
will save your guests the effort of having to re-enter their data for
each booking they make. Additionally, already logged in users can view
a list of their current bookings and cancel them, should the need arise.
Additional advantage: The login enables companies to book their contract
rates and regular guest to book their special prices when logging in on
the hotel’s website. Of course, the respective rate can be closed and
the guest or the agent can book regular rates.
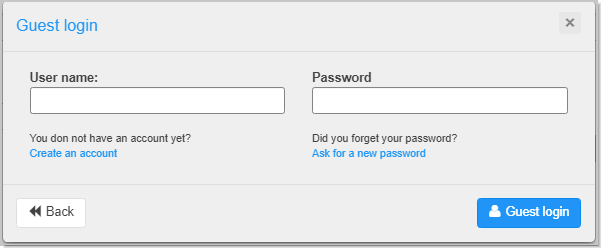
Example of a guest login (please click)
By means of the "Guest login" link, the user can log into
the WBE by means of the hotel's website:
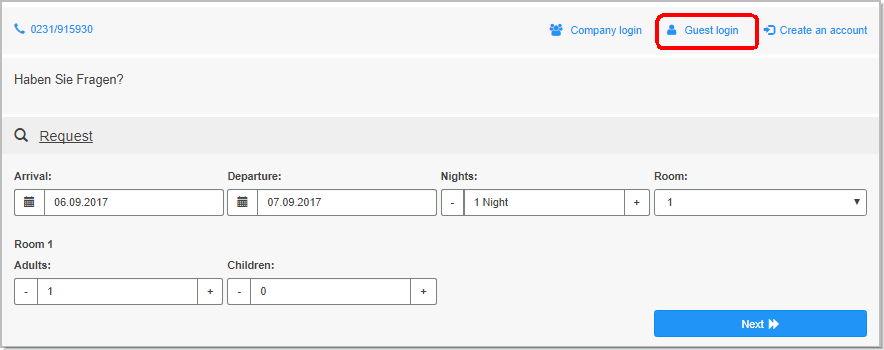
For the user name, we enter the email address which has been saved as
the primary email address in the protel Air contact information.
The user determines their password during their first login.
To be able to use the “WBE login” some special system settings
are necessary. Ask your protel Air partner or contact the Cloud
Support Team for more information! |
Attention!
 The
[Create WBE login as ...]
button will be displayed when the accessed guest profile does
not have a WBE login.
The
[Create WBE login as ...]
button will be displayed when the accessed guest profile does
not have a WBE login.
For
private guest profiles, you can create a login as User:

For
all other profile types (company, travel agencies, etc.), you
can alternately create
access as an agent:

We will explain
the difference between Users
and Agents further down
in the section on "Agent or User Login?"
The
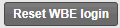
[Reset WBE login]
button will be shown when the accessed guest profile already has
a WBE login.
There
must be an active
email address in the contact information
provided in the guest profile. When adding a new email address,
close the guest profile and reopen it so that the [Create
WBE login as ... ] button appears.
Agent
or User login?
For company, travel agency, source, and group profiles, you can alternatively
create an Agent login to the User login.
Unlike “normal” user logins, agents can also make reservations for third
parties. This enables companies, for example, to carry out online bookings
for their employees and travel agencies to do the same for their clients.
An additional advantage is that logged in agents have access to all guest
profiles for which you have executed bookings.
Should a special rate have been saved for a guest profile (Guest profile
> Overview > Special rates), the special rate will always be automatically
proposed, as long as it is available.
Display
The display next to the [Reset WBE login] button will indicate what
type of WBE login you are dealing with (Guest or Agent):


Click the [Create
WBE login as ...] to create a new WBE login for the guest profile.
Access is created immediately
after the button has been clicked on. An email is sent to enable the guest
to activate the login. The email contains a short welcoming letter as
well as a link which the guest can use to assign an exclusive password
for their user account.
In the next window, you
determine the details for the welcoming letter.
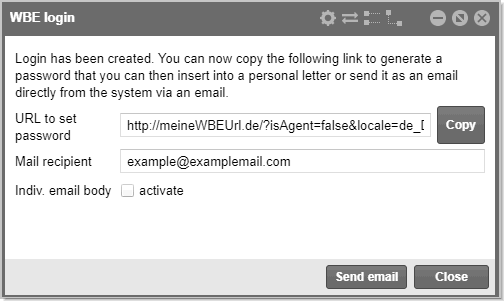
URL to set password
By means of the displayed
URL; the guest can assign a password fo their (new) WBE login. For already
existing ones, the old password will be overwritten by a new one. The
guest can login to the hotel’s WBE with the email address saved in protel
Air, and with the entered password.
[Copy] button
Copies the URL needed for password entry to the clipboard: This option
is recommended when wanting to use the URL outside of protel Air, for
example when wanting to send the email with your own Mail Client.
Mail recipient
This is where the email address for the guest profile appears by default.
When needed, another email address can be entered for sending the email
- however the WBE login will always use the email address provided in
the guest profile!
Indiv. email body [x]
If you do not want to use the default text from the system data, (System
data > Documents > Text templates > Settings > PMS-WBE
Login ), select the checkbox here and
edit the displayed default text anyway you like. While doing so, please
do not edit or change the link in the text!
ATTENTION: The individual email text does not
support hyperlinks, which means that you cannot embed images via
a link. Links which are embedded in the default text might also
not function properly! |
[Send email] button
When clicking this button, protel Air sends an email to the email address
provided above, requesting the recipient to enter a password for their
(new) user account. The email contains the link by which a new password
can be assigned and the saved default text which is configured in protel
Air's system data: System data > Documents > Templates > Settings
> PMS-WBE
login.
Reset WBE Login
For existing logins, click on the "WBE login (reset) button if
you want to send an email to the guest about password changes. The guest
then receives an email with a link for assigning a new password for their
access.
In the next window, you determine the details for the email - like section
above: Create WBE login-login.
The commissions tab is only available for travel agent and company profiles.
You can add a commission code to a travel
agent or company profile.
Open
the profile and select the Commissions tab.
Click
Add and select an appropriate
commission code - see the following screenshot.
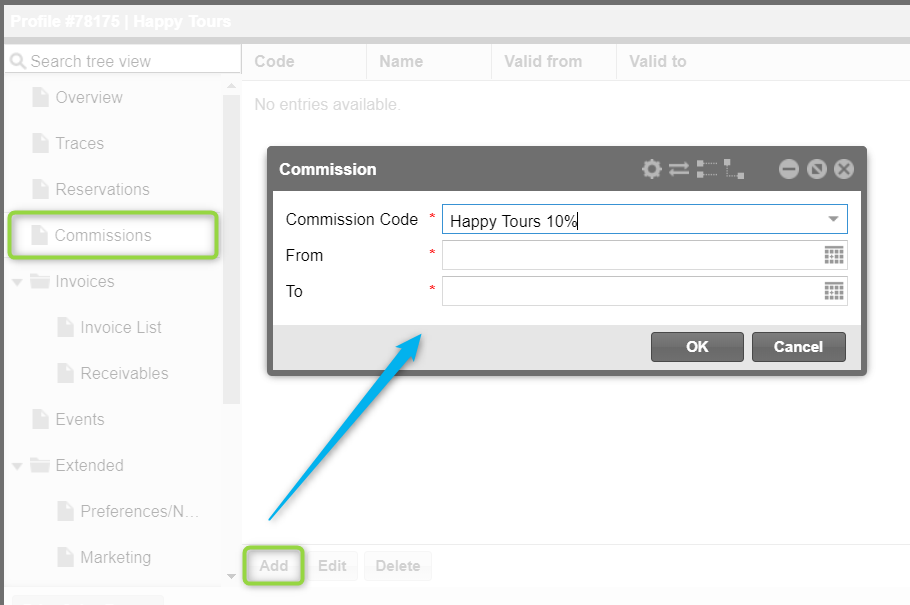
Then
set the validity of the commission codes (this is mandatory) by defining
a From and a To
date.
Click
OK to attach the code to the
profile.
Facts about the Commissions
feature you should be aware of when adding a commission code to a profile:
Each
Commission Code can only be attached once to a profile.
Commission
codes can only be associated with travel agency or company profiles.
If
two profiles are merged then the commission of the target profile
is taken.
An
expired commission code cannot be attached to a profile.
Related
Topics:
System
data > POS > Commission: How to Setup Commission Codes
Reservation
> Reservation dialog > Reservation > Commissions: How to Attach
a Commission Code to a reservation
Invoice list
[Guest profile > invoices > Invoice list]
In this dialog box, all of the invoices which have been created with
this guest profile as the recipient are displayed.
Invoices marked with a green  point are still open;
those marked with a red
point are still open;
those marked with a red  dot have already been closed.
Open an invoice by double-clicking,
on the context menu or by clicking
the [Open invoice] button.
[guest profile > invoices > Receivables]
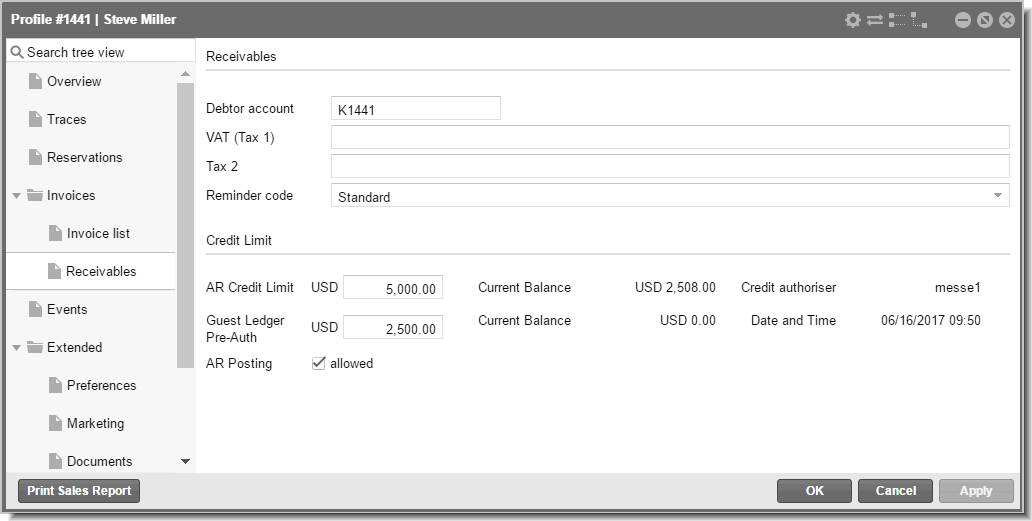
In the Receivables section you
can make settings for transmitting to a possibly connected financial accounting
system as well as Reminders.
Field |
Description |
Debtor account: |
If the
guest profile belongs to a client with a debtor account, the allotted
account will be entered here. The account can be edited here,
as need arises. |
VAT ID |
This is
where the value added tax ID is managed (entry / editing, etc.)
- only if available. |
Tax 2 |
This is
where you can save an additional tax number - if available.
You can also enter the cost center for a certain company's department. |
Reminder code |
Each
guest can be allocated an exclusive reminder code for payment
reminders. During invoicing, the payment code is taken into consideration
and displayed in the debtor management. By allotting this code
as "not to be reminded", the guest profile will be blocked
out for payment reminders.
|
Extras / IATA
code |
Only for travel agencies - IATA
number entry.
IATA = International Air Transport Association.
A travel agency with an IATA agency sells air tickets at original
prices and renders service charges. Each travel agency with an
IATA agency has an IATA number which you can enter here. |
In the credit
limit area, you can make settings for the Accounts Receivable (AR)
credit limit. By means of the AR credit limit, you can allow payments
to a guest profile up to a certain amount. Once the AR credit limit has
been used up, the guest can, for example, be asked to pay in cash or card.
Field |
Description |
|
AR Credit Limit |
This is
where you enter the AR Credit Limit, you want to grant to the
guest for their receivables payments. The AR Credit Limit is the
credit line to which the debtor is allowed to accumulate receivables. |
Current
Balance: |
This value
provides information about how much of the credit limit the debtor
has used up. |
Guest Ledger
Pre-Auth |
The Guest
Ledger Pre-Auth limit is a credit line a debtor is allowed to
accumulate during his stay.
Amounts granted to the amount stated here can be settled with
a debit balance method of payment (e.g., invoice). |
Current
Balance: |
This value
provides information about how much of the Guest Ledger Pre-Auth
the debtor has already use. |
Credit authorizer |
This is
where the name of the user who has saved the Guest Ledger Pre-Auth. |
Date and time |
The date
and time of the changes made last is entered here. |
AR Posting |
|
Select this checkbox to allow
the guest / guest profile to make accounts receivable postings. |
|
By removing the checkmark, you
disable the guest the right to pay with an accounts receivable
method of payment. |
The settings regarding the AR Credit
limit in the guest profile are part of the feature
for entering and checking AR credit limits which is currently
available in the basic version. The basic version is initially
limited to the creation of accounts receivable credit limits in
the guest profile and its display and management in the credit
limit forecast. Additional functions such as the automatic
management of accounts receivable credit limits are being developed. |
Related
Topics:
Active
lists > Credit Limit Forecast
Information
about how to configure (methods of payment with a debit balance
[Guest profile > Extended]
Preferences/Notes
Guest profile > Extended > Preferences/Notes]
Field |
Description |
Notes |
This is
where you can leave notifications for the restaurant or general
comments about a guest. Should the guest decided to reserve a
room again in the hotel, the information saved here can be accessed
by all of the colleagues who will later access this profile. Eventual
guest preferences can be as follows:
daily newspaper, shuttle service on
day of departure, babysitter, etc. |
Room facilities |
You can
now enter room amenities preferred by the guest which will be
taken into account when making a reservation. -
All wishes come true! The
respective room features are generated in the system data where
they can be individually allocated for each room.
|
Preferred
room |
If applicable,
enter the guest's preferred room here (popular function with regular
guests). |
Marketing
[Guest profile > Extended > Marketing]
Allot certain VIP or marketing codes to a guest:
Field |
Description |
VIP
codes
|
VIP codes can be useful to assign
guests to certain customer groups with specific privileges. VIP
codes can also be used for evaluations and for creating mail merges.
Create these codes in your system data under “Guest profile,”
in the tab “Codes.” |
Marketing
codes |
With
the aid of marketing codes, you can for example enter what the
origin of the guest address is (advertisement, brochure enquiry,
golfer, etc.). Marketing codes can be used as filters "guest
profile > data export / mailings" (i.e., "Create
a list of all of the guests who have a marketing code x"). |
Documents
Guest profile > Extended > Documents]
Serves
to record travel document information (e. g. passport, visas, etc.).
Click on [Add] to add a new document
for the guest.
Field |
Description |
Type |
This is
where you select the document type.
The
document type you have available in your system is determined
in protel Air's system data (Guest profile > Codes > Document
types). |
Number |
Enter the
number of the document (e.g., passport number, etc.) |
Expiry date |
Enter the
expiry date (good thru). The date is noted on the respective document. |
Date of issue |
Enter the
date of issue here (when was the document created?). The date
is noted on the respective document. |
Country |
Select
the country where the document was issued. Enter the first letters
of a country into the list and protel Air will skip to the respective
country. In order to be able to access countries which are used
less in the country selection, click on the “All” option in the
dialog box. |
Place
of issue |
This is
where the authorities' place of issue can be entered. |
[Guest profile > Extended > Membership cards]
Here
you can save a membership card for your guest, for example if a guest
is a member of a special hotel loyalty program.
Click on [Add] to add a new
card.
In the Name field, select the
card which you would like to allot.
Fill in the remaining fields and confirm
with [OK]
Related
Topics:
Compiling
Membership Cards: System data > Profiles > Codes >Membership
Cards
Configuring
Membership Cards: System data > User defined fields > Membership
cards
[Guest profile > Text history]
The text history in the guest profile serves to manage the correspondence
being done via this guest profile. All reservation texts, written correspondence,
mail merges, etc., are listed according to date created, name of author,
formula names, and storage location.
Double-click the application to open it.
New document
Guest profile > “Text History” tab >
[New Document]] button.
Click the [New document] button
to create a personalized guest correspondence (e.g., invitations, birthday
cards, side letters or brochures, etc.). Contrary to reservation texts,
invoices, and registration forms, guest letters do not have direct reference
to a reservation.
The Print Tasks window opens:
Field |
Description |
Language |
The guest’s
language is preselected by default. Should the written correspondence
you are trying to create not be available in the respective language,
you can select a different language here (e.g., German). |
Template |
Select
the desired template for the written correspondence.
|
Type
|
Determine the file format and
the type of transmission for your written correspondence:
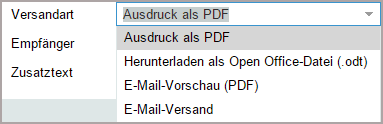
Print
as PDF: Creates a guest letter in PDF format.
Save
as an Open Office file (.odt): Creates the guest letter
in odt format.
Email
preview (PDF):Sends an e-mail with the guest letter (PDF)
attached to the e-mail address of the selected recipient (see
below). The email address has to be saved to the contact data
of the respective guest profile!
Send
as email: Creates a PDF as a preview. Select this option
when wanting to check the contents of the PDF, before sending
it as an email attachment (see “email transmission”).
|
Recipient
|
Determine the recipient of your
written correspondence:
a) This guest - transmits the guest
letter to the currently selected guest profile.
b) Search guest profile - any other
guest profile can be selected to be the recipient.
c) Email address: When necessary,
an email address can be manually entered for the email transmission |
Additional
text |
Select the additional free texts
check box , if a more personal text is to be
additionally printed with the written correspondence. The desired
text can than be written into the additional free text field. , if a more personal text is to be
additionally printed with the written correspondence. The desired
text can than be written into the additional free text field.
|
User defined fields tab
User Defined Fields (UDFs) are
very helpful for saving additional contents and can be individually created
and designed exclusively by each hotel. Example:
Save additional information for a guest, e.g., information about allergies
or a pet.
User
defined fields are only available when they have been created
in system data (go to system data > User
defined fields). If
there have not been any user defined fields created for your system,
this window remains empty. |
For example, should a picklist have been defined
for a user defined field, you can allocate one or more element from this
list to the guest.
Exporting user defined fields in text documents
User defined fields can also be used in and exported to text documents.
Example: Assuming, you have generated the "Pet info" user
defined field for the guest profile. The respective replacement code would
be: ${guest.udf.Pet-info}
You can create a report which shows you all of the revenues generated
by the respective guest. After the total revenues, a summary of the monthly
revenues per product group is displayed.