Content
Transmitting messages
The transmission rules in Messenger are required to send either emails or text messages to the guest. The transmission rules in protel Messenger enable you to organize the transmission of automated confirmation mails or surveys.
|
|
Caution! If you belong to a hotel group, please always check to see which hotel has been selected in the upper right corner of the Cloud Center when adding the transmission rules. |
 |
Note We have collected some examples for transmission rules in a separate PDF document: Messenger transmission rules. |
Direct message via Short Message Service
In order to be able to inform a guest via text message, i.e., informing him that his room has been cleaned, a corresponding transmission rule for text messages has to be created. Supposing you would like to have a transmission rule for direct messages to be sent from the front office. Here’s what you need to do:
Creating a transmission rule
Click on “Transmission rules” located in the left area of the window. This menu option enables you to create transmission rules for text message and emails. Doing so enables you, for example, to transmit direct messages to the guest from the front office or transmit automated post-stay surveys after a guest has checked out.

protel Cloud Center > Messenger > Messenger > Transmission rules > Add
In order to create a new transmission rule, click [Add]. A new window opens:
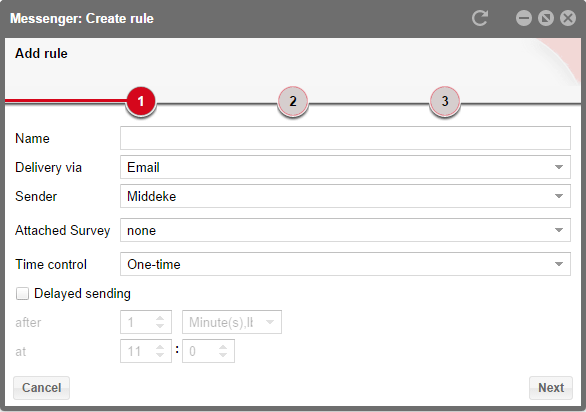
protel Cloud Center > Messenger > Messenger > Transmission rules > Add rule
In this window, enter a name for a transmission rule, i.e, “Instant Message”. This name will only be shown internally in the Cloud Center; it does not appear by the guest.
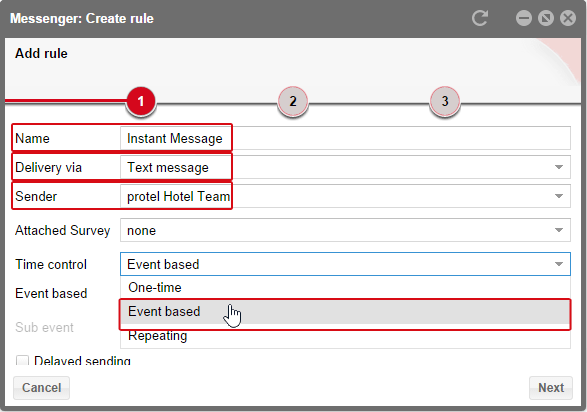
protel Cloud Center > Messenger > Messenger > Transmission rules > Add rule > Time control
Select “Text Message” and search for the desired sender, should you have saved numerous senders.
For example, enter the direct message “Event based” in the Time control field.
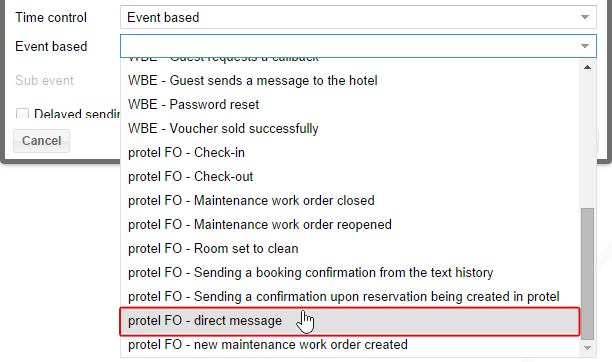
protel Cloud Center > Messenger > Messenger > Transmission rules > Add rule > Event based
Select the event based “protel FO - direct message” and click the [Next] button.
 |
Note It is possible to set a time delay for the messages. This option, however, should not be used for the direct message. |
Setting up a filter
In the second step, you can add additional filters in order to lay down a specific selection of senders. Since the recipient of the direct message is selected via protel FO, it is not possible to add more filters.
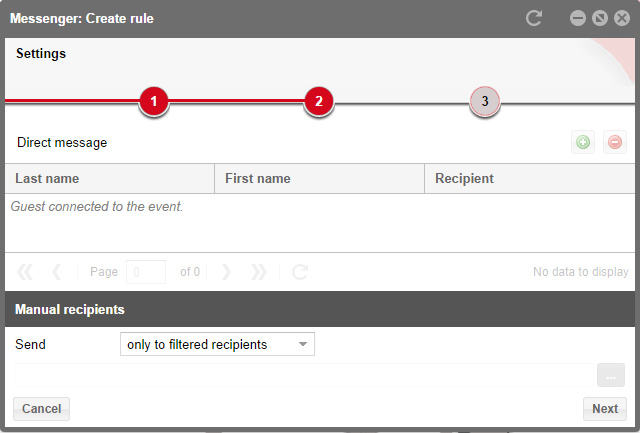
protel Cloud Center > Messenger > Messenger > Transmission rules > Add rule > Filter
You can, however, also manually add additional recipients in addition to the filtered ones.
 |
Note When entering a number, make sure that the “0049” format is used for country codes. Please do NOT enter a plus sign to replace the zeros. |
Add message
The last step enables you to send the guest a message.
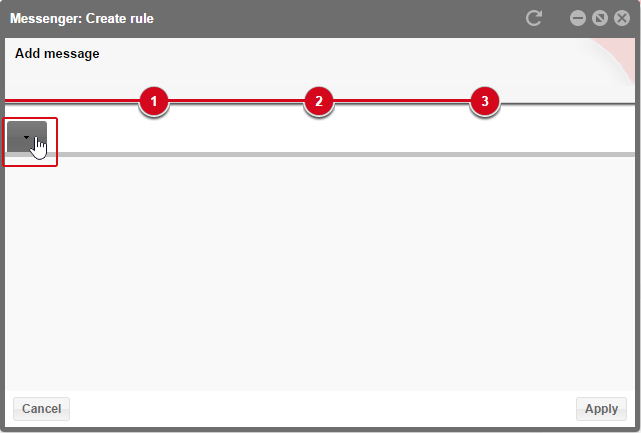
protel Cloud Center > Messenger > Messenger > Transmission rules > Add rule > Add Message
Click on the button with the arrow and select a language. Afterwards you can enter a message.
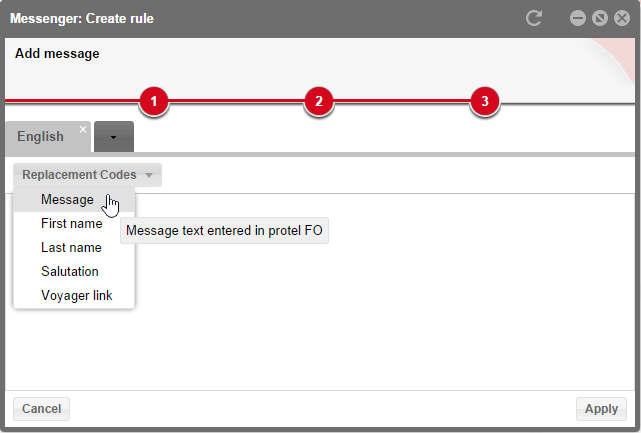
protel Cloud Center > Messenger > Messenger > Transmission rules > Add rule > Add Message
Insert the "Message" replacement code as a text here. This will send the message which had been entered in protel FO. Please do not add any further texts here; the only text should be {{Message}}.
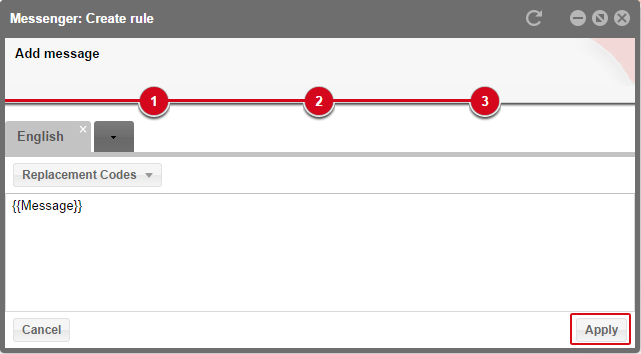
Therefore, click the [Apply] button.
The new transmission rule will then be added the transmission rules overview.
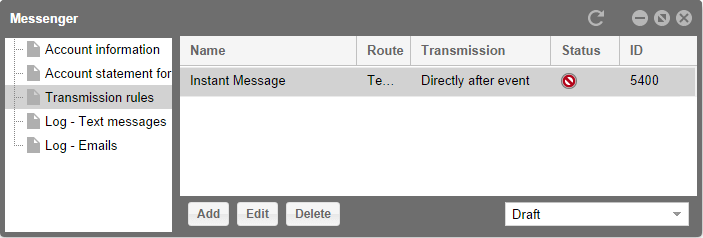
protel Cloud Center > Messenger > Messenger > Transmission rules
After creating it, the transmission rule is in edit mode. To use the rule, you must activate it. In doing so, a green check mark will appear in the transmission rules overview.
You will find a list of the sent text messages in the log for text messages. To gain access to the log, open the log for text messages in the navigation to the left side of the window.
One time transmission
A transmission rule for a single application can be applied to mailing actions for example, an Easter mailing or a special event.
Open the “Transmission rules” menu item in Messenger...

... and click on [Add] down in the bar.
Creating a transmission rule
A new window opens:

protel Cloud Center > Messenger > Messenger > Transmission rules > Add rule
In the window, enter a name for the transmission rule, i.e., Easter mailing. This name will only be shown internally in the Cloud Center; it does not appear by the guest.
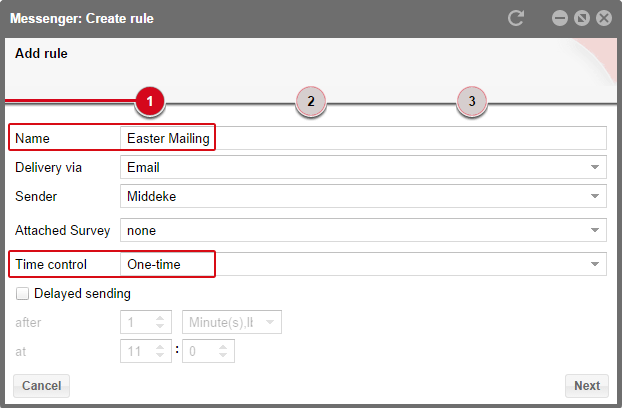
protel Cloud Center > Messenger > Messenger > Transmission rules > Add rule
Select “One-time” from time control. You also have the possibility of sending the mail with a delayed sending. This, however, is not recommended for one-time mailings. If you do not enter anything here, you will send the mail by the click of the mouse.
Therefore, simply click the [Next] button.
Setting up a filter
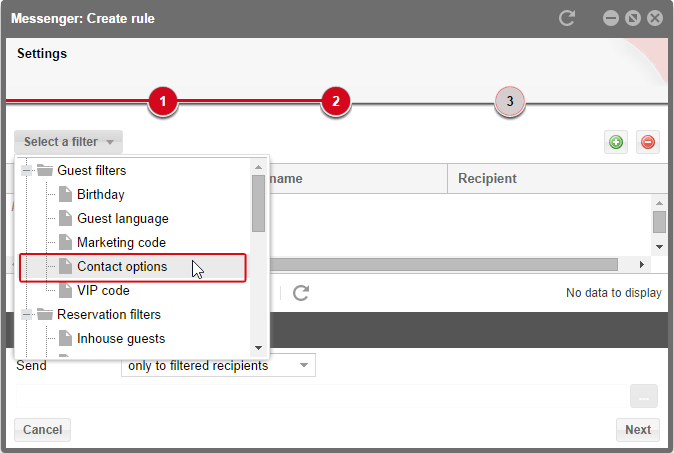
protel Cloud Center > Messenger > Messenger > Transmission rules > Add rule > Filter
The second step helps you determine the filters. You always have to apply a filter, even if you want to inform all of your guests. Select the “Contact options” from the guest filters assuming you want to send the Easter mailing to as many guests as possible.
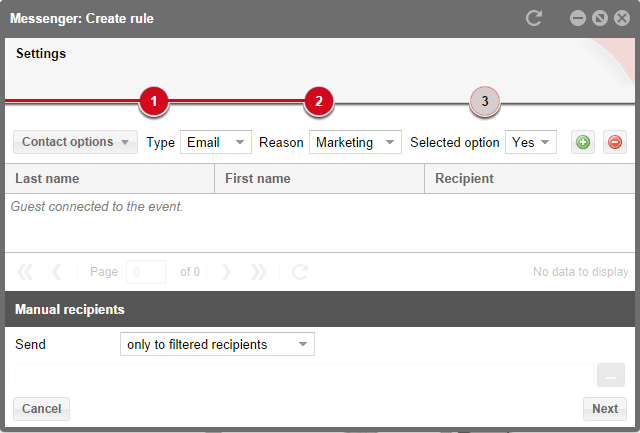
protel Cloud Center > Messenger > Messenger > Transmission rules > Add rule > Filter
As a result, additional selection possibilities will appear. Enter “Email” as a type and “Marketing” as a reason. Enter “Yes” to the selected option field. This enables you to filter the guests who have selected your email address and have agreed to receiving your marketing mailings.
You can also negate the filter. Select the "Not" checkbox, if you want to correspond with all of the guests who do not apply to the selected filter.
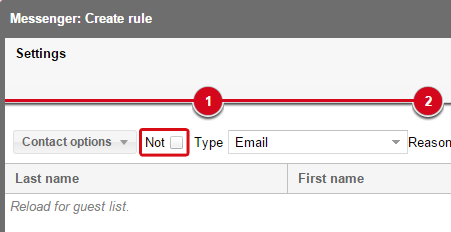
protel Cloud Center > Messenger > Messenger > Transmission rules > Add rule > Filter
The possibility of negating a filter does not apply to all of the filters, but rather only if there is an effective use for it (for the optional date, for example, it is not effective to write to those whose option does not expire in X days).
The plus sign enables you to add additional filters in order to limit your guest selection. If you want to remove a filter, simply do so by clicking the little red minus sign.
Sending a copy to manual recipients
In addition to the filtered recipients, you can also manually insert recipients as CC in your mails. Select the corresponding option...

protel Cloud Center > Messenger > Messenger > Transmission rules > Add rule > Manual recipients
...an additional line will then appear.

protel Cloud Center > Messenger > Messenger > Transmission rules > Add rule > Manual recipients > [...]
Click the [...] button to open a new window.
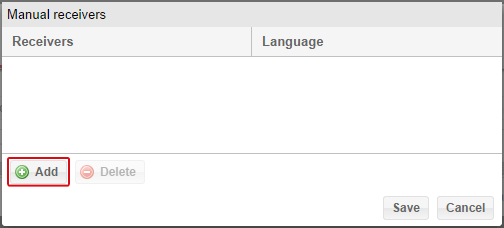
protel Cloud Center > Messenger > Messenger > Transmission rules > Add rule > Manual recipients > Add
Click on [Add].
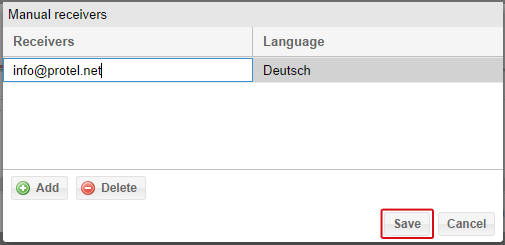
protel Cloud Center > Messenger > Messenger > Transmission rules > Add rule > Manual recipients > Save
In the line which now appears, enter the email address of the manual recipient and then click on [Save].
A copy of the guest email will then be sent to this email address. If you don’t want the guest to see that you received this email as a copy, select the “Manual recipients in BCC. You will then receive a blind copy.
 |
Attention! If you send a mailing to a large number of filtered recipients and, for example, your own e-mail address as a manual recipient, you will only receive the first 100 messages as a copy - this is a measure to ensure that your e-mail server is not overloaded. You can also check the correct sending to all filtered recipients in the e-mail log. |
Message only to manual recipients
You can send a message only to manual recipients as well. There is one thing to note for this option. Because the message will not be send to filtered guests, it does not matter which contact data of the guest is saved in protel. When selecting “Send only to manual recipients“, the selected filter will be used for ALL the hotel guests – not only for those who have submitted an email address or a mobile number.
 |
Note The current number of the sent messages can therefore be much higher than the number of the guests in the transmission rule’s preview. |
Contrary to the "Manual Recipients in CC" option, you can also select the language in which you would like to receive mails that are only sent to manual recipients. When wanting to test a message which you have created using various languages, you can set the different languages for the various recipients.
 |
Example When creating a transmission rule with a filter in order to contact each guest returning for the third time via e-mail, the preview will show you all of the guests arriving for the third time AND who have provided an e-mail address. Supposing you do not want to send an email to the guest returning for the third time, but would rather receive one yourself. Then select in the second step “only to manual recipients” for sending. There you can then enter your e-mail address. The filter only searches for guests arriving for a third time; however it is irrelevant if the guest has provided an email address since you will be receiving the email instead of the guest. Previously the guests had to fulfill two criteria. Since one criterion is now omitted, a considerably larger amount of guests will now be able to fulfill the filter conditions. You will not notice this, however, if you do not update the preview in Messenger. Therefore, next to the selection menu in which you set to “only to manual recipients” there is an additional notice informing you about this difference. |
Add message
In the main dialog, click [Next] in order to work your way to the third step of the transmission rule.
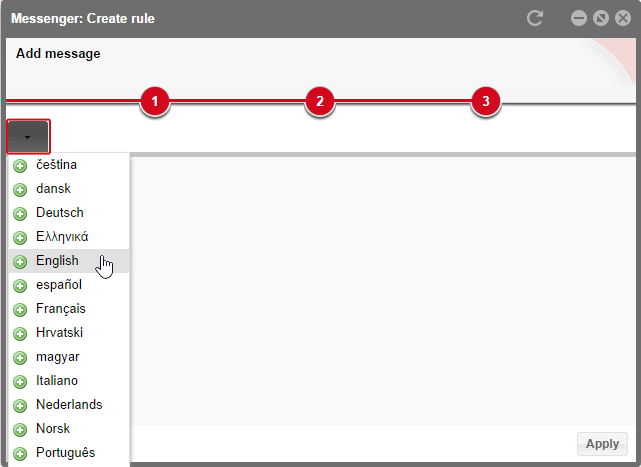
protel Cloud Center > Messenger > Messenger > Transmission rules > Add rule > Add Message
When you get there, you will first need to select the language of the message you will be sending. An edit box will appear after you have added a language.
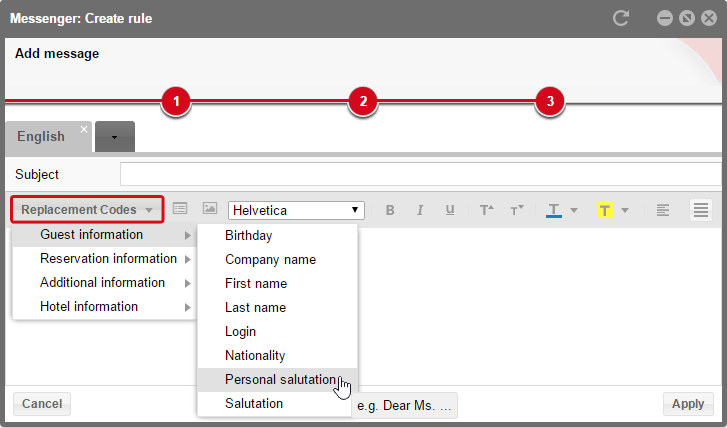
protel Cloud Center > Messenger > Messenger > Transmission rules > Add rule > Add Message
Enter the subject and the message. You can use replacement codes both in the message editor as well as the subject line. The replacement codes available to you, depending on the filter you have selected, can be found in the “Replacement Codes” selection menu. There you will find all of the replacement codes thematically grouped and explained by examples or explanations; these explanations become visible when moving the cursor over the replacement code. This will let you know exactly what information is contained in the replacement code and which text can be connected.
 |
Note You can also format the replacement codes. Please make sure to mark the replacement code completely before formatting it (including the brackets). If the replacement code is formatted only in parts, it will not work and no data is replaced in the message. Correct: {{salutation}} | in HTML: <strong>{{Salutation}}</strong> Wrong: {{salutation}} | in HTML: <strong>{{Salutatio</strong>n}} |
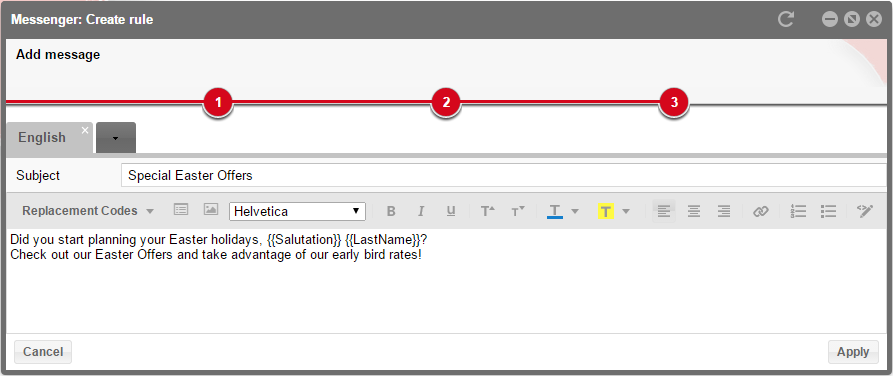
protel Cloud Center > Messenger > Messenger > Transmission rules > Message
The editor then offers you many possibilities for designing your messages. Here is a short legend for the overview:
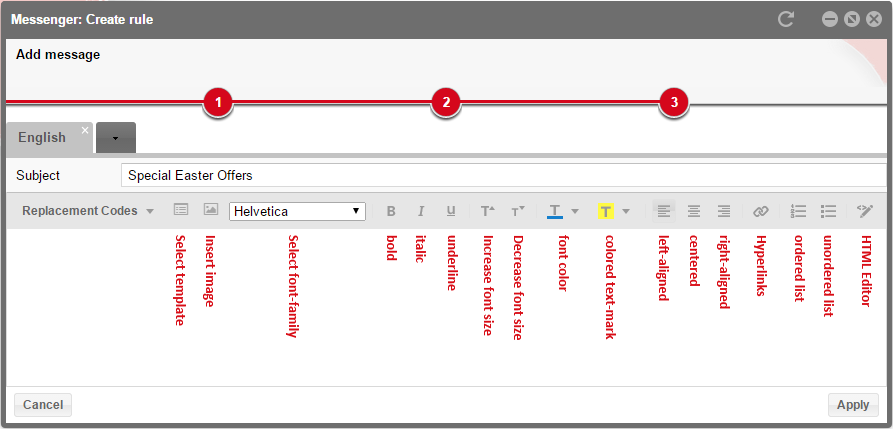
protel Cloud Center > Messenger > Messenger > Transmission rules > Message
When moving the cursor over the respective symbols, you will be shown explanatory mouse-over texts.
For example, select a template suitable for the respective reason for the message. Click on the ![]() symbol and a selection of templates opens.
symbol and a selection of templates opens.
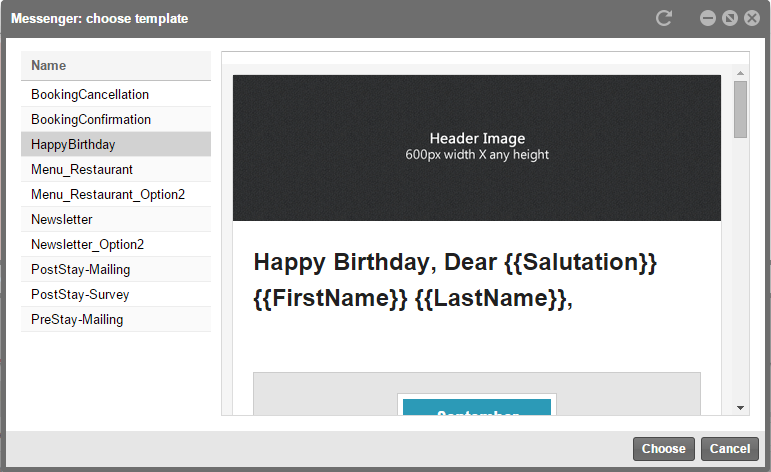
protel Cloud Center > Messenger > Messenger > Transmission rules > Message > Templates
Look for the appropriate template from the list and click on [Select] to insert it into the message. In doing so, please note that the template will first need to be selected; the template would replace texts which have already been written.
The templates offer the advantage of having finished HTML mails at your disposal for various occasions for which you will only need to replace images and texts. All HTML formats are finished and possible replacement codes have already been inserted.
If you would rather do all of the formatting yourself, simply use the editor's functions described above.
Inserting images
You can also insert images into your message. To do so, click the images symbol ![]() located in the tools list. It will also allow you to replace already existing images,
e.g., the wild card images of the templates.
located in the tools list. It will also allow you to replace already existing images,
e.g., the wild card images of the templates.
A new window opens:
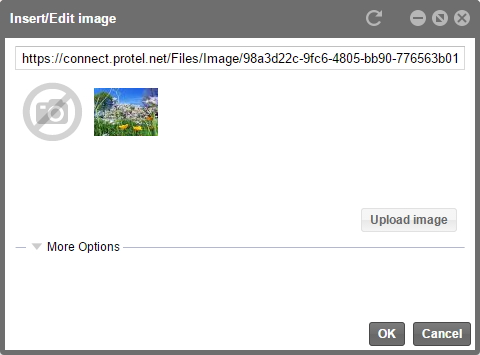
protel Cloud Center > Messenger > Messenger > Transmission rules > Message > Insert/edit image
Select the [Upload image] button and select an image which you would like to upload from your PC. It will then be displayed as a preview. You can then insert the image by clicking on [OK] or use ("More Options") to further format the image.
First click on the little arrow next to "More Options". You will then see both of the sub-sections "Size and Details" and "Style". Next click on the little arrow in front of "Size and Details".
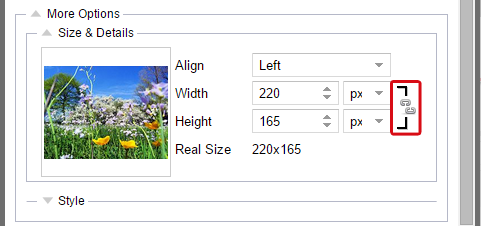
protel Cloud Center > Messenger > Messenger >Transmission rules > Message > Insert/edit image
There you will be able to change the alignment as well as the dimensions of the image. By clicking the chain links located at the right edge, you can determine the width and height are to be changed proportionally or independently of one another. The chain links at the top of the screenshot are disconnected (= disproportional). If the width and height are not dependent on one another, the image can appear warped.
The original size of the image will also be displayed to you; if you no longer remember the original measurements, simply look at the numbers below the selection fields ("Real Size").
In the area of "Style", you will be able to make more settings.
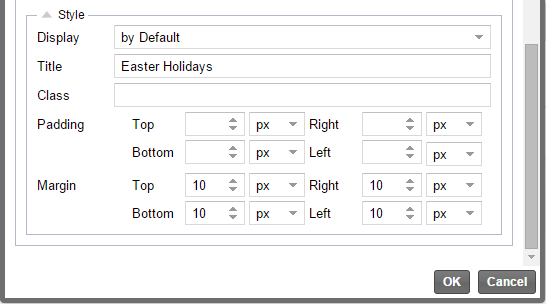
protel Cloud Center > Messenger > Messenger >Transmission rules > Message > Insert/edit image
Select an alignment for the image and enter the title of your image. The title will then be displayed when moving the mouse cursor across the image.
You will only need the "Css-Class" field if you have previously designed an HTML mail with exclusive Css-Classes. Otherwise you can simply leave this field empty.
Afterwards, you can still enter the distances for the diagram. Once you’ve completed all of the formatting, click on [OK].
Your message will again be shown with the inserted image:
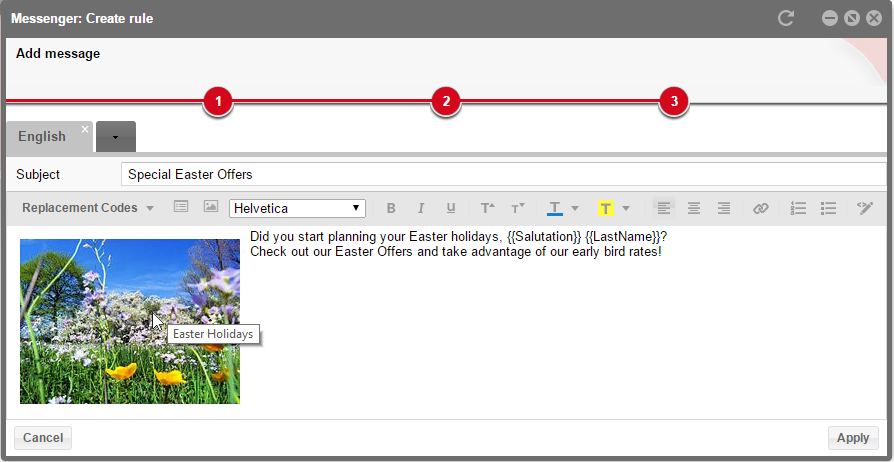
protel Cloud Center > Messenger > Messenger > Transmission rules > Add rule > Message
In the screenshot above you can see the inserted title as a mouse-over text and the distance of 10 pixels to all of the image's sides. The distance enables you to avoid that the text and the frames touch the image in an unsightly manner.
You can still use the other icons in the tool bar to format the text (font size, colour, etc.).
Once you have completely finished entering and designing your guest’s message, click [Apply].
The transmission rule then appears in the Messenger overview.

protel Cloud Center > Messenger > Messenger > Transmission rules
You can now click on [Apply rule]. This button enables you to send the mailing directly to the guests you had previously selected. You will find a list of the sent emails in the in log of emails. To gain access to the log, open the log for emails in the navigation to the left side of the window.
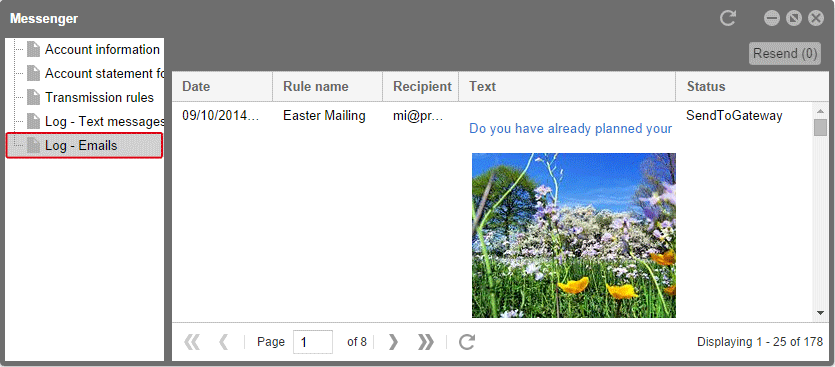
 |
Note How to edit the columns and to appropriately display the window contents is explained here. |
When designing the email, it is recommended to pay attention to the first line of the message. Many email clients display the first line of the message directly in the overview. A targeted opening will arouse the interest of your guests. The example mail would look something like this in the overview:

- Additional tips and hints for creating HTML emails can be found in the separate help chapter Practical tips: HTML-emails
Repeating email transmissions
A repeating transmission rule is suitable for standard emails such as a post-stay guest survey. In order to send repeating emails to your guests, you will need to compile a new transmission rule.
Open the “Transmission rules” menu item in Messenger...

... and click on [Add] down in the bar.
Creating a transmission rule
protel Cloud Center > Messenger > Messenger > Transmission rules > Add rule > Add Message
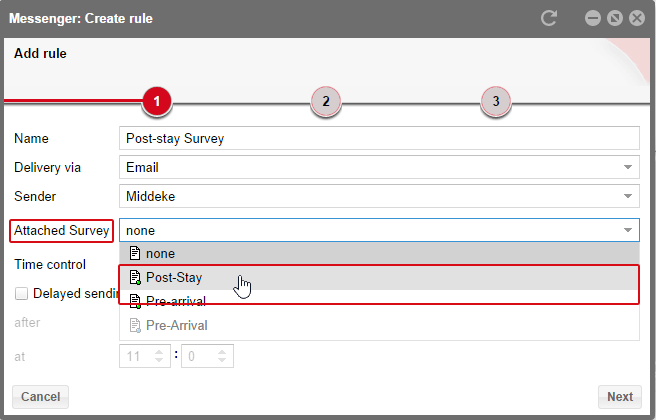
Enter a name for the transmission rule, i.e, “Post-Stay Survey”. This name will only be shown internally in the Cloud Center; it does not appear by the guest.
Enter “email” as a route.
In this example, your guest is to receive a post-stay survey, for which you will have to also search for the desired survey under “Attached Survey”. All of the surveys which have the “active” status you can select from the list. Surveys which you have created, but have not yet “activated” will be grayed out.
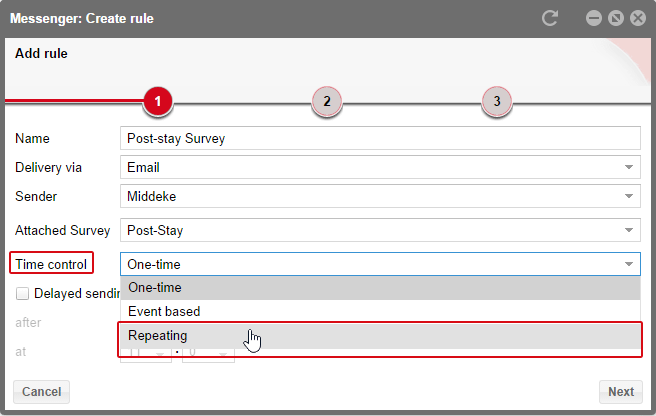
protel Cloud Center > Messenger > Messenger > Transmission rules > Add rule > Time control
The next field enables you to decide if you would once again like to send this survey to your guests. Choose the entry "Repeating".
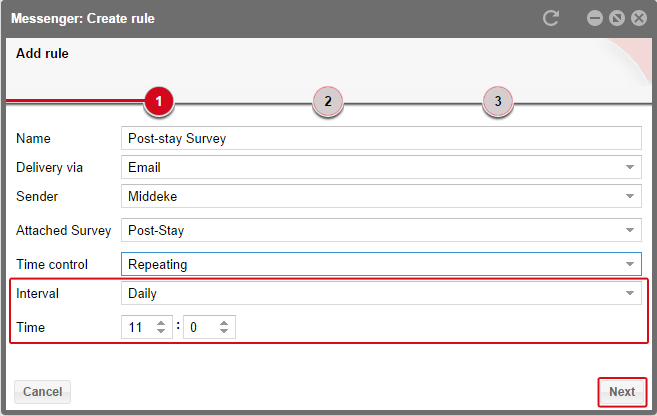
protel Cloud Center > Messenger > Messenger > Transmission rules > Add rule > Interval
For repeating transmission, also select the intervals in which the emails are to be sent. If you have selected the daily interval and 11 o’clock as the time, Messenger will check everyday to see which guests are to receive the survey and then sends the survey to these guests. Instead of sending messages on a “daily” basis, you can select a specific day when the message is to sent on a regular basis. The next step will help you determine the filter for the selection of the guests.
To do so, simply click the [Next] button.
Setting up a filter
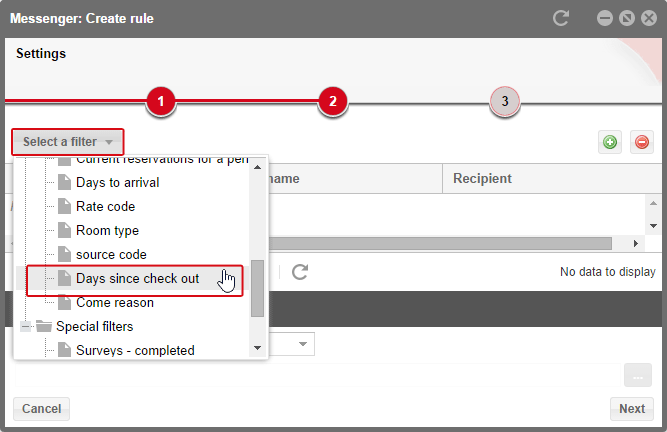
protel Cloud Center > Messenger > Messenger > Transmission rules > Add rule > Filter
The next step will help you decide which guests are to receive the survey. Use the “Select a filter” to do so. To use a post-stay survey, select the “Days since check out” filter from the “Reservation filters” group.
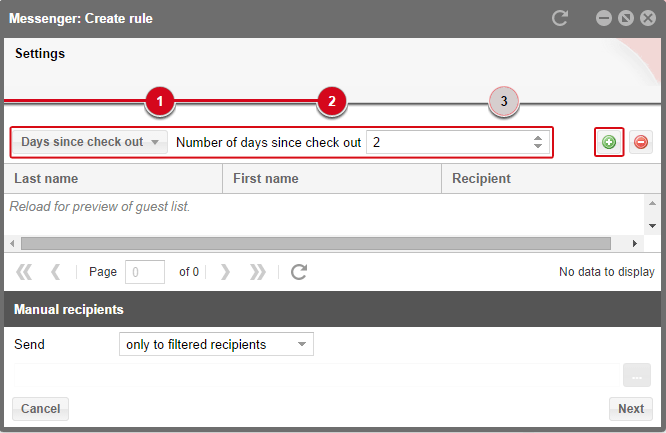
protel Cloud Center > Messenger > Messenger > Transmission rules > Add rule > Filter
Then set the number of days since check out to determine when the guest is to receive the survey.
The plus sign will enable you to expand on additional filters when wanting to limit guest selection. It is recommended to add the "Surveys - Incorporate mailing interval" filter for the example shown above. By using this filter, you are making sure that your regular guests will only receive the survey within certain spans of time. protel Survey is used to determine how often you would like to survey a guest after staying at your hotel.
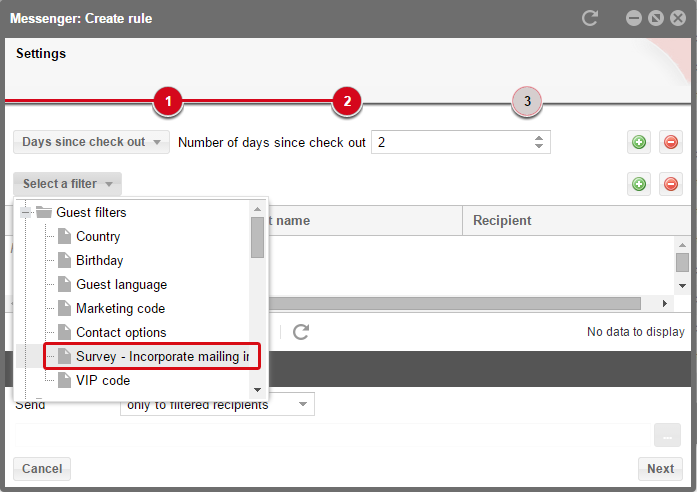
protel Cloud Center > Messenger > Messenger > Transmission rules > Add rule > Filter
Click on the plus symbol and select the "Survey - Incorporate mailing interval" filter.
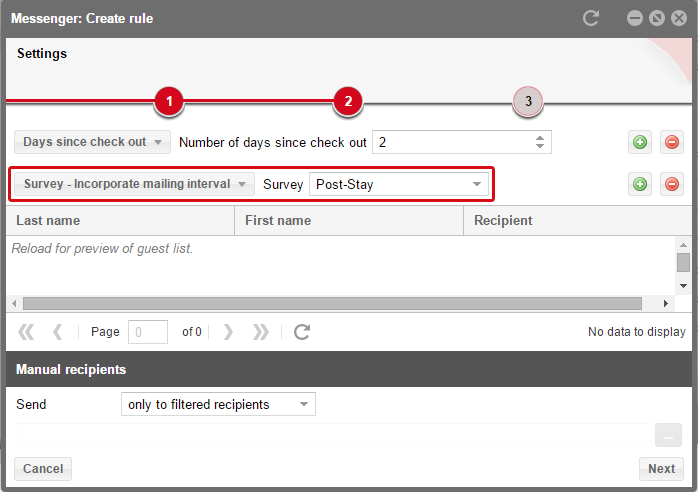
protel Cloud Center > Messenger > Messenger > Transmission rules > Add rule > Filter
Afterwards, you determine which survey the filter corresponds to. Select the same survey which you have selected in the first step.
Should a guest, for example stay at your hotel every two weeks on a regular basis he will still receive the survey only on a quarterly basis if you have made the following setting in Survey:
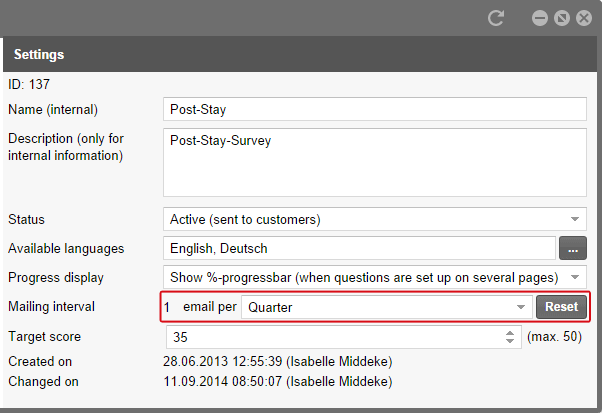
protel Cloud Center > Messenger > Survey > Post-Stay-Survey > Settings
In the second step of adding a transmission rule you will find once again the option to manually add recipients as CC or BCC.

That is described in detail when sending one-time mailings. Click [Next] when you have finished entering everything.
Add message
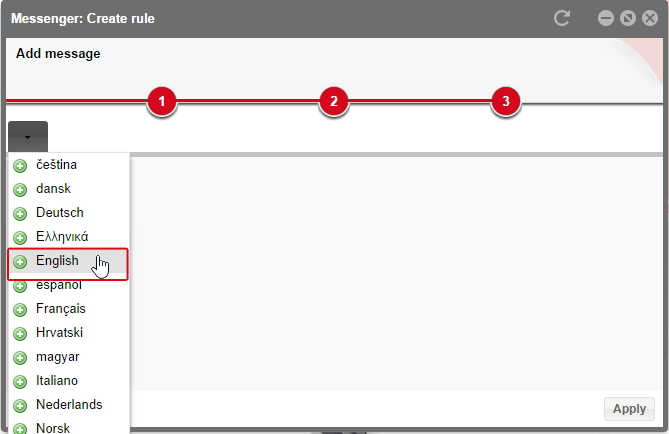
protel Cloud Center > Messenger > Messenger > Transmission rules > Add rule > Add Message > Language
In the third step, open the language selection by clicking the arrow button at the top left corner of the message window. When you select a language an edit field will be displayed.
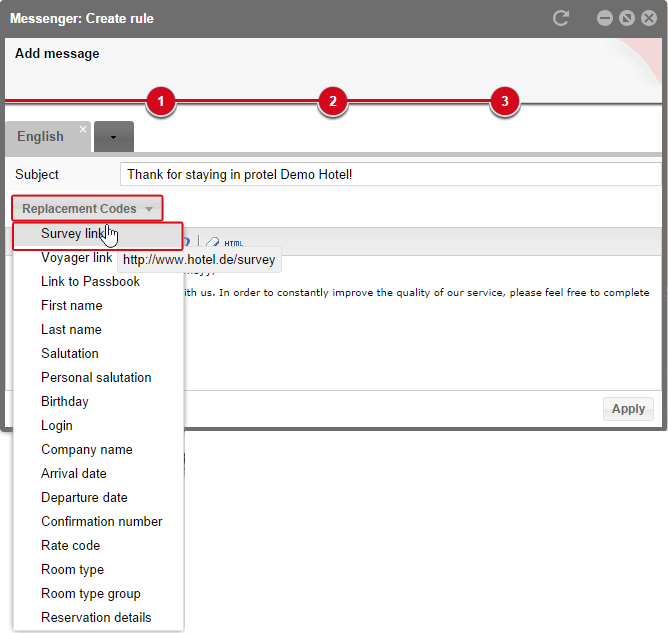
protel Cloud Center > Messenger > Messenger > Transmission rules > Add rule > Add Message > Replacement Codes
There you should enter the subject and the text. You can use replacement codes in the subject field as well as in the text field.
For this mailing, you should insert a survey link so that the guest is able to call up the survey.
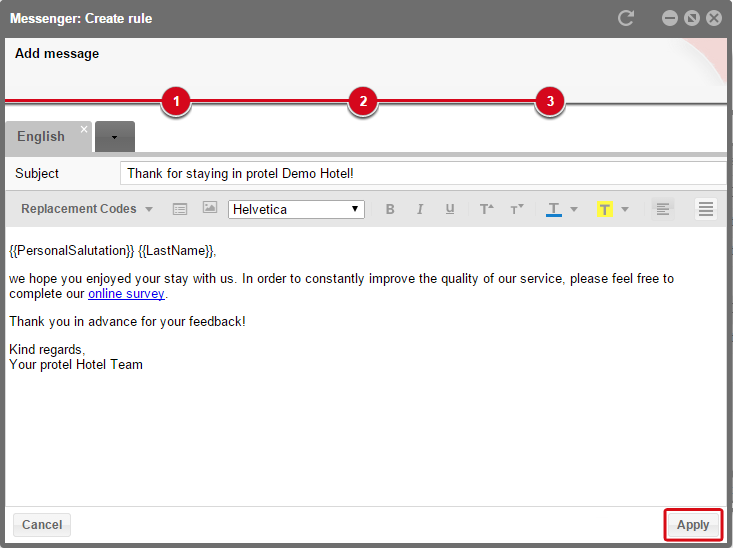
protel Cloud Center > Messenger > Messenger > Transmission rules > Add rule > Add Message
Via the [HTML] button you will find the message’s source text in which you can execute additional formatting. This is described in more detail when creating a transmission rule for one-time mailings.
Once you have entered the message for your guest, click the [Apply] button.
 |
Note Please note that you can only add languages when the transmission rule is inactive. Therefore you should add the languages to be used with the messages before activating the transmission rule. You can change the status of a transmission message in the Messenger window. |
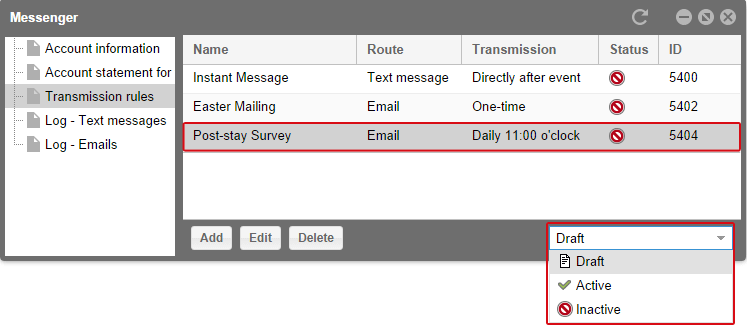
protel Cloud Center > Messenger > Messenger > Transmission rules > Status
The edit mode enables you to alter the rules and for example, add more languages. Once you have activated the rule, these options will no longer be possible. In case a transmission rule will not be needed at a later time, please set the status to inactive.
 |
Note How to edit the columns and to appropriately display the window contents is explained here. |
Event based email transmissions
An automated email transmission is necessary after certain events, such as a reservation. An event-based transmission rule is set up for each guest who successfully completes a reservation so that they receive a confirmation of reservation.
Open the “Transmission rules” menu item in Messenger...

... and click on [Add] down in the bar.
Creating a transmission rule
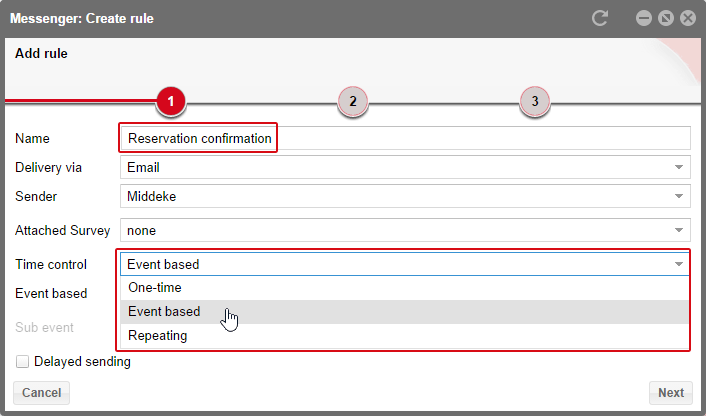
protel Cloud Center > Messenger > Messenger > Transmission rules > Add rule > Time control
Enter a name for the transmission rule and select the delivery path and sender. This name will only be shown internally in the Cloud Center; it does not appear for the guest.
A survey is not to be sent, therefore keep the “attached survey” set to none.
In the “Time Control” select “Event based”.
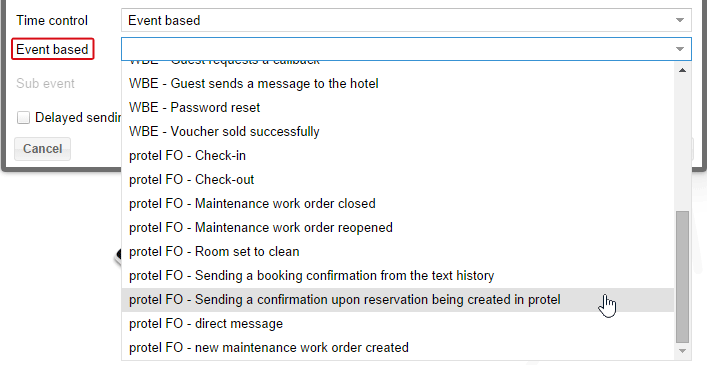
protel Cloud Center > Messenger > Messenger > Transmission rules > Add rule > Event based
For the conformation of reservation, select reservation as an event.
Some events enable you to define sub events. You will not receive a sub event when entering a reservation, in this case click the [Next] button.
 |
Note When you select the event Sending a confirmation upon reservation being created in protel a PDF will be created based on a protel form. This PDF is sent to the guest in attachment of the messenger mail. Please make sure to use only Word documents with the file extension .doc and which are not bigger than 400 KB. Otherwise a time-out could occur while sending the message. |
Setting up a filter
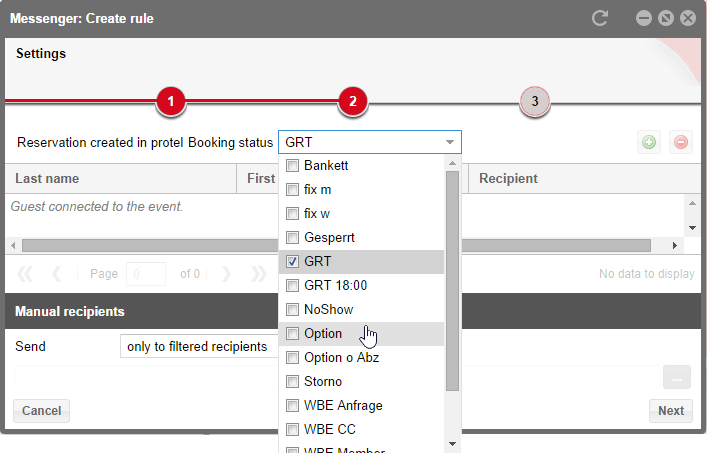
protel Cloud Center > Messenger > Messenger > Transmission rules > Add rule > Filter
The event “Sending a confirmation upon reservation being created in protel” is adopted as a filter. Additionally include the reservation status for which you would like to send the confirmation of reservation. The plus sign enables you to add additional filters. Please note, however, that the filter critera are to be additionally utilized. You will then only see the guests who fulfill ALL of your filter criteria. When using too many limitations, you run the risk of not reaching all of the guests you would like to reach.
How to set recipients in CC is explained when sending one-time mailings. Click [Next] when you have finished configuring filters and recipients.
Add message
In the third step, you have to select a language...
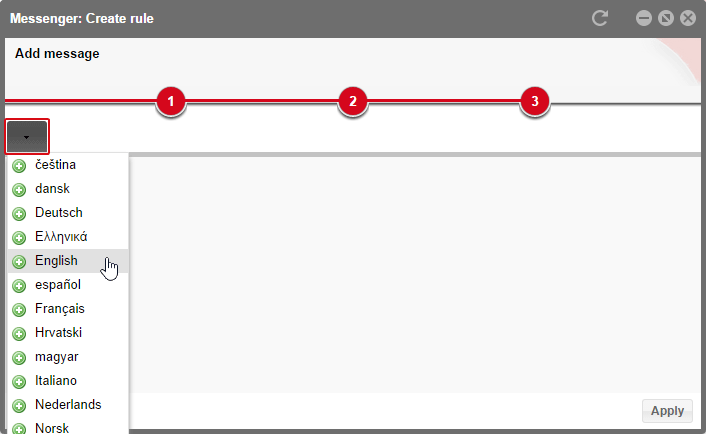
protel Cloud Center > Messenger > Messenger > Transmission rules > Add rule > Add Message
... and then you add the message.
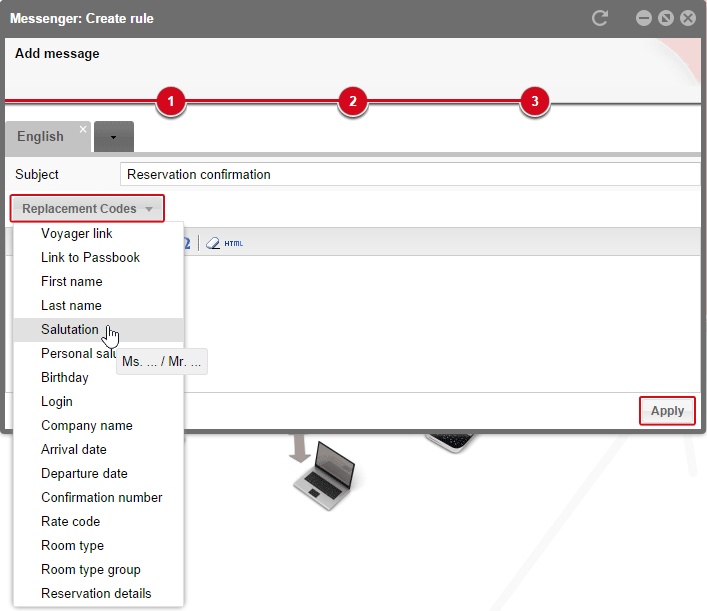
protel Cloud Center > Messenger > Messenger > Transmission rules > Add rule > Add Message
Various replacement codes, for example salutation or the confirmation number, are at your disposal.
Above the [HTML] button you will find the message’s source text in which you can execute additional formatting. This is described in more detail when creating a transmission rule for one-time mailings.
 |
Note Tell your guests already in the reservation confirmation that they are able to cancel their reservation on their own via the WBE 4.0. We recommend to insert the "Reservation details" replacement code into the reservation confirmation. Using this link, guests will be able to cancel their reservation directly in protel WBE. It is important that the guests directly cancel their bookings by means of WBE 4.0, so that protel will be able to reimburse the charges to your hotel! |
Once you have entered the message to your guest, click the [Apply] button.
 |
Note Please note that you can only add languages when the transmission rule is inactive. Therefore you should only then add the languages to be used with the messages before activating the transmission rule. You can change the status of a transmission rule in the Messenger window. |
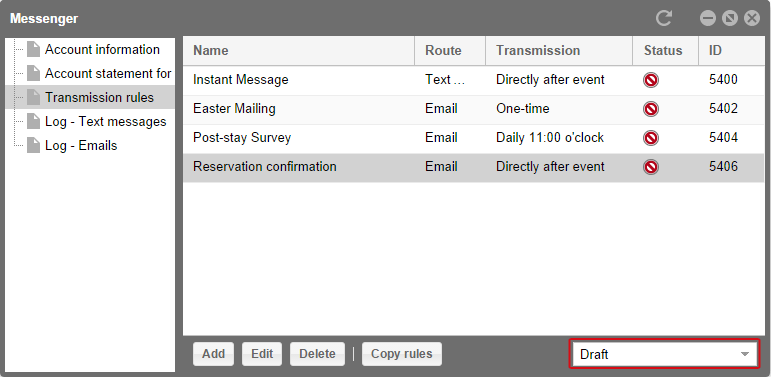
protel Cloud Center > Messenger > Messenger > Transmission rules
Click one of the transmission rules and select the desired status from the selection menu located in the bar at the lower right hand corner of the window. Transmission rules which are in edit mode, can still be edited after they have been created.
To do so, click [Edit] or double-click the transmission rule. In doing so, the edit dialog box opens to enable you to edit the transmission rule. After you have finished making the desired changes, simply close the window. All of the changes will be saved automatically.
 |
Note How to edit the columns and to appropriately display the window contents is explained here. |
Copy transmission rules
If your hotel is part of a MPE, you can now copy transmission rules from one hotel to the other.
To do so, select one or more transmission rules (in order to select more than one transmission rule, keep the CTRL key depressed while clicking).

protel Cloud Center > Messenger > Transmission rules
Then, click on [Copy rules] whereby a new window opens in which you can select to which of your MPE hotels the rule(s) is/are to be copied.
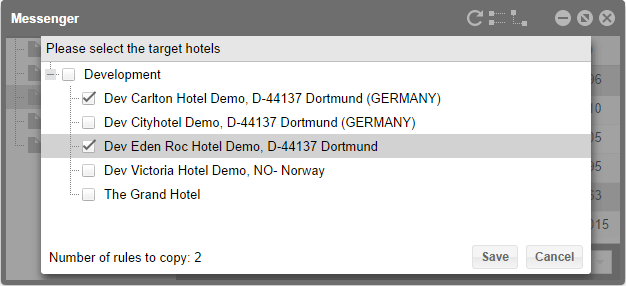
protel Cloud Center > Messenger > Transmission rules
This window will display the number of transmission rules you have selected for the copy procedure. Select the checkbox next to the desired hotels; when finished, click [Save].
This simplifies the setup of protel Messenger for MPE hotels. After you have copied transmission rules it is recommended to check the message again. Maybe some information has to be adjusted before you activate the copied transmission rule.
Testing transmission rules
If you would like to test a newly created transmission rule, you can send it to manual recipients. Therefore, enter your own email address as a manual recipient. Please select an additional email address which does not have the same domain as your sender address in protel Messenger (the domain is the second part of the email address which comes after the @ symbol: xyz@domain.com); this can be another email account at Google Mail, Hotmail/Outlook, AOL.com, etc.). Some mail servers have settings which automatically filter out emails as spam if emails, coming from an external server, use the domain of the hotel's mail server. Because protel Messenger has been configured to use your email address as the sender address, it is possible that a test mail will not reach you even though protel Messenger has sent it properly. Therefore, it is more useful to send the test mails at least to two or more various domains.
Please use the help in the chapter about avoiding spam classification, should your test mail arrival at the email address with the other domain, but not arrive at the email address with your own domain. The tips described there will help you with the configuration of your mail server. Afterwards, the mails you send to your own domain should be marked as safe as well.
The test message which you sent to the email address of another mail provider enables you to test whether or not the message will be sent to users who normally use one of the larger providers, but certainly not your hotel's domain. The measures described in the chapter on avoiding spam classification not only help your mail server accept mails from protel Messenger, but also increases the probability that the mails will successfully be sent to your guests. Additionally, you also have the possibility for using protel Messenger for internal messages about rules, such as new maintenance orders, etc.