The reservation dialog is the focal point
when dealing with the creation and editing of reservations Here you have
access to all relevant guest and reservation data. The displayed reservation
data can be edited with but a few mouse-clicks - the changes made here
directly influence the occupancy situation.
There are numerous ways of accessing the reservation
dialog
by means of the booking enquiry
via room plan via double-clicking
the respective reservation
via room type plan (for new installations)
by means of the active list (by
double-clicking or via the function button)
via the context menu (right-mouse button click on the reservation)
A reservation
can contain a lot of information and details. To gain a better overview,
the information has been distributed amongst numerous tabs which are listed
in the left part of the reservation dialog.
Move
your pointer to the right edge of the title bar until the pointer changes
into two arrows . By keeping the left mouse button depressed, move it
to the right or left to change the width of the menu bar.
Linked profiles
Reservations
Rooms
Guests
Invoices
Payment instructions
Fixed charges
Action log
Traces
RBD
Extras
Extended
By default, the Dialog Box opens
with activated "Rooms"
tab.
Booker of the reservation
[Reservation dialog]
At the top left of the
reservation dialog, the Booker of the reservation will be displayed:
A simple click of the mouse
on the name of the booker will open the
guest profile for that booker.
Here you can, for example, edit the booker's
contact information.
Change booker
By clicking on the magnifying
glass  you can change the booker for the entire
reservation. The guest and booker of a reservation can be identical.
you can change the booker for the entire
reservation. The guest and booker of a reservation can be identical.
Reservation number & CRS number
Reservation dialog]

Each reservation automatically
contains an internal reservation number which is displayed at the top
center of the reservation dialog. If necessary, a CRS number (Central
Reservation System) can be saved. To do so, click on the pencil symbol
located at the top right of the reservation number  .
Then, enter the CRS number.
.
Then, enter the CRS number.
By means of the following replacement code -${globalcrsnumber}
- the CRS number can also be used and exported in reservation texts.
Creation date, edit date, and user
[Reservation dialog]
In the upper right you will see:

[Reservation dialog]
 Information about
navigation in this section: In the displayed window, click on
a certain element in order to navigate you to the respective help
topic. Areas marked in blue are related to topics which are going
to be covered in this section (4. "Print tasks, Invoice
dialog & Co"). Information about
navigation in this section: In the displayed window, click on
a certain element in order to navigate you to the respective help
topic. Areas marked in blue are related to topics which are going
to be covered in this section (4. "Print tasks, Invoice
dialog & Co").
|
[Reservation dialog > Print tasks]
Create a reservation confirmation at the blink of an eye by clicking
on the print tasks > reservation confirmation located in the reservation
dialog.
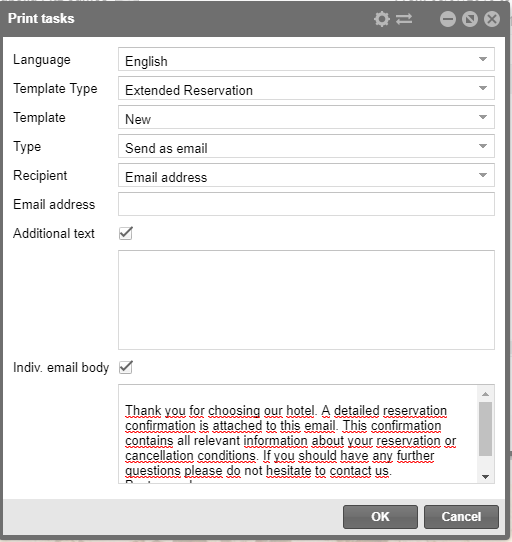
Figure: Reservation
dialog > Print tasks > Booking confirmation |
Option |
Description |
Print Mode |
protel
Air has implemented an option to trigger the sending of guest-facing
documents in a third-party application. Example: By choosing the
External Print mode in
the Print Tasks screen, the external system will be triggered
to create the respective email/document.
To print your reservation confirmation
locally, please select the Local
Print Mode.
 If you would like
to "externally" print your reservation confirmations
or other guest documents, you require an interface to
a compatible 3rd party vendor's software, e.g., the Serenata
integration via protel I/O. After the tool has been connected
to your protel Air, the feature can be activated for use.
— For more information, please contact our Sales-Team. If you would like
to "externally" print your reservation confirmations
or other guest documents, you require an interface to
a compatible 3rd party vendor's software, e.g., the Serenata
integration via protel I/O. After the tool has been connected
to your protel Air, the feature can be activated for use.
— For more information, please contact our Sales-Team.
|
|
Language |
The language
will be automatically set as in the guest profile adjusted. So
the guest documents will be created in the correct language. (Changes
are only required if the target language differs from the guest's
language!) |
Template
type |
Select
a template type (only required if the desired template type deviates
from the standard template type. For group reservations eg. there
are special templates - see chapter "Booking confirmation
for group reservations".)
Note: If all templates
of one template type have been set to inactive in the system data,
the template type will not be shown in this place (see example
here). |
Template |
Select
a template. (only required if the desired template deviates from
the default template type)
The selectable templates will be displayed alphabetically:
The template helps you determine the language to be used for the
reservation confirmation. If you, for instance, select the Spanish
template, your confirmation will be created in Spanish.
|
Type |
a)
Print as PDF |
Creates a booking confirmation as
a PDF file. |
b)
Create an Open Office file (.odt) |
|
c)
Print as email |
|
Recipient |
a)
Booker |
Sends the
reservation confirmation to the booker. |
b)
Search guest profile |
Any other
guest profile can be selected to be the recipient. |
c)
Email address |
Any email
address can be inserted here. |
Add.
free text |
Set a checkmark
in the Add. free text check
box when an individual text should be printed to the reservation
confirmation. The desired text can than be written into the additional
free text field.
IMPORTANT:
In order to insure that the additional free text is going to appear
in the written correspondence, the following replacement code
${freetext} will have
to be added to the respective text template! |
Indiv. email body |
Send the
reservation confirmation via email, you can enter an arbitrary
text which deviates from the standard text taken from the system
data. Simply select the check box, and enter the desired text
into the text field.
ATTENTION: The individual email text
does not support hyperlinks, which means that you cannot
embed images via a link. Links which are embedded in the
default text might also not function properly! |
|
Click
[OK] to create the booking confirmation
according to the made modifications.
Background
information about the booking confirmation:
Recipient of the reservation is
always the booker of the booking.
The default template is defined
in the system data under “Text Templates > Settings > Default
Settings > Hotel management > Reservation confirmation”.
The default text for the electronic
reservation confirmation is defined in the system data under “Text
Templates > Tab “Settings > Default Settings > Hotel
management > E-mail template". |
 Related information on the configuration
of the reservation confirmation:
Related information on the configuration
of the reservation confirmation:
System data > Text templates
System date > Text templates > Settings

[Reservation dialog > Print tasks]
Registration laws in some countries stipulate that guests have to fill
out a registration form when they arrive in the hotel.
This registration form can be created as a PDF in protel Air. You can
then print it and have it filled out by the guest. Data such as room number,
arrival and departure date are taken from the reservation. If the guest
profile includes address and contact data, these details will also be
filled in when printing the registration form.
In the reservation dialog, click on [Print
Tasks] and then on “Registration Form.”
Language:
Select the language in which the registration form is to be created.
(only required if the target language differs from the preset language
of the default template.)
Template
type: Select a template type
(only required if the desired template type deviates from the standard
template type)
- Single
page: When the check box has been selected, protel Air
will print every registration form on a single page in A 4 format.
If you remove the check mar, even two registration forms can be printed
on a single A4 format page. In this case, the registration form will
have to be generated in A5 format (Standard).
Background
information about the registration form:
The default text for the electronic
reservation confirmation is defined in the system data under “Text
Templates > Tab “Settings” > Default Settings > Hotel
management > “Registration Form.”
If the reservation contains more
than one guest, you will need to pay attention to the following:
- when selecting a room in the
"Rooms" tab, the data of the allotted guests will be
exported to the registration form. When no guests have been allotted,
the respective fields will remain empty.
- Select a guest in the "Guest" tab, the registration
form will be created for this guest.
All entry fields that have not
been filled in by protel Air
automatically, will need to be manually filled in by the guest!
If required, the companion
(accompanying person) will also have to be filled in manually.
For regular guests with completely
filled in guest profiles, registration forms can be prepared before
the guests arrive. This way the guest only needs to sign the filled
in and printed registration form. |
Further information regarding the configuration
of the registration form template:
System data > Text templates > Settings
Invoices
[Reservation dialog]

A click on the [invoices] button
opens the invoice overview for the reservation.
Learn
more... 
Show group
[Reservation dialog]

The [Show
group] button only appears if the opened reservation belongs to
a group reservation. Clicking on the button opens the Group
reservation dialog box. ("Reservation > Group reservations")
[Reservation dialog]
Copy reservation
[Reservation dialog > reservation tasks]
The "Copy reservation" function does that. It copies the entire
reservation to an arbitrary arrival date still to be set:
Element |
Explanation |
Arrival date |
This is
where to select the desired arrival date for the copy. |
Departure date |
The departure
date automatically adjusts itself - the number of nights from
the original reservation is decisive. If necessary, you can change
the departure date by clicking on the respective calendar page.

|
No. of copies |
This is
where you need to enter the number of copies that are to be created. |
Click on [OK]
to create the desired copy/copies.
What is going to be copied?
The following information taken from the original reservation is used
for the copy:
Booker
Guest
Rate Code (depending on availability)
Number of persons
Number of nights
Room type
Reservation comments
Fixed charges
Traces
Changes made to the RBD
Altered invoice address, where applicable
Reservation status - please
note: For reservations in the future, the set reservation status
will be adopted. The default status from the system data will be used
for in-house reservations, checked out reservations, and cancelled
reservations.!
What is not copied?
 Register credit card data
Credit card data may be entered manually,
for example, if a guest makes a booking by telephone.
Click the Reservation
tasks > Register credit card data to enter credit
card data for the accessed reservation.
Attention!
For security reasons, only authorized
hotel personnel can access the dialog box to enter credit card
data!
The window
for entering the credit card data opens. Enter all of the relevant data
manually here .
Ill.: Reservation tasks > Register
credit card data. |
All fields
with * are mandatory
Entry |
Description |
Credit card no.* |
This is
where you enter the credit card number without any spaces or special
characters. protel Air
checks the entered credit card number
for its validity. The checking of the data occurs during entry.
As long as the entered number is incorrect
or incomplete, the entry field will be framed in red:

It will switch to a blue frame when
the number has been accepted:

|
Cardholder* |
This is
where you enter the cardholder's name. |
Valid from |
This entry
is optional. Usually, the date has to be only provided for debit
cards. |
Valid thru* |
Enter the
card's expiry date here.
Click on the calendar icon and select
the month and the year from the calendar. Click on [OK] to select
the date.
|
Card type |
The credit
card type will automatically appear once the credit card number
has been successfully entered. |

|
Issue no. |
Optional.
The issue no is only used by certain card types (Smart, Solo,
Maestro) and is a single or double digit number printed on the
front of the card. |
Reservation ID |
The reservation
number is automatically adopted by the reservation dialog box. |
Guest profile ID |
This
option is not available for protel Air. |
Surrogate value (Token) |
The token
is displayed here once the credit card information has been tokenized
(encrypted).
Explanation: Rather than using real
credit card numbers, protel Air solely uses tokenized numbers.
The sensitive original data are stored on the external tokenization
server where they are protected from unauthorized access. |
By clicking
on the [Tokenize] button, the
entered credit card information will be encrypted and the following message
appears (see illustration below).
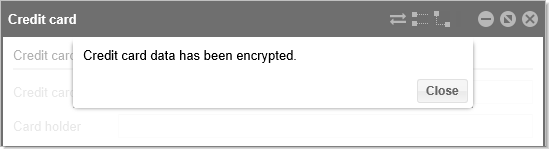
Ill.:
Credit card data has been entered, saved, and tokenized. |
Click on [Close] to return
to the credit card screen.
Click on the little cross  to
close the window and to return to the reservation dialog box.
to
close the window and to return to the reservation dialog box.
 Show
credit card data
Show
credit card data
Rather than using real credit card information,
protel Air solely uses surrogate value (tokenized numbers). The sensitive
original data are stored on the external tokenization server where they
are protected from unauthorized access.
Should a credit card be manually charged (e.g.,
because a guest does not arrive and will be invoiced as "NoShow"),
there is the option to decrypt and display the credit card data by means
of the detokenizer.
Attention!
For security reasons, only authorized
hotel personnel can access the dialog box containing credit card
data! The dialog can only be called up if credit card data has
been entered for the respective reservation (see above).
First, open the reservation
dialog. Once there, click on (Reservation
tasks > Show credit card data)
Afterwards a new window opens:
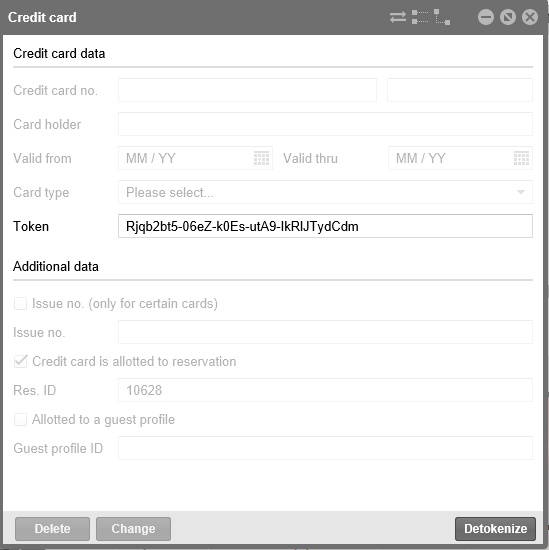
Ill.:
Detokenize credit card information for display purposes |
Click
on the [Detokenize] button. The
credit card information will then be decrypted and displayed as shown
in the illustration:
The surrogate
value (Token) is displayed in the Token
field.
Click on the little cross to
close the window and to return to the reservation dialog box.
Edit credit card data
As need arises, you can edit previously saved
credit card data.
First, open the reservation dialog. Once
there, click on (Reservation tasks > Show
credit card data).
Attention!
For security reasons, only authorized
hotel personnel can access the dialog box containing credit card
data! The dialog can only be called up if credit card data has
been entered for the respective reservation (see above).
In the next window, click on the [Detokenize]
button.
In the next window displaying the credit card
data, make the necessary changes and then click on the [Change] button.
Delete credit
card data
As need arises, you can delete previously saved
credit card data.
First, open the reservation dialog. Once
there, click on (Reservation tasks > Show
credit card data).
Attention!
For security reasons, only authorized
hotel personnel can access the dialog box containing credit card
data! The dialog can only be called up if credit card data has
been entered for the respective reservation (see above).
In the next window, click on the [Detokenize]
button.
In the next window displaying the credit card
data, click the [Delete] button.
All of the credit card data including the token are deleted from the tokenization
server.
[Reservation
Summary dialog > Reservation tasks]
 This function is only available
for the implementation of an EFT interface with connected payment
provider! This function is only available
for the implementation of an EFT interface with connected payment
provider! |
The authorization
offers you the security that the reserved amount is also available for
debit.
The requested
amount is reserved to the credit card. This means that it will be fixed
for a previously agreed upon period of time (max. 28 days). A posting
will not be done at this time.


