 Rooms
tab
[Reservation dialog box > Room]
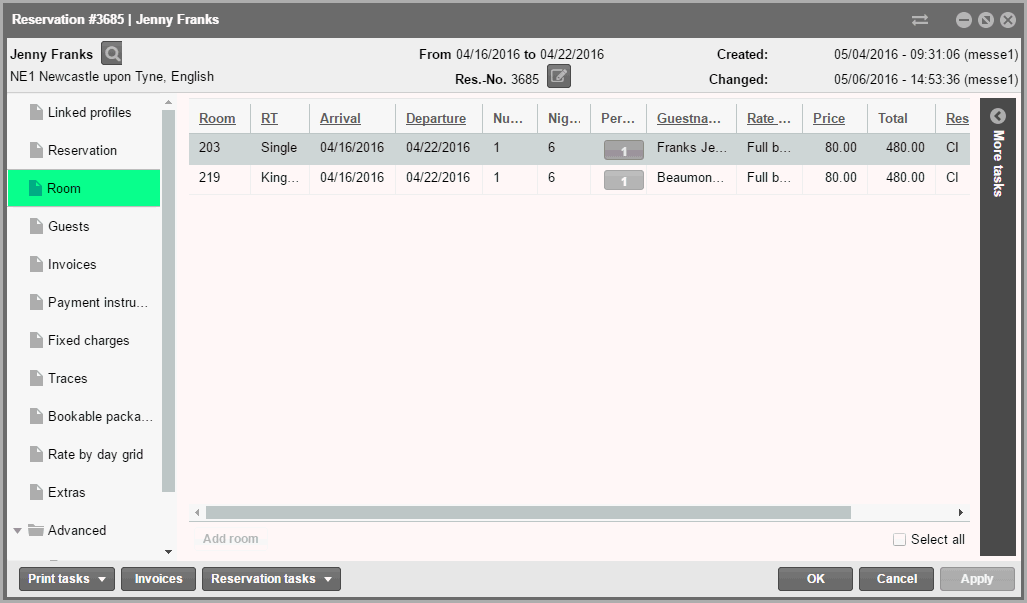
The room tab gives you all of the information about the rooms of a reservation.
When necessary, you can separately edit each room here. Changes
which you make to the dialog are always based on the respective room and
guests.
 HINT: The contents
of columns with underlined
column titles can be edited inline,
i.e., the contents can be marked and directly edited.
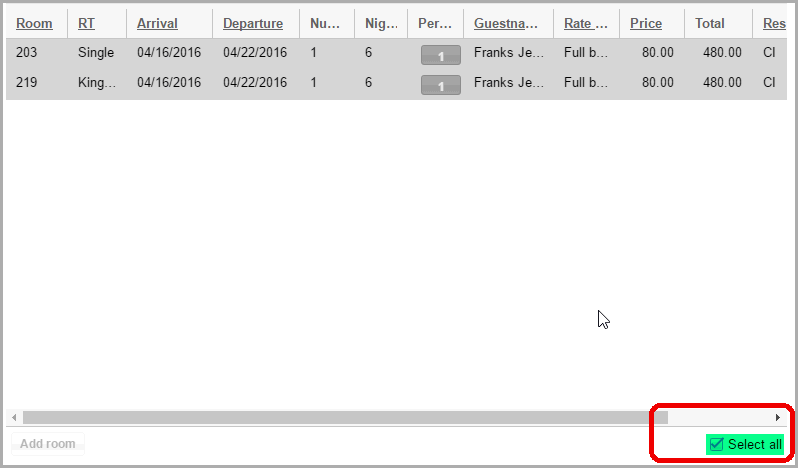
Select and edit all guests / rooms
You
will find the "Select all" check box at the lower right of the
reservation dialog which will help you to quickly and easily make changes
for all the rooms or guests in a reservation which contains many rooms
and guests. If you find a checkbox which has been activated, all of the
guests or rooms of a reservation will be marked and can be simultaneously
edited.
Room tab columns
The columns of the room tab can be rearranged, shown, hidden, and sorted
arbitrarily. You can save the column settings either for you or for all
users. The contents of underlined columns can be edited.
See also: Elements & functions > Active Lists > Column settings.
Change / allot room
[Reservation summary > "Room"
tab > "Room" column]
 Possible,
as long as the guest has not yet checked in.
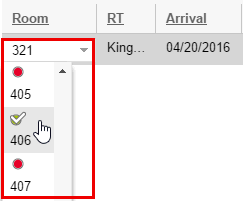
Click on the room you would like to change. If there ae respective rooms
available in the reserved room type for the booked time-span, these rooms
will appear in a drop-down list. There, you can select another room:
For room type reservations (a question mark
(?) will be displayed instead of a room number), you can now also allot
a room here. The allotted room will then be split.
 More
information about room allotment can be found here:
Reservation summary (this chapter) > Section 4c > Allot
rooms.

[Reservation summary > "Room"
tab > "Room type" column]
 Possible,
as long as the guest has not yet checked in.
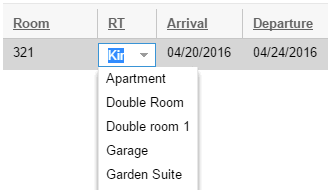
Would you like to change the room type for the booked room at short
notice? No problem! To do so, simply click on the room type for the room
in question. If there are still room types available for the booked time-period,
a list field appears from which you can select another room type.
Afterwards, you will be asked if the rate is to be recalculated. The
way you answer the question depends on whether you are working with a
free update or an upsell.
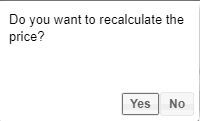
Upsell
Answer with Yes if you are dealing
with an Upsell. In this case, the calculated room type column is
refreshed in the table.
In our example here, a deluxe double room (D-DR) was originally booked.
However, the garden suite (GR-SUI) is being charged:

Upgrade
Answer the question with No,
if we are dealing with a free Upgrade. In this case, the Calculated room
type in the table view has NOT been adjusted.
Another room will be allotted for the respectively
changed room type.

Modify Arrival/Departure date
[Reservation summary > "Room" column > "Arrival"
/ "Departure"column]
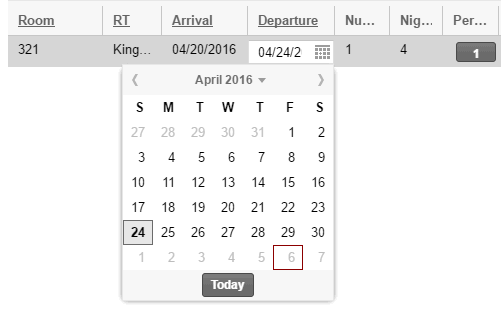
Select the room and click into the date field in order to edit the arrival
or departure date.
 The arrival date can only be altered
as long as a room has not yet been checked in.

Change Number of rooms (Number of rooms column)
NOTE: This function is only available for room type reservations containing
numerous booked rooms!
Change number of rooms (only for room type reservations)
[Reservation summary > "Room" tab > "Number of
Rooms" column]
Assuming, 2 rooms of the "Deluxe room" type have been booked.
This booking should add an additional room within the same room type.
In the "Rooms" tab located in the reservation summary,
click on the room number you would like to change ("Number of
rooms" column).
You can either use your keyboard to overwrite the number of
booked rooms or selected it from the drop-down list.

[Reservation summary > "Room"
tab > "Persons" column]
 Only possible with rooms where the maximum
allowed occupancy has not been reached!
Click on the number of persons in the row of the respective room.

Afterwards, select the age group for the guest and click on [Add]
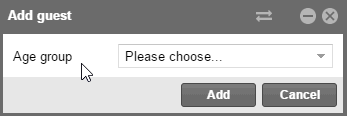
protel Air first
inserts an anonymous guest. You can then personalize it later in the Guest
tab.
 The total rate for the reservation will be automatically adjusted once
you have entered an additional person.
Alternatively you can add guests via the "More tasks" tab
- see below (Add guest).

Delete guest
 Only
possible if the guest has not yet been checked in.
If you would like to delete an added person, you can do this in the
Guest tab: Select guest > More tasks > Cancellation.
Edit / allot guest
[Reservation summary > "Room"
tab > Guest name(s)" column]
The Guest name(s) column shows
you the guest allotted for this room. Should a room be booked for various
persons, the booker will be entered as the guest for the room, all other
guests will appear as "<anonymous>". As need arises, you
can change the originally allotted Guest or - for "anonymous guests"
- you can allot a new guest.
To do so, click on the respective guest name in the room row and enter
the guest's name. protel Air already supports you during the entry by
automatically searching for identical guest names and displaying them
in the results list.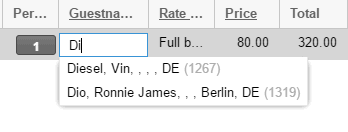
Adopt the desired guest by clicking <Enter> and then use the mouse
and click into an arbitrary position in the window area.
[Reservation summary > "Room"
tab > "Rate Code" column]
The rate code column shows you the allotted rate code for this room.
As need arises, you can change the original allotted rate code. To do
so, simply click the field below the "Rate code" column: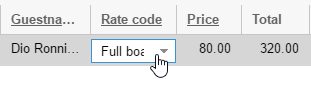
 For rate code changes, protel Air uses the saved
rate regulations to check whether the desired rate code can
be allotted to the reservation (permissible seasonal periods,
length of stay (LOS), weekday rules, restriction values Should
a desired rate code not be compatible with the rate regulations
and still be allotted, protel Air
automatically sets the rates for the booked nights to €0.00 ! For rate code changes, protel Air uses the saved
rate regulations to check whether the desired rate code can
be allotted to the reservation (permissible seasonal periods,
length of stay (LOS), weekday rules, restriction values Should
a desired rate code not be compatible with the rate regulations
and still be allotted, protel Air
automatically sets the rates for the booked nights to €0.00 !
Enter a new price manually into the reservation summary (or the
RBD)!
|
 Related Topics:
Reservation summary > Manually
alter room rate
Reservation summary > RBD

[Reservation summary > "Room"
tab > "Prices" column]
Do you want to change the room rate per night for a reserved room at
short notice? Then click on the price of the respective room and enter
type in the new price into the field. The new price is valid for the entire
reservation and is based on accommodation per night.


[Reservation summary > "Room" tab > "Status"
column]
In order to change the reservation status for the booked room, click
on the status located in the respective rooms line:
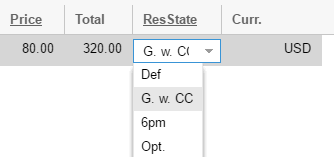

Enter Arrival/Departure date
If the guest is departing/arriving at a certain time, the time can be
entered or changed in these two fields:

Buttons and Context menu
When right-clicking on a room or guest, the context menu appears. The
commands in the context menu can vary in the context menu according to
the status of the reservation (arrival or departure cancelled, etc.).
The same commands that you can call-up via the context menu are also available
at the bottom of the window via a Button.
Check in
The Check-in button is active
in the reservation dialog box:
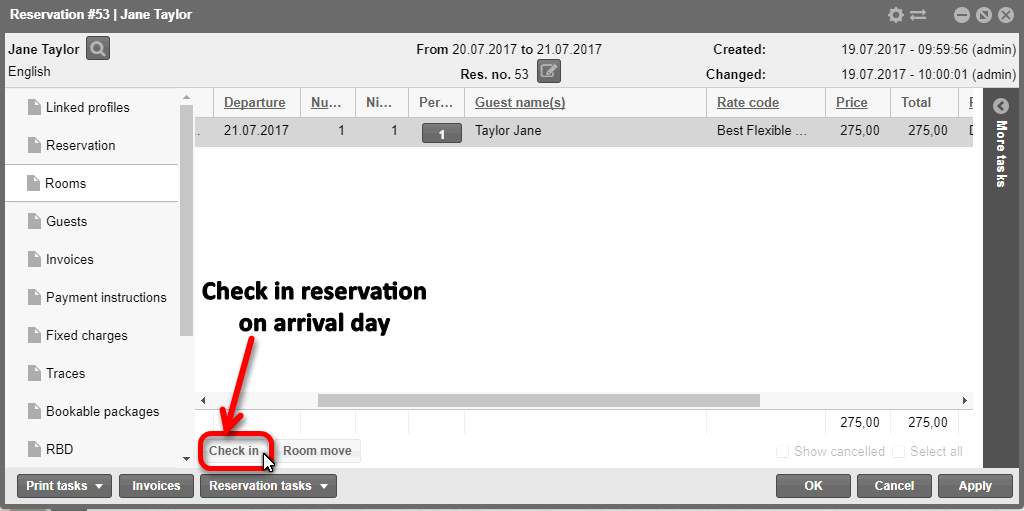
Check out
For departures, the Check-out
button is active in the reservation dialog box:
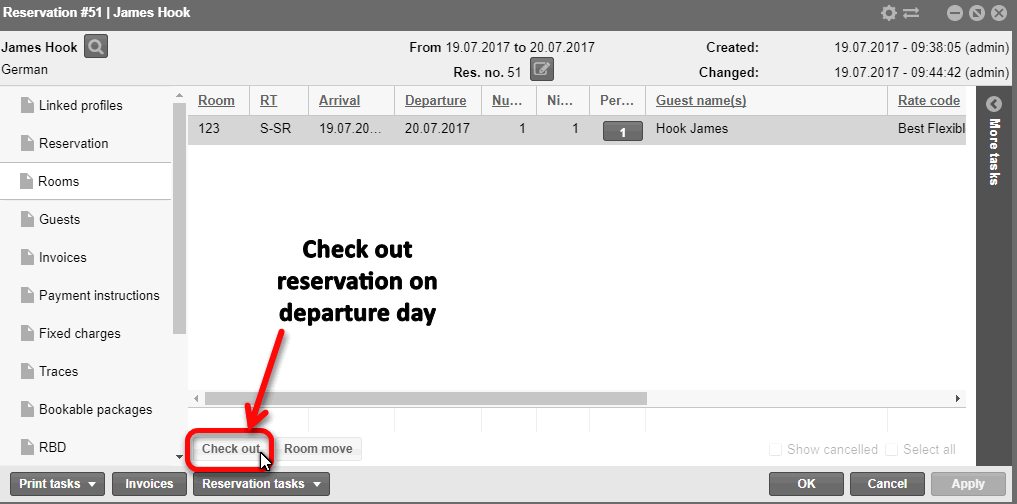
Move
[Reservation dialog box > Room / Guest tab > [Move] button]
Does the guest want to switch rooms during his stay? By means of the
move function, the stay can be easily moved to another room for one or
more days.
For entering moves, please select the respective room/guest in the reservation
summary, and then click on the "More tasks" button and once
there, on the [Move] button.
Keep reading... 
Linen
change
In
the reservation, the preset linen change from the system data can be individually
overwritten (booked room type / booked price). Each reservation can be
allocated to a diverging linen change, e.g., when dealing with a special
guest (person suffering from an allergy).
This
is what you do:
- Open the context menu for the respective
reservation and click on the [Linen change] button located in the
Room tab - or open the context menu and select the linen change command
located there.
- Select the desired linen change:
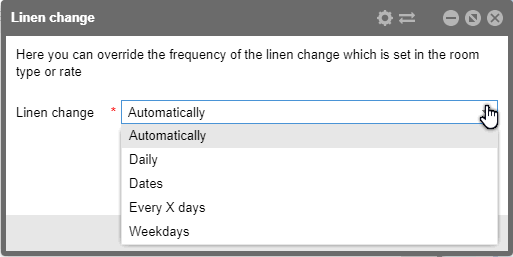
Every X days: For example, enter "2" here if
you want the linen change to run every second day.
Automatic means that the linen change will occur at the
time of departure by default.
Date: By clicking on [Add], you can create several
date entries for the linen change.
Daily: Der linen change
occurs on a daily basis.
Weekdays: Select the days where the linen change
is to take place (e.g., every Wednesday and Saturday).
Note!
 You
can save the basic settings for the linen change in the room type
- this will be overwritten by the settings made in the room price.
The settings made in the reservations have the highest priority.
If you click on More tasks located to the right of the window, you will
have access to additional editing functions.
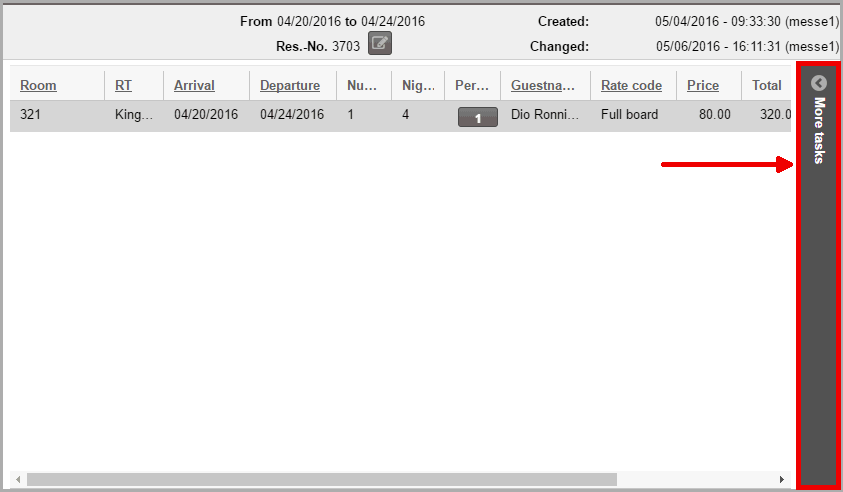
The types of functions shown in the "More tasks" area, depends
on the reservation status of the reservation which has been opened.
Arriving guests, for example, can be directly checked in; for departing
guests, the "Check-out"
button appears.
Check-in
 This function is only available for
non-checked rooms on the day of arrival!
[Reservation dialog box > Rooms tab > More tasks > Check-in]
Execute a check-in for a booked room on the arrival day.
All persons who have been allotted to the room, automatically receive
the "checked-in" status (even "anonymous guests").
For numerous rooms which have been saved, each room can be checked-in
separately - e.g., when guests have varying arrival times.
The multiple selection will allow you to check in numerous rooms at
the same time.
Check-out
 This function is only available for
checked-in rooms on the day of departure!
[Reservation dialog box > Rooms tab > More tasks > Check-out]
Execute the checkout for a room on the departure date.
If the room to be checked-out has not yet been invoiced, you can now
access all of the respective invoices.
If a checkout is accessed, although a guest's departure date has not
yet been reached, you will receive the following message: "One of
the selected guests is not departing today. Would you like to continue?".
Should the guest actually leave earlier than planned, you can set the
departure date to today by simply clicking the button with the same name.
 Guests can not be checked out on the
arrival date (the "Check-out" function can not be selected).
Undo check-in
[Reservation dialog box > Rooms tab > More tasks > Undo check-in]
 This function is only available for
checked-in rooms!
Did you accidentally check-in a guest? With this function, you can undo
the check-in process (only possible on arrival date!).
Undo check-out
[Reservation dialog box > Rooms tab > More tasks > Undo check-out]
 This function is only available for
checked-in rooms!
With the aid of this function, an already executed check-out can be
easily undone.
 Should the respective guest have already
been booked an invoice, this will have to be opened again by means of
an extra step (Invoice summary > Invoice tasks > Reopen invoice)!
[Reservation summary > "Room"
tab > "Room" > More tasks > Cancel room]
 This function is only available for non-checked-in rooms!
In the "Reservation summary dialog box
> "Room" window, select the room that is to be cancelled
and click on the [Cancellation]
button located in the "More tasks" area.
Afterwards, enter the turn away reason and
click on "OK".

[Reservation summary > "Room"
tab > "Room" > More tasks > Undo cancellation]
This menu point is displayed in the More options
section, when a cancelled reservation
has been marked in the window!
In order to reset a cancelled room, you will
first need to make the room visible in the reservation summary: In the
lower part of the reservation summary, click on the "Reservation
tasks" (m) button and then click on the "Show all cancellations".
Select the cancelled room and click on "More
Tasks" > "Undo cancellation".

Would you like to save various rate
codes or rates for the individual days of a guest's stay? With the rate
by day grid, this is possible. As soon as you enter the edited information
into the rate-by-day grid, protel Air
will automatically book the correct values to the day.
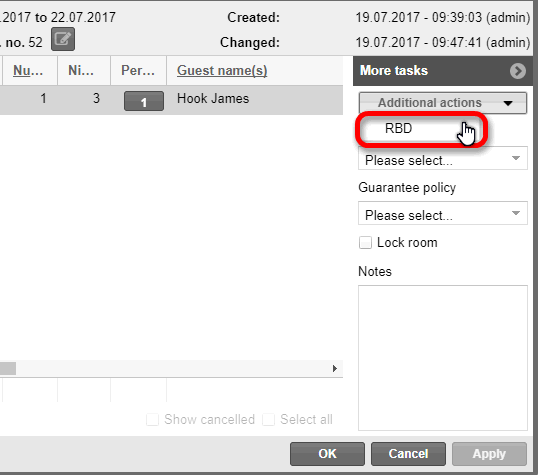
In the reservation
dialog, select the respective room or guest and click on the "More
tasks" area and then select the Additional
Actions > Rate by day grid.
Keep reading...


[Reservation summary > "Room" tab > "Room"
> More tasks > Add guest]
 This function is only active if the
room's maximum occupancy has not yet been reached!
A click to the "More
tasks > Add profile" button adds an additional guest to the selected
room.
There are two ways for doing
this:
a) The room has already been
checked in – Should
this be the case, protel Air
will create a second data record, starting with the current date:
Example: The guest has checked
in on 02 October 2015. An additional guest is added on 03 October.
b) The guest has not yet
arrived – In
this case, protel Air
increases the number of persons for a selected room by one person (compare
section on "Changing number of persons").
 The total rate for the reservation will
be automatically adjusted once you have entered an additional person.

[Reservation
summary >Rooms > More tasks Cancellation conditions]
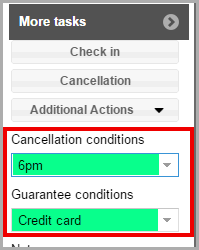
Below the Additional Actions button, you will
find the guarantee conditions and the cancellation conditions valid for
the booked room. The conditions are allocated by default via the booked
rate code (see also: System
data > Pricing).
Via the drop
down menus you can add new guarantee and cancellation conditions or change
existing ones.
Lock room
[Reservation
summary > Room > More tasks > "Lock room" check box]
For regular guests
who prefer a certain room, a room can be permanently assigned to them.
To do so, select
the checkbox:
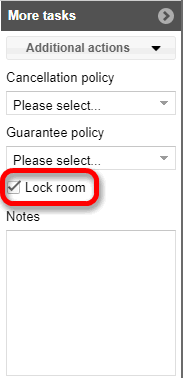
Consequences:
The room can
no longer be moved:
No other room
can be assigned.
“Reservation
> Room assignment” no other room can be assigned in the program.
Reservations
with fixed room number will be marked with a little lock symbol in the
room plan:

Moving the guest
to another room can then only be done with special user rights.
[Reservation
summary >Rooms > More tasks > Notes]
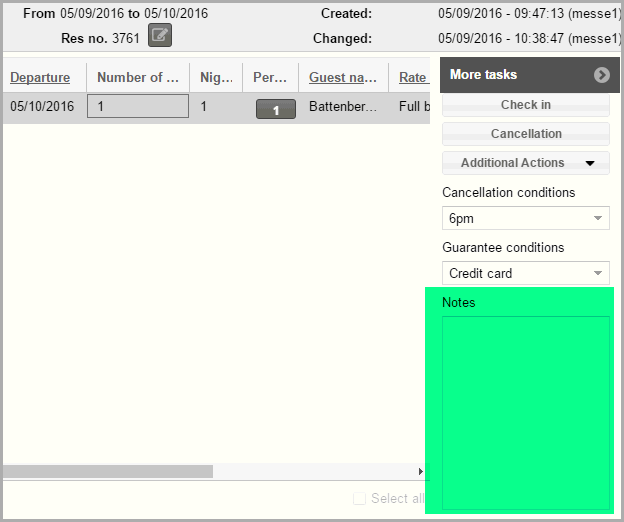
This is where
you keep special notes about the booked room. Simply enter the text and
then click on [Apply].
HINT:
The ${resItems.roomNotes} replacement code enables you to use the room
notes you have saved here in the extended reservation texts. Should you
have questions about inserting replacement codes into your templates,
go here
or contact your protel Cloud Support Team or your protel partner.
 The protel Air
upgrade in Summer 2020 brought about changes to the
user interface and also to many functions.


 More
information about room allotment can be found here:


