Invoice overview
In the invoice overview, you can take care
of all of the tasks dealing with the invoicing procedure. You can book
the charges and payments, finalize and print out an invoice, and check-it
out with the respective reservation. You can also create informational
or interim invoices, or open several partial invoices for a reservation.
There are numerous ways of accessing the
invoice overview:
Where? |
How? |
by means of the context menu |
Select
a reservation either in the room plan or in an active list. In
the context menu, click on "Open invoice". |
via the invoice history |
["Cash"
menu - "invoice history"] Select an invoice and click
on the Open invoice button |
via active lists |
["In-house",
"Invoices", "Departures", and "Reservations"
lists] : select an invoice and click on the "Open
invoice" button. |
via the reservation dialog |
Open the
reservation summary and click
on the "Invoices"
button. |
Via the guest profile |
[Invoices
> Invoice list" tab]: Displays all of the invoices for
a particular guest. Select an invoice and click on the "Open invoice" button. |
When you open an invoice,
you will see the invoice overview. The following tutorial will walk you
through this important dialog box and show you the elements of it's various
sections.
Invoices
[Invoice overview > Left part of window "invoices"]
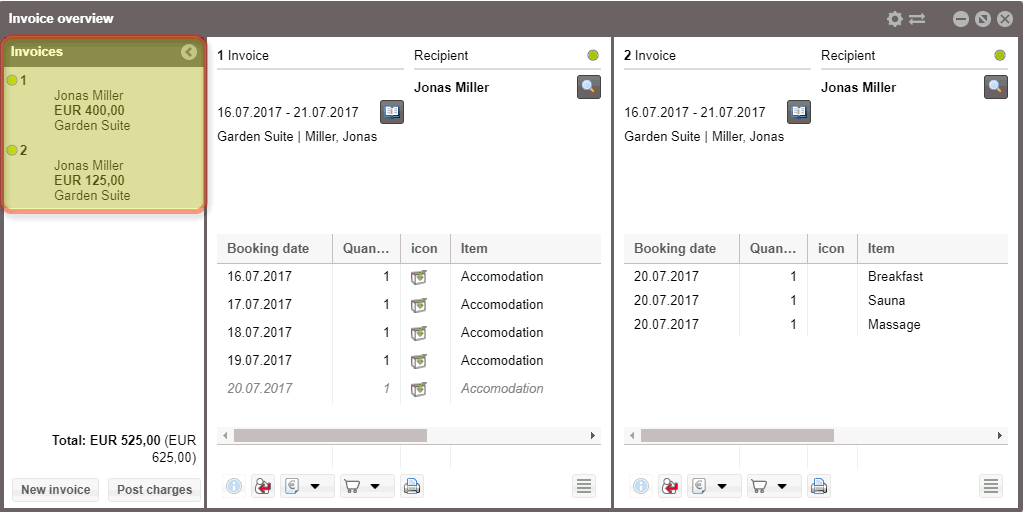
To the left of the invoice dialog box, you
will find the invoices area -
an exclusive invoice tab will be displayed for each invoice. In short,
the invoice tab provides the invoice recipient with the current invoice
balance and the room number.
For three or more invoice dialog
boxes, you can view the details of the respective invoice by simply clicking
on the invoice tab.
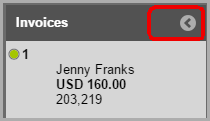
As need arises, the invoices window area can be closed: To do so, click
the little arrow  in the invoice list:
Display of Balance and Forecast
The invoice balance is displayed in bold,
the expected total amount (forecast) appears in parentheses ().
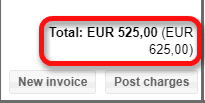
The invoice balance also contains payments which have already made (e.g.,
deposits).
When the invoice balance is EUR 0.00,
it either means that costs have not yet occurred because the guest has
not yet checked in, or because the invoice has already been balanced.
If the expected total amount (forecast) is EUR
0.00, then all of the rooms in the reservation have already been
checked out.
Generating amounts automatically
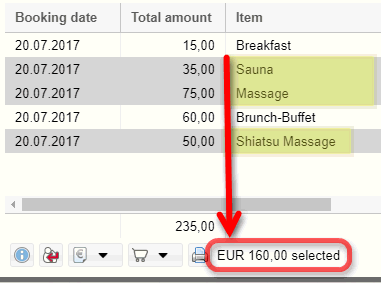
If you select several charges in the invoice window, the total amount
of the marked charges will be shown at the bottom of the window.
What are the different statuses of an invoice?
Icon |
Meaning |

|
Open |

|
Closed. Invoice has been paid /
checked out. |

|
Voided. You will void an invoice
if it has been raised incorrectly. Guests cannot pay for a voided
invoice. |

|
Fiscalized - Is used to fulfill
tax requirements in specific countries |

|
Fiscalized and voided |

|
Proforma invoice was printed |
[Invoice overview > Left part of window "invoices" >
"New invoice" button]

As need arises, several partial invoices are saved for a reservation
which can be directed towards various invoice recipients. To do so, click
the [New invoice] button.
 For further
information about "partial invoices", look here:
Hot Topics > Invoices > Numerous
invoices/reservation.
[Invoice overview > Left part of window "invoices" >
"Post charges" button]

 This function is only available for open invoices. The system will need
to be also logged in with the cash register.
For each reservation / each room, additionally used items and services
can easily be booked to the invoice(e.g., minibar, swimming pool fees,
etc.).
Please click on the
[Post charges] button located
in the bottom left of the invoice
dialog box. The "Book"
view appears.
Select a room: The invoice
item is based on the selected room, i.e., the first guest in the room.
Only the rooms for the respective reservation will be offered for
selection.
Enter item / service:
Description: Shows additional
information for the selected item.
Date: The date is automatically
filled in and can be overwritten when required.
Currency: (Only
available if your hotel works with multi currency)
Unit price: The price
is automatically filled in and can be overwritten when required.
QTY (quantity).:
Should the item be booked more than once, simply enter the number
here.
- INV (invoice): The item
can be posted to the default invoice or to any other selectable invoice.
Payment instructions are also being taken into account - or being
explicitly ignored:
Automatic:
Of there no payment instructions are defined, the item is posted
to the default invoice. If there are payment instructions, the
defined rules for postings are taken into account.
Select
invoice: Select different invoice: If you select a specific
invoice, the payment instructions are overridden and the charges
are posted to this invoice.
New
invoice: Creates a new invoice for posting the item.
Total: Shows
the total amount that will be posted to the invoice.
Repeat steps 2) - 11) until you have selected all items that
you would like to place on the invoice.
Click [OK] to add the
selected items to the invoice.
As soon as an item has been added, it appears in the invoice overview
and is then posted to the guest's invoice.
Video Tutorial: Post charges
[Invoice overview > Invoice dialog box]
An invoice can contain numerous invoice dialog boxes - for three
or more invoice dialog boxes, you can open any respective invoice
dialog box by simply clicking on the invoice tab located on the left side
of the dialog box.
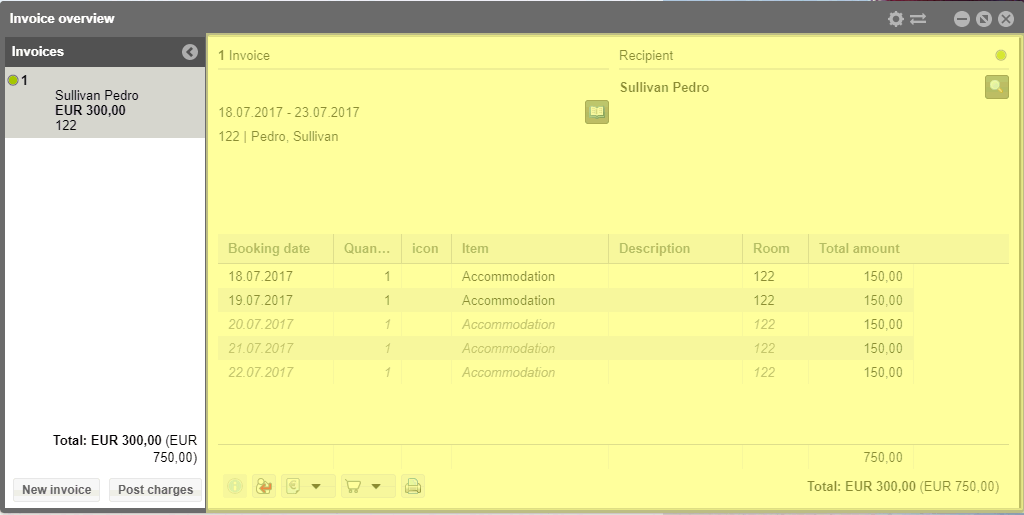
You will find fundamental
information about the reservation in the upper part of the invoice dialog
box:
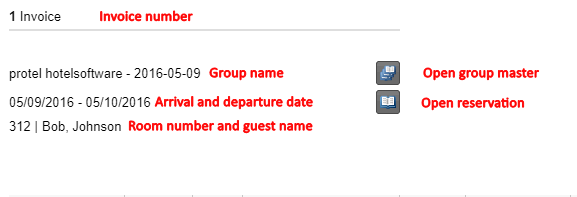
By clicking the group symbol
 , the
reservation's group master opens (only for group reservations) opens.
By clicking the reservation
symbol  ,
the reservation summary opens.
At the top right, you will see the recipients name and address data.
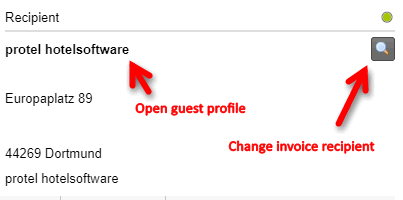
Click on the recipient's name to open the respective guest profile.
By clicking the  magnifying glass next to the recipient,
the guest profile search will open.
This is where you can allocate another person / company as an invoice
recipient.
Invoice details
[Invoice overview > Invoice dialog box > Invoice lines]
All of the services which have been booked and which will supposedly
be done during the guest's stay, will be displayed. Furthermore, all of
the booked and voided payments will be displayed here.

Already booked charges will be displayed in black.
This can also apply to charges which have been manually added today.
Charges appearing in grey
are either charges that will occur in the future, or are fixed
charges. Fixed charges are charges contained in a rate and are therefore
booked automatically at the end of day.
Packages are marked with the
package symbol  .
.
By right-clicking on a line of the invoice, you can access detailed
information as well as other useful functions (Invoice
tasks and Item tasks - see
below).
Detailed Information
[Invoice overview > Invoice dialog box > Detail button  ]
]
Select an invoice line and click on the info icon  or open the context menu and then on the Show
details.
In the "detailed information" window, you can see all of the
details about a posted charge which has been saved, Amongst other things,
the detailed information also shows the room to which the charges are
to be posted - this information can be very helpful, especially if an
item has been moved from one invoice to another. When charges have been
voided, the voiding reason can also be viewed here.
When working with a package, the individual parts of the package will
be displayed here.
Edit package
In the "detailed information" window, you can look at the
individual parts of packages and, when required, remove them individually.
Select a package.
Open the context menu and select the "Show
details" command.
In the following overview, all of the individual parts of the
package will be listed.
By clicking on the [Remove]
button, you can remove individual contents from the package.
Edit term and description
[Invoice dialog > Item tasks > Edit item]
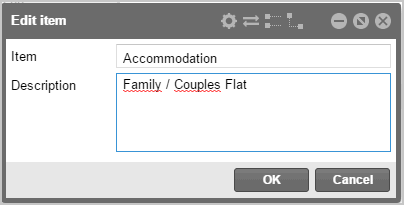
You can edit the name and description for charges which have already
been booked or manually added.
Select the item you want to edit in the invoice overview.
Open the context menu by right clicking the respective item
and select "Item tasks > Edit item" - see the following
figure.
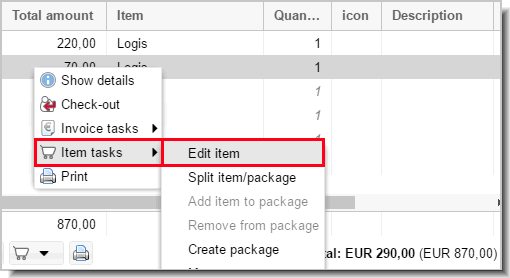
Use the left mouse button to click directly into the Item
field or its Description and
enter a new one.
This can be very useful, if you’d like to indicate that the second
booked breakfast is for a different person.
Check-out 
[Invoice overview > Invoice window > Invoice tasks > Check
out]
The check-out button posts a
payment for all open items, closes the invoice, and results in the print-out
of the invoice. This is required before a guest can be checked out.
 The check-out
button in the invoice overview only checks out the invoice, not the guest or the reservation!
If you would like to do both in one quick step, we recommend using
the [Check-out] button in either the departures list or the reservation
summary dialog box! The check-out
button in the invoice overview only checks out the invoice, not the guest or the reservation!
If you would like to do both in one quick step, we recommend using
the [Check-out] button in either the departures list or the reservation
summary dialog box!
|
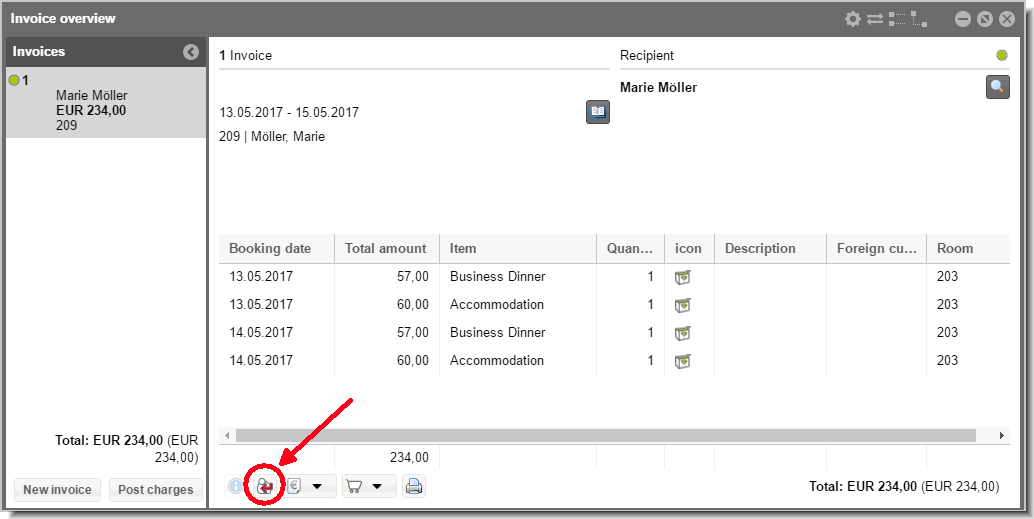
In the invoice overview,
click the check-out button to close an invoice.
Video Tutorial
Learn how to execute a checkout along with
posting a payment and closing the invoice.
[Invoice overview > Invoice tasks]
Click the button  or open the context menu and click
on the Invoice tasks.
The invoice tasks contain the following sub-tasks:
Post payment
Deposit posting (only available
in specific countries, e.g. for implementation of Cash Register Security
Regulation, [RKSV]). A dedicated documentation can be requested.
Fiscalize (only available in specific
countries). A dedicated documentation can be requested.
Interim invoice
Reopen invoice (only available for
closed invoices)
Void invoice
Print proforma invoice
[Invoice
overview> Invoice tasks > Post payment]
This option allows you to post a payment to
an invoice without closing the invoice. For example, this is particularly
useful when dealing with an advance
payment ( a so called deposit).
Video Tutorial
Take a look at how to post advance payments
and how to confirm those payments in the form of an information invoice.
Example
Open
the invoice overview (e.g., by marking the respective reservation
in the invoice list and click the [Open
invoice] button).
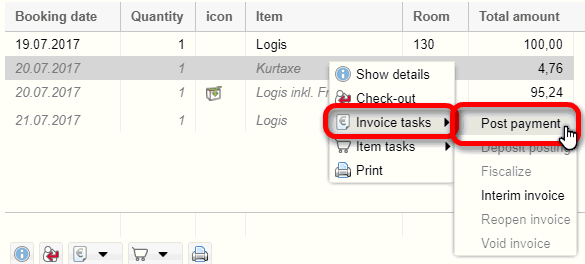
In
the invoice overview, click on the "Invoice tasks" button
(you will find the button at the bottom left of the invoice
overview). Or you can open the context menu by right-clicking on an
arbitrary position in the invoice and selecting the Invoice
tasks command.
Click
on "Post payment".
The
"Post payment" window
opens.
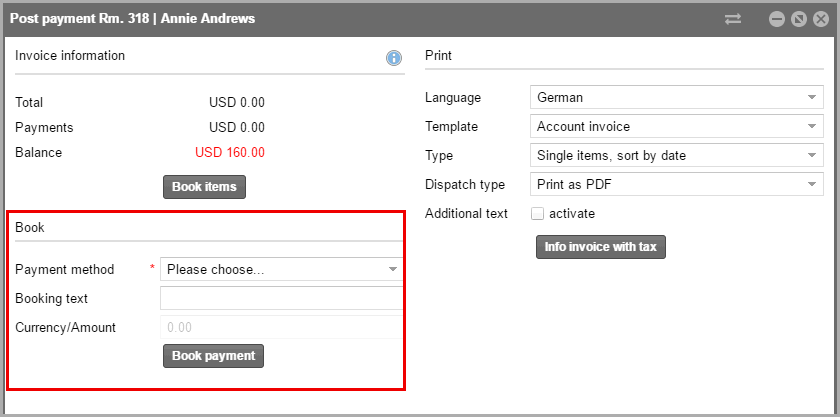
In
the "Book" area, select a method of payment - e.g., "cash"
- from the "Method of payment" field. You can also select
the method of payment using the <ARROW DOWN> key or typing the
starting letter (e.g., c for
cash) and press <Enter>.
Enter
an amount and click on [Book payment].
Close
the window.
The charge will be posted to the invoice and displayed in red.

The remaining amount is shown on the bottom
right in parentheses.
Example:

The amount shown in bold displays the expenses incurred to date, minus
the payments made. The amount in parentheses () depicts the expected total
amount due, also minus the payments already made. By clicking the "Close
window" button, you will return either to the invoice overview or
the room plan.
Print
payment receipts
[Check-out, Post payment]
When posting a payment in protel Air and your system has been configured
for printing receipts, the receipt will be printed when posting the payment.
The printing of the receipt is controlled via the method of payment:
The method of payment is then allotted to a receipt in the system data.
As soon as a payment is booked with the respective method of payment,
protel Air automatically prints the appropriate receipt.
 Learn more: Configuring methods of payment for printing receipt
Fiscalization
[Invoice overview > Invoice dialog box > Invoice tasks > Fiscalization]
[Invoice overview > Invoice dialog box > Invoice tasks > Interim
invoice]
Payment
of all charges posted up until today and printing an interim invoice.
An
interim invoice can be printed during a guest's stay and is only available
when items have already been charged. It shows all the items that have
been charged to date, incl. taxes/ VAT.
 Interim invoices can only be created
for checked in reservations! Interim invoices can only be created
for checked in reservations!
|
Video Tutorial
Example
Open
the invoice overview (e.g., by marking the respective reservation
in the invoice list and click the [Open
invoice] button).
In the invoice
overview, click on the "Invoice
tasks"
button, (you will find the button at the bottom left of the
invoice overview). Or you can open the context menu by right-clicking
on an arbitrary position in the invoice and selecting the Invoice tasks
command.
Select the menu item
“Interim invoice”.
You will only have this option, if the reservation has already been
checked in. The amount due up to this point in time will automatically
be entered into the amount line.
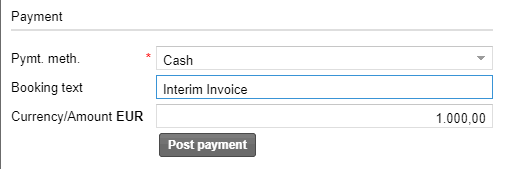
Select a Payment method (Pymt. meth.).
If required enter
a booking text, e.g., "Interim
invoice".
Confirm the payment
by clicking the [Post payment]
button.
Next, you can print
the invoice in the section of the window to the right:
Click on [Print
invoice] to generate an interim invoice which shows
all charged items incurred to date incl. VAT, excluding forecast
items.
Click on [Proforma
invoice] to generate an interim invoice which shows all
items incurred to date (charged items) and a forecast of
upcoming charges, both incl. VAT.
Close the interim invoice
as well as the 'Pay invoice' overview in order to return to the invoice
overview.
Related topics
 Info Invoice (Print button
  in Invoice overview)
 Proforma Invoice (Invoice Overview
> Invoice tasks
  > Print proforma invoice)
Reopen invoice
[Invoice
overview > Invoice dialog box > Invoice tasks > Reopen invoice]
Closed
invoices can still be opened on the same day in order to enter corrections,
for example.
Open the invoice dialog box, click on
the Invoice tasks button  , or
open the "invoice tasks" context menu, and then click on the
Reopen invoice.
[Invoice
overview > Invoice dialog box > Invoice tasks > Void]
You will have
the possibility of voiding closed invoices afterwards. The voided invoice
revokes a previous invoice and creates the opposite to the originally
generated invoice.
Open the invoice dialog box, click on
the Invoice tasks button  , or open the "invoice tasks"
context menu, and then click on void
invoice.
Enter a voiding reason and confirm with
[OK].
Invoice items contained in the previous
invoice will be voided- the single and total price will now be displayed
with a negative amount; payments made will be booked with a positive amount.
By means of the [New
invoice] function, you can generate a corrected invoice, as need
arises.
Void invoice and repost certain items
You can void an invoice and at the same
time transfer individual invoice items to a new invoice.
At the bottom of the invoice dialog
box, click on "Invoice tasks
 >
Void Invoice"
In the void window, click the Void and repost items
button - see figure.

In
the next window, select the invoice item(s) being reposted- see figure.
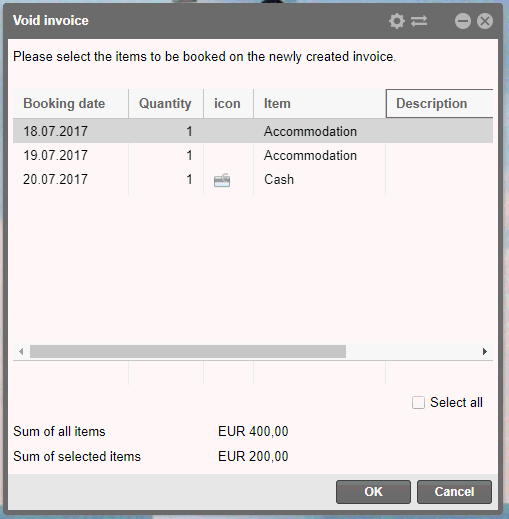
By keeping the CTRL key depressed, you
can also select several invoice items.
Click on OK
to directly book the selected items to a new invoice.
A voided
invoice is identified by a small red cross: 
Video Tutorial | Void invoice
In this tutorial we will show you how you
can void an invoice and repost the items.
[Invoice overview > Invoice dialog box > Invoice tasks > Proforma
invoice]
Related topics
 Info Invoice (Print button
  in Invoice overview)
 Interim Invoice (Invoice Overview >
Invoice tasks
  > Interim invoice)
[Invoice
overview > Invoice dialog box > Item tasks  ]
]
[Invoice
overview > Invoice dialog box > Item tasks  > Split item/package]
You
can split the invoice items into several parts.
Attention!
 In order to keep the overview simple, it is not
possible to split payments with a debit balance. In order
to correct a debtor (accounts receivable), the payment can be
voided instead and reposted with the correct amount.
When
is splitting useful?
Example
1)
If a wrong price or a false amount has been booked, they can both
be corrected with a split afterwards. Assuming that instead of
3 breakfasts, 4 had been booked. In this case, split one breakfast
and then void it. The breakfasts which actually had been consumed,
will then remain on the invoice.
Example
2)
A booking should be split into two items. Example: Double room
for €220.00 of which €100.00 are to be split (e.g., because this
is the single room rate and the company only pays for the price
of a single room): Changing the rate by splitting €100.00; there
are now two accommodation bookings on the invoice, one booking
for €100.00 and another €120.00 for accommodation. The text for
the invoice item can still be changed to "single room".
Example 3)
For instance, there are four breakfast on one guest’s invoice.
Only two are meant to stay on the guest's invoice. You can now
split this one post of four breakfasts into two separate posts
or move two breakfast to another invoice. |
How to proceed
Select
the invoice item you would like to split.
Click
on the button  or open the "Item tasks"
context menu and click on Split item/package.
In
the “Split items” dialog you now have the following options:
Split
amount |
Split the invoice posting into
a given amount and the remaining amount.
Example: The original posting consisted of: 4 x breakfast for
a total of €48.00.
If you enter “20” into the entry “Split amount.” field
,protel Air
turns this into: 4 x breakfast for a total
of €20.00 + 4x breakfast for a total
of €28.00, |
Split
parts |
This will split into several
equal parts.
Example: The original posting consisted of: 4 x breakfast for a
total of €48.00.
protel Air turns
this into: 3 x breakfast for a total
of €16.00, if “3” was entered into the entry field “Split parts.” |
Split
percentage |
Subtracts the entered percentage
value.
Example: The original posting consisted of: 4 x breakfast for a
total of €48.00.
protel Air turns
this into: 4 x breakfast for a total
of €12.00 (25%) + 4 x breakfast for a total
of €36.00, if “25” has been entered into the "Split percent"
option field. |
Split
number |
Only
active for amount > 1!
Splits the entered number.
Example: If you enter “3” the posting will be divided into 3 and
1 breakfast on the invoice. If you enter “2” the invoice shows
2 x 2 breakfasts, and so on. |
TIPP:The
executed splits are recorded in the action log in detail. Questions regarding
the composition of certain invoice items can be answered immediately with
the action log; splits can be traced in detail (Lists > Action log).
 You can find additional information about transferring
charges here:
Hot Topics > Everything about invoices > Numerous
invoices / reservations.
Add Item to package
[Invoice
overview > Invoice dialog box > Item tasks  > Add Item to package]
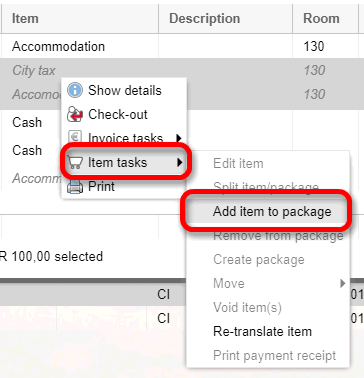
Items can be added to an already existing
package.
Keep the CTRL key depressed and select
the package and the item.
Click on the button  or open the "Item tasks" context menu and click on Split
item/package.
The selected items will then be added
to the marked package.
Create / delete package
[Invoice
overview > Invoice dialog box > Item tasks  > Create / delete package
Merge several
charges in the invoice overview into one package. This can be useful,
for instance, if a guest has consumed several items from the mini-bar
and would like to have them show as one item on the invoice.
 You will find a detailed description in the chapter entitled "Everything
about invoices > Packages".
[Invoice
overview > Invoice dialog box > Item tasks  > Move
In the
invoice overview you can very easily transfer an invoice item onto
another invoice.
 The function is only available for
items and services which have already been posted.
Select the invoice items which
you would like to transfer to another invoice.
Click on the  button
or open the "Item tasks" context menu and then click on
Move.
Via
the search function, you can select the invoice to which it is to
be transferred. While doing this, several search possibilities will
be offered to you, so that you can search for an explicit invoice.
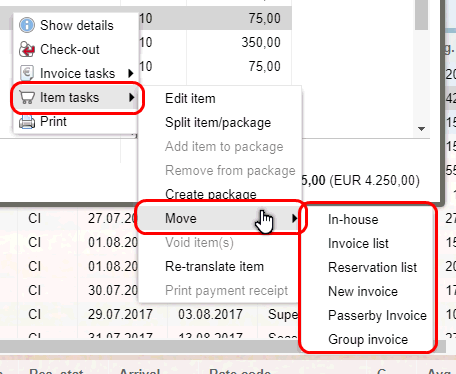
With the "new invoice" command, the invoice items will be posted
to a new invoice window. By means of the "Passerby invoice"
command, you can also post to a new passerby invoice.
For group reservations, an invoice
item can very simply be posted to the overriding group
invoice.
Transfer invoice items via drag &
drop
You can transfer an invoice item via
drag & drop, if a reservation contains at least two invoice dialog
boxes.
As need arises, new invoice boxes can
be created with the [New invoice] button.
[Invoice
overview > Invoice dialog box > Item tasks  > Void Item(s)]
Video Tutorial
Example
Select
the invoice being deleted in the invoice overview (one, or use multiple
selection for more than one)
Click on the  button
or open the "Item tasks" context menu and then click on
Void.
 The postings will be deleted, i.e.,
the respective counter entries will be automatically executed.
The counter entry can also be done manually:
Click on the "Post charges"
button and select the respective service from the "Book services"
view (either by entering the name or by clicking on the [...] button).
In the Unit
price column, enter a negative value for the item and then
confirm it by clicking OK.
 It
is often useful to transfer the postings which counterbalance
each other onto a separate invoice, so that it will not be printed
onto the guest's invoice.
Re-translate items
[Invoice
overview > Invoice dialog box > Item tasks  > [Retranslate item]
In protel Air, items and services can
be saved in many languages. For example, if the guest speaks Spanish,
the items and services will automatically be booked in Spanish (provided
that a Spanish translation has been saved to the system data).
With the "Re-translate
items" function, you can reload the language for the booked
items and services whenever required. Has the guest's language been changed
afterwards, all of the invoice items that are going to appear in the guest's
language will need to be retranslated.
Select an arbitrary item on the invoice.
Click on the  button
or open the "Item tasks" context menu and then click on the
Re-translate items.
After clicking the Print
button  an info invoice will be created.
The info invoice solely serves to inform the guest and is not connected
to any payment requirement. It will be created when the guest would like
to know which about the incurred items and services to date (normally
during stay). Info invoices can also be used as receipts for payments
made. By default, info invoices do not consider taxes.
A requirement
for an info invoice is that there are services which have already been
booked. The info invoice will always only reflect the current state of
the invoice and does not contain any services which might occur in the
future.
 Please note that an info invoice does
not list any taxes and only contains posted items and services
(no forecast). Please note that an info invoice does
not list any taxes and only contains posted items and services
(no forecast).
|
Field |
Function |
Language |
Select the language in which the
invoice is to be compiled (the invoice form must be available
in the selected language). |
Template |
Select a template (only required
if the desired template deviates from the default template type).
By means of the template, you can also set the language to be
used for the confirmation. |
Type |
When printing the invoice, you can
set how the booked articles are to appear on the invoice. Determine
the sorting and whether or not each article is to be grouped individually
or if the same articles are to be combined in the invoice being
printed. |
Dispatch
type |
Print
as PDF (default): Creates an invoice as a PDF file. |
Send
e-mail: Sends an e-mail with the invoice as a PDF attachment
to the e-mail address of the recipient. The email address is taken
from the contact data saved in the guest profile! A copy of the
email will be automatically sent to the hotel’s email address
(system data > My property > Email). |
E-mail
preview (PDF): Creates a PDF as a preview. Select this
option when wanting to check the contents of the PDF, before sending
it as an email attachment (see above). |
Recipient
(only for selected Email transmission / Email preview option) |
Invoice
holder: Sends the invoice to the person who has been designated
as invoice holder in the invoice overview. The email text for
invoices saved in the system data will be used (system data >
Text templates > tab > "Settings" > Hotel management
(Inv.)). |
Booker:
Sends the invoice to the booker of the reservation. The email
text for invoices saved in the system data will be used (system
data > Text templates > tab > "Settings" >
Hotel management (Inv.)). |
Guest
profile: Sends the invoice to the guest selected by means
of the booker of the reservation. The email text for invoices
saved in the system data will be used (system data > Text templates
> tab > "Settings" > Hotel management (Inv.)). |
E-mail
address: This is where you can manually enter
an arbitrary email address to which the email is to be sent. A
text field for entering the email text automatically opens (the
email text for invoices saved in the system data will not be used
in this case, because the program cannot translate the wildcards
used for the salutation). |
 Additional text:
|
Select the additional free texts
check box:  activate,
if an additional text is to be printed to the invoice. The desired
text can than be written into the additional free text field.
HINT: The additional text in the invoice form can be exported
with the following replacement code: ${freetext} activate,
if an additional text is to be printed to the invoice. The desired
text can than be written into the additional free text field.
HINT: The additional text in the invoice form can be exported
with the following replacement code: ${freetext} |
 Email text
|
As long as the email address is not
entered manually, protel Air will use the email text for
invoices saved in the system data (see above). Set a check here
if you want to edit the text. |
Issue booking text with or without description
The booking text in the invoice can
optionally be issued with or without a description.
Example:

Assume
that the position “English - traditional” has been booked containing
the description “Sausages, bacon, eggs...”.
By means of the replacement code in
your invoice forms, you can control if the booked articles are to be issued
with or without the description.
${item.invoiceText} |
Use
this replacement code if you only want to issue the article text. |
${item.additionalText} |
The article will then be issued together
with the description (contained in the default form). |
Hint:
In order to be able to change the replacement code in the invoice form,
you will have to remove the protection from tables (right mouse-click
in the table column > Menu “Cell” > Command “Remove protection”).
Related
topics
 Interim Invoice (Invoice Overview >
Invoice tasks
  > Interim invoice)
 Proforma Invoice (Invoice Overview
> Invoice tasks
  > Print proforma invoice)
Delete invoice

An invoice which does not contain any
postings can be deleted with this button.
Handling of exclusive taxes
Since
protel Air is designed for worldwide use, the system offers extensive
options for configuring the calculation of taxes. In this regard, the
handling of exclusive taxes was significantly improved.
This
enhancement only affects countries/businesses that levy exclusive taxes
(e.g. Canada & USA). Exclusive taxes are not included in the
product prices, thus the tax is added on top of the price on the bill.
 NOTE:
Please contact protel Air Cloud Support or your protel Partner
for assistance in configuring and using exclusive taxes! NOTE:
Please contact protel Air Cloud Support or your protel Partner
for assistance in configuring and using exclusive taxes!
|
Summarizing
similar taxes when printing invoices
Invoices > Check-out
/ Print invoice
Tax amounts for similar
invoice items can be combined for printing invoices. This feature was
developed specifically for countries where several exclusive tax rates
are levied on one price (e.g., US).
 NOTE:
This option has to be activated with an XSetup (see below). NOTE:
This option has to be activated with an XSetup (see below).
|
Benefits
The feature achieves fundamental improvements
for printing invoices, especially when the room rate varies due to restriction
values or when they have been adjusted manually.
Example: Due to a rate
restriction, $35.00 is added to the price of an overnight stay. Due to
the internal calculation logic, the corresponding tax amounts (lodging
tax and sales tax) are printed twice on the invoice: once for the original
posting and once for the difference item - see following illustration:
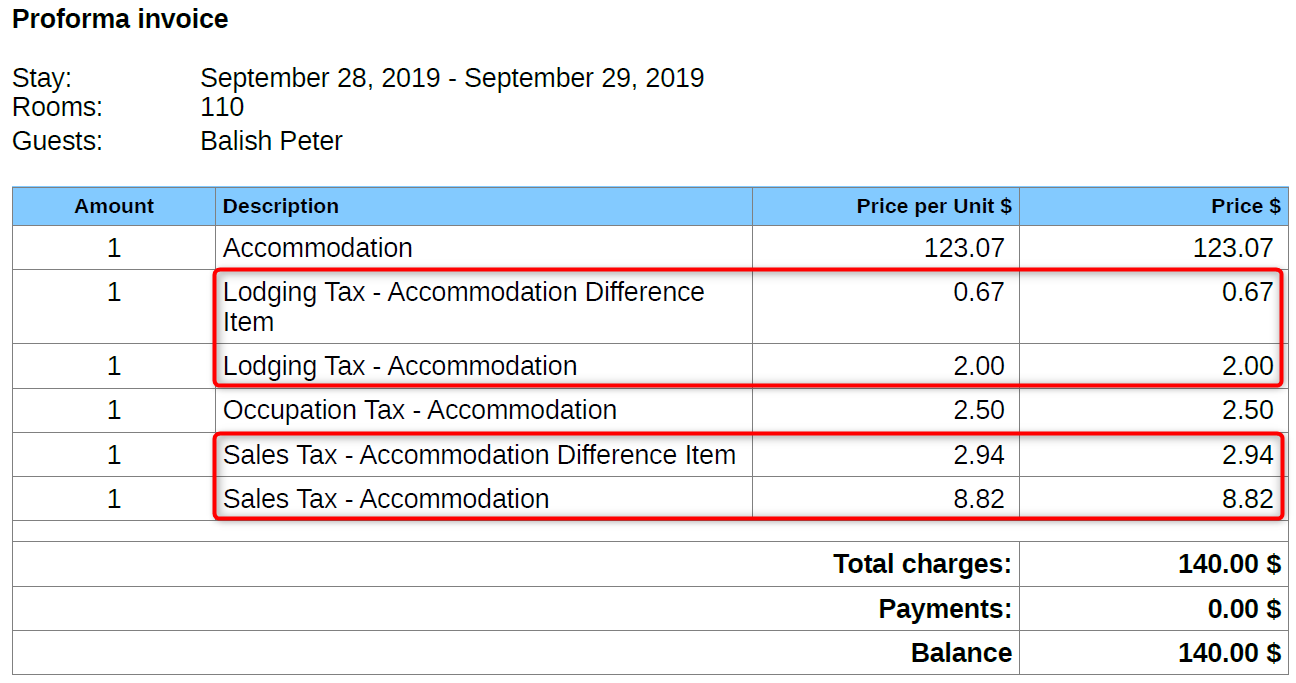
For
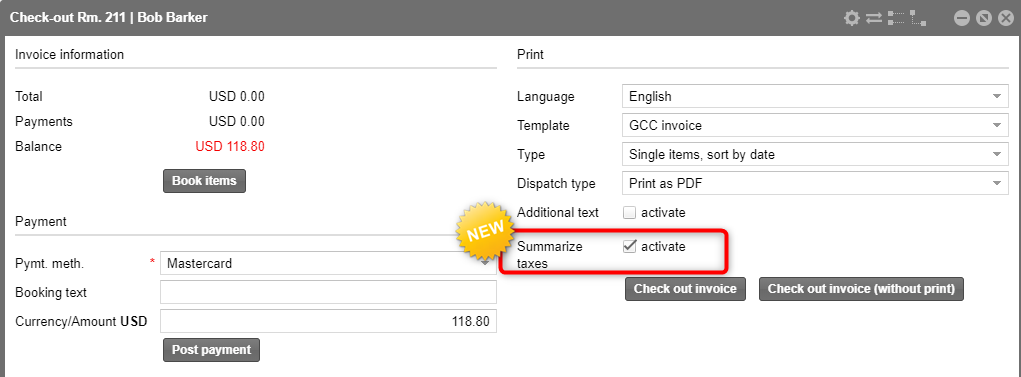
a better overview, the items on the invoice can be combined when activating
the Summarize taxes checkbox during checkout / printing the invoice:
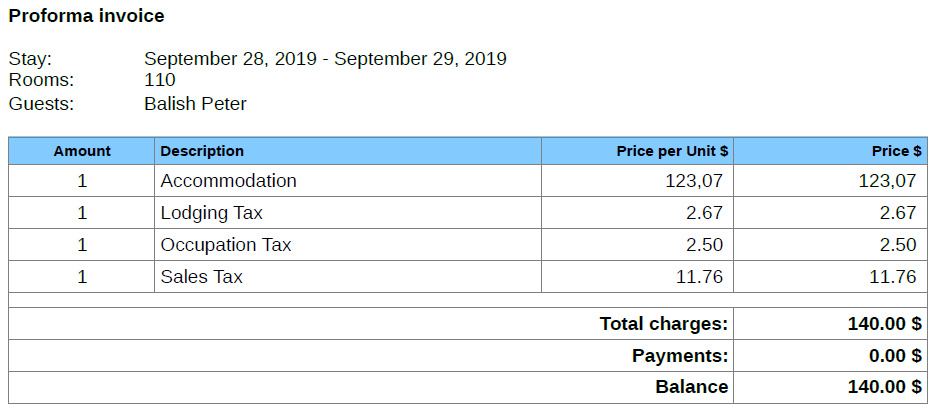
Result: Taxes
on similar invoice items (=same price and same item), are combined in
the invoice printout - the invoice is much easier to understand than above:
XSetup
The Summarize
taxes option has to be activated with the following XSetup. The
logged-in user needs to have access to the XSetup entries in the system
data.
System
data > System > XSetup
Result:
If the XSetup is activated, the Summarize
taxes checkbox is available when printing invoices and checking
out the invoice.
The checkbox is set by default, i.e., similar
taxes are automatically combined on the invoice per day.
Summarizing
similar taxes in the invoice dialog box
Tax amounts for similar
invoice items ( = same price and same item) can be combined in the invoice
dialog box. This feature was developed specifically for countries where
several exclusive tax rates are levied on one price (e.g., US).
The feature can only
be activated by protel Support staff!
 NOTE:
Please contact protel Air Cloud Support or your protel Partner
for assistance in configuring and using exclusive taxes! NOTE:
Please contact protel Air Cloud Support or your protel Partner
for assistance in configuring and using exclusive taxes!
|
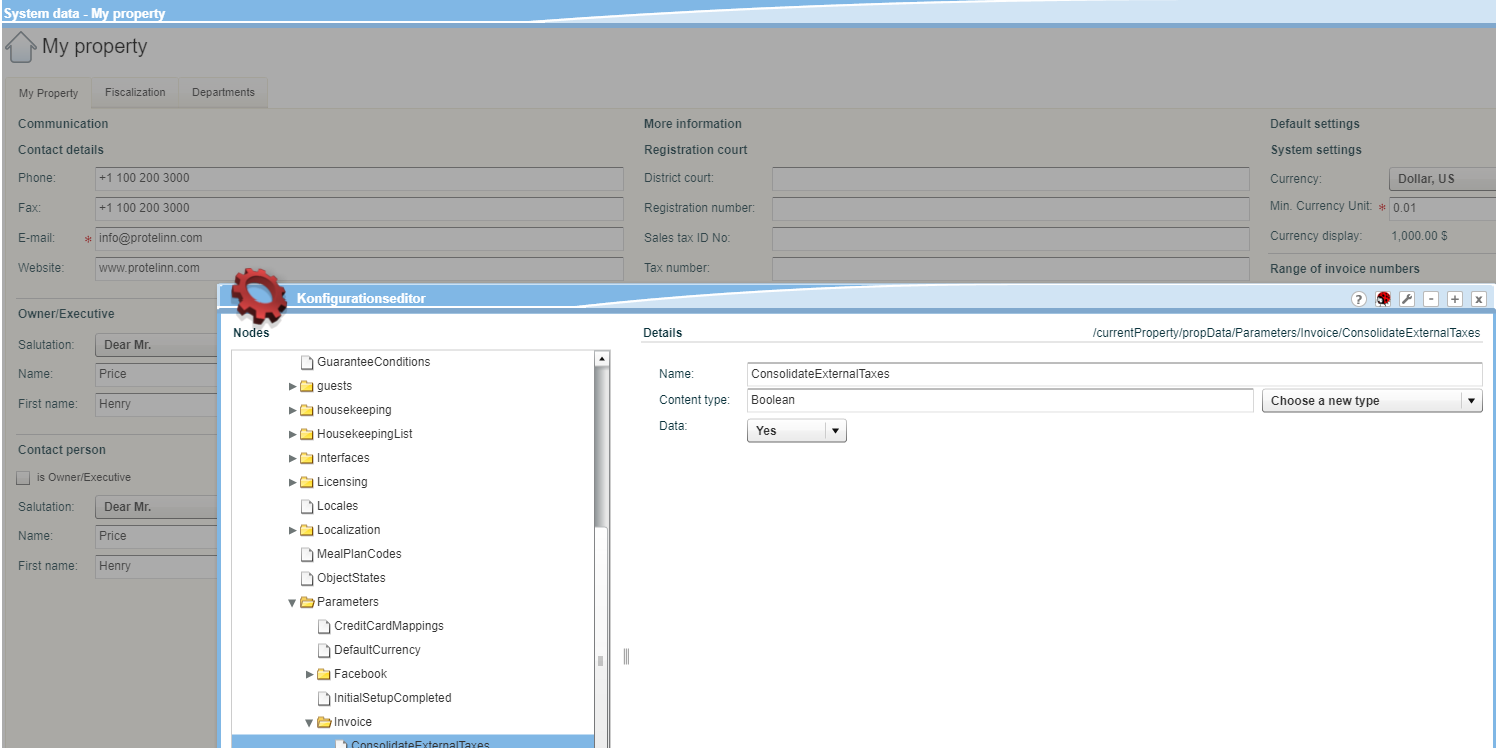
Example
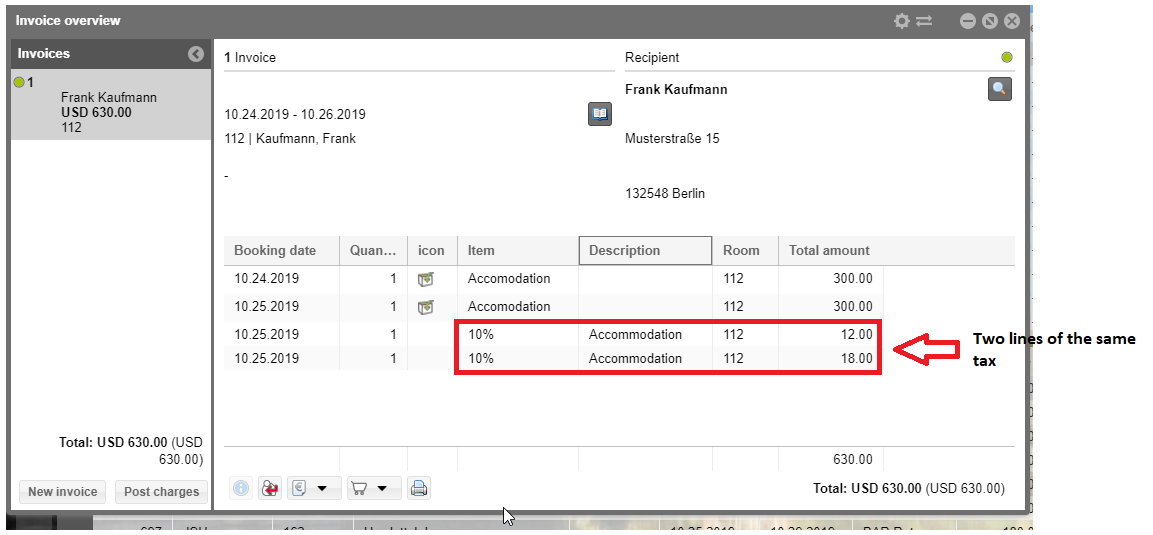
Tax amounts for similar
invoice items are displayed separately ('ConsolidateExternalTaxes' is
not set)
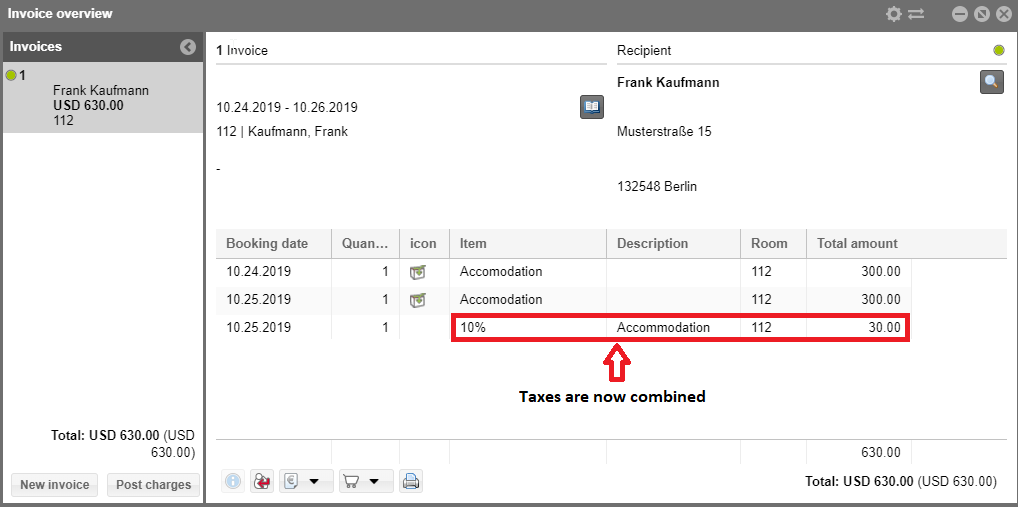
Tax amounts for similar invoice items
are displayed in one line ('ConsolidateExternalTaxes' is set)
Allotting a tax item to a tax
System data > POS
> Taxes
Taxes can be allotted to certain items. The
allotted item is then used to post this tax to the invoice.
Example:
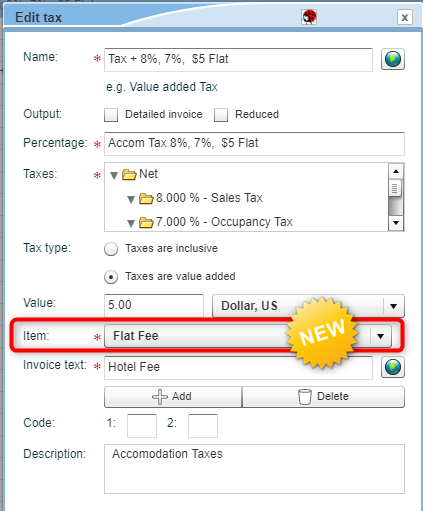
The tax item which is to be allotted can
be created accordingly in the system data. The default item in the system
data is called "Exclusive tax" (ID = 5).
Reduced option
System data > POS
> Taxes
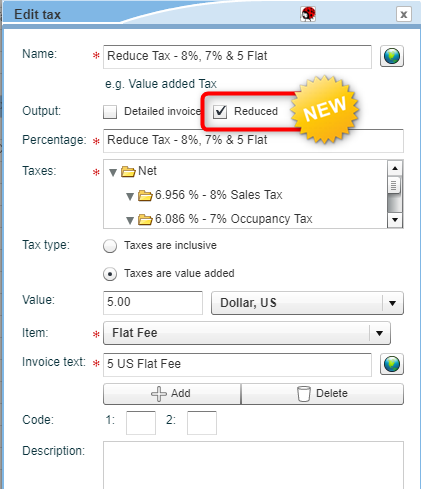
The tax amount is deducted from the item
price on the invoice by using the Reduced
option.
The item's net price then appears on the
invoice and the tax amount will then be displayed separately.
Example:
The gross price for an overnight stay is $100.00, the tax is 10% (= $10.00).
If the option "Reduced" is activated, booked items are displayed
on the invoice as follows:
Accommodation |
$
90.00 (Net amount) |
Tax |
$ 10.00 (Tax
amount) |
Total |
$
100.00 (Gross amount) |
NOTE:
This option is only available if a tax is set up as exclusive tax.
Text replacement
codes
For hotels operating with
exclusive taxes, we recommend using the following text replacement codes
to issue the gross and net price per item:
Example of use in the invoice
template:
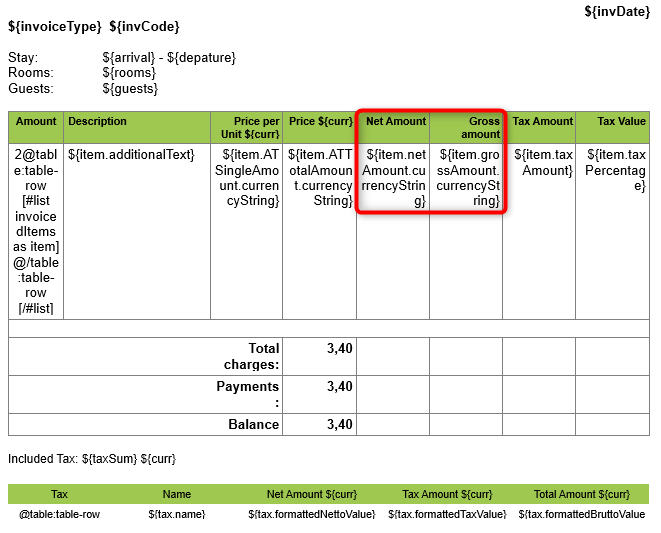
If you have any questions
regarding the use of text replacement codes, protel
Cloud Support or your local protel partner will be happy to be of
assistance.
 The protel Air
upgrade in Summer 2020 brought about changes to the
user interface and also to many functions.
 in the invoice list:


 For further
information about "partial invoices", look here:

 magnifying glass to open
your item list in order to select the respective item by double-clicking
on it.


 , the
reservation's group master opens (only for group reservations) opens.
 ,
the reservation summary opens.
 magnifying glass next to the recipient,
the guest profile search will open.
 .
. ]
]


 or open the context menu and click
on the


 Learn more: Configuring methods of payment for printing receipt
 in Invoice overview)


 ]
] or open the "Item tasks"
context menu and click on


 Additional text:


