Creating a reservation
in the room plan
Video Tutorial
Example
Creating reservations is a quick and easy process in the room plan,
which provides a constant, up-to-date overview of the occupation and availability
of each room. When you open the room plan, the Reservation
mode is automatically active. In this mode, you can use the mouse
like a pencil and enter the reservation by clicking into the line of the
room, holding and pulling open the reservation to fit the time period
- just like you would in a traditional paper room plan.
Open the room plan by means of
the Reservation > room plan.
For the requested time period, select a suitable room from
the room list located to the left.
Start with the arrival data, click
your mouse button and keep it depressed while dragging the cursor
to the day of departure. Should a reservation be possible for the
selected time period, the reservation will be shown as a bluish transparent
bar; the bar will be orange if the reservation is not possible (e.g.,
because the room is occupied for the selected time period).

Figure: Room plan:
A reservation is dragged open with the mouse.
Arrival: 18 May, Departure: 20 May 2016 |
When you reach the desired departure
day, release the mouse button. The new reservation is immediately
written to the Placed reservation
section as a temporary reservation, which opens
on the right side of the window. Should you work from numerous workstations,
the room will be blocked on all of the workstations for the requested
time period. This prevents two members of staff making a reservation
for the same room on the same day.
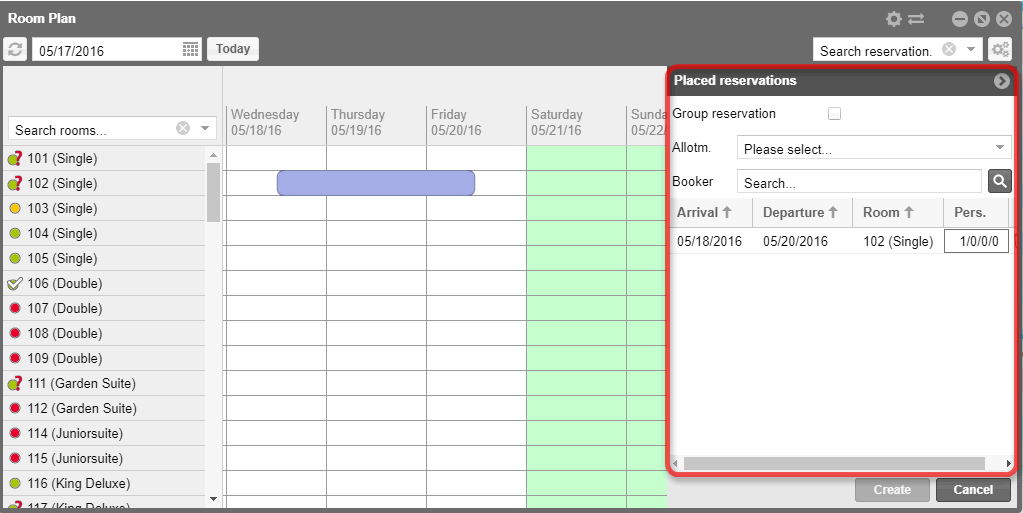
Figure: Room plan: Display
of the placed reservations. |
The "placed reservations" section
once again shows the benchmarks of the reservation (arrival, departure,
room, number of persons). Here, you can also:
a) enter the booker
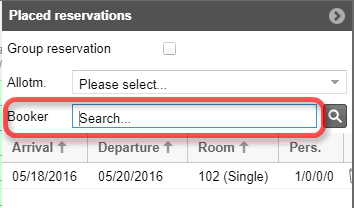
Figure: Room plan >
Reservation cache:
Field for entering the booker. |
Then, enter the name of the booker (or parts
of it) into the "Booker" field. During the entry, protel Air
checks to see if the name has already been entered into the database.
Matches will be displayed in a list and can be directly used by hitting
the <Enter> key.
Should the guest not yet be available...

Figure: The
booker was not found in the database. |
... open the guest profile
by clicking on the magnifying glass and clicking on New
guest profile to add the guest to the database.
b) change
arrival and departure date
Click into the date field (arrival/departure)
if you want to select or enter another date for the arrival or departure
day. This is especially practical for long-term guests whose departure
dates lie several weeks in the future.
c) enter the number of persons
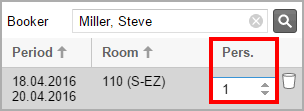
Figure: Room plan >
Reservation cache:
Enter number of persons. |
By default, one guest
will be assigned to each newly created reservation. If you
already know the exact number of persons, you can adjust the number here
- either by using the small arrow keys or by simply overwriting the number
using your keyboard. The number of persons is limited to the maximum number
of occupants for one room.
 If you don't
want to add any additional rooms,
click the [Create] button now and read point
7.
d)
add additional
rooms
If you want to add other room to the reservation,
simply drag open an additional room in the room plan.
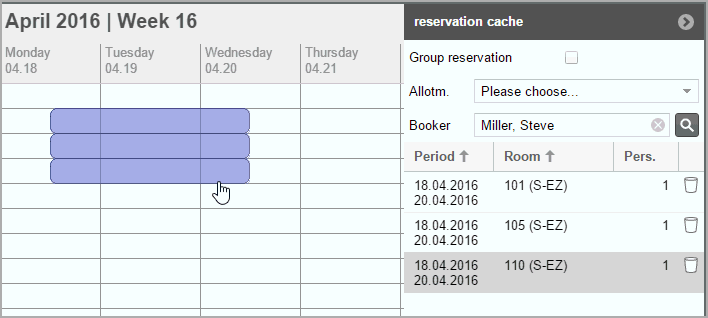
Figure: Room plan >
Reserving numerous rooms in one work-step. |
HINT:
If you would like to remove a room type reservation, simply click on the
waste basket  symbol
next to the reservation. Caution:
By clicking the [Cancel] button,
you are aborting the entire reservation
procedure.
e) marking the reservation
as a group reservation.
If you have reserved numerous rooms and the
guests arrive as a group, set the check mark in the Group Reservation
check box:
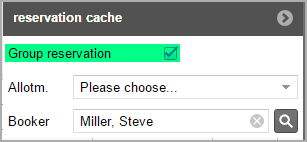
Figure: Room plan >
Reservation cache:
The reservation will be marked as a group reservation. |
A group reservation will be generated when
numerous guests have at least one attribute in common (for example they
have a common travel agent).
For more information
about group reservations, go here.
Click on the [Create]
button to save the reservation.
Enter reservation
details: The reservation dialog box now appears on your screen.
Here you have access to all other guest and reservation data. Confirm
the reservation dialog by clicking on [OK], in order to save changes
made.
In
some systems, certain fields in the reservation dialog box are mandatory
fields.
 These
fields are marked by an asterisk* and
the dialog can only be closed with the [OK] button after all of the
fields have been filled in.
The reservation appears in the room plan.
 For
further information about the reservation dialog box, look here:
Reservation > Reservation summary
 The protel Air
upgrade in Summer 2020 brought about changes to the
user interface and also to many functions.


 If you
 symbol
next to the reservation.
 T
T For
further information about the reservation dialog box, look here: