Creating a reservation in the
room type plan
Video Tutorial
Example
In the room type plan, you
will be able to book several rooms for any number of guests in a single
work-step. For a reservation entry by means of the room type plan, we
recommend you use the following steps:
To
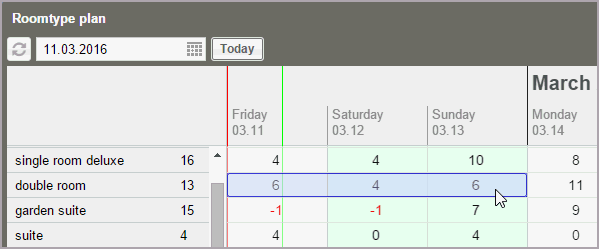
enter a reservation for a particular room type, place
your mouse on the row in the respective room type for which you would
like to make the reservation.
 Hint: The numbers in the room type
column tell you how many rooms are available for the room type.
Click
on the arrival date in the row of the room type, hold the mouse key
and pull the mouse pointer to the departure
date. Then release the mouse key.

Figure: Creating
a reservation in the room type plan |
The
new reservation now appears in the "Placed
reservations" section which opens at the right side of
the window.

Figure: Room type
plan: Placed reservations display |
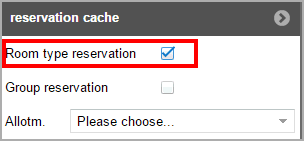
The status of the room
type reservation check box determines whether you are making
a reservation for a particular room or a general room type.

Figure: Room type plan
> Reservation cache:
The reservation will be marked as a room type reservation. |
A room type
reservation (= checkbox is checked) reduces the availability of
the room type - the actual room is not assigned until the guest checks
in.
If the checkbox is NOT checked, protel Air automatically assigns a particular
room of the selected room type to the reservation. The reservation will
be displayed in the room plan accordingly.
When
making a room reservation, a fixed room is automatically allotted to the
booked room type - the reservations then appear in the room type plan.
A
room type reservation is first debited from the amount of booked room
types - the actual room is not assigned until the check-in.
By
default, the room type plan opens in "Room reservation mode".
Remember to select the "Room type reservation" checkbox if you
want to post a room type reservation!
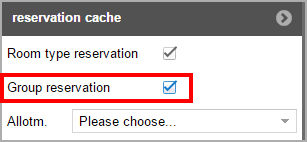
If the guests are arriving as a group,
set the check mark in the Group Reservation check box:

Figure: Room plan >
Reservation cache:
The reservation will be marked as a group reservation. |
A group reservation will be generated when
numerous guests have at least one attribute in common (for example they
have a common travel agent).
For more information about group reservations,
go here.
Then, enter the name of the booker
(or parts of it) into the "Booker"
field. During the entry, protel Air checks to see if the name has
already been entered into the database. Matches will be displayed
in a list and can be directly used by hitting the <Enter> key.
Should the guest not yet be available...

Figure: The
booker was not found in the database. |
... open the guest profile
by clicking on the magnifying glass and clicking on New
guest profile to add the guest to the database.
Click into the date field (arrivals/departures( if you
want to select or enter another date for the day of arrival or departure.
This is especially practical for long-term guests, e.g., whose departure
dates lie several weeks in the future.
- Provide the number of rooms you would like to reserve in the selected
room type - either by using the little arrow keys or by using your
keyboard to overwrite the number.

Enter number of persons:
If you already know the exact occupancy at this time, you can adjust
the number of persons in the "Pers."
column. The number you enter is limited to the maximum occupancy of
the respective room type.
Would you like to add no more rooms?
 Click the [Create]
button and continue reading at point 11.
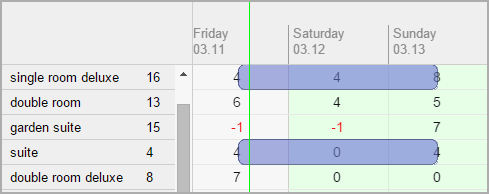
Add additional room types
If you would like to add more rooms from another room type, simply
drag open a new reservation in the desired room type line.

Figure: Room type plan
> Reserving numerous room types in one step. |
HINT:
If you would like to remove a room type reservation, simply go to the
click on the waste basket  symbol next to the reservation.
Caution: By clicking the [Cancel] button, you are aborting
the entire reservation procedure.
Click on the [Create]
button to save the reservation.
Enter reservation details: The reservation dialog box now appears
on your screen. Here you have access to all other guest and reservation
data. Confirm the reservation dialog by clicking on [OK], in order
to save changes made.
In some systems, certain fields
in the reservation dialog box are mandatory fields.

These
fields are marked by an asterix* and the dialog can only
be closed with the [OK] button after all of the fields have been filled
in.

|
During entry, protel Air immediately
checks if the entered amount of rooms and the number of people
are actually available for the selected room type. If the entry
exceeds availability, you will receive a message. |
 You can find further information about the reservation summary here:
Reservation > Reservation dialog
 Related Topics:
Room type plan > Group reservation
 The protel Air
upgrade in Summer 2020 brought about changes to the
user interface and also to many functions.


 Click the [Create]
button and continue reading at point 11.
 symbol next to the reservation.


 You can find further information about the reservation summary here: